Overview
I have other posts on my site here for more built out installations of VMware VCF. However, while I was researching a build script for a recent nested installation I was building, I came across a post on William Lam’s website about a single host VMware VCF install. This surely piqued my interest and I decided I would give this a go and document all the pieces I have found in my research and own learning.
VMware Virtual Cloud Foundation (VCF)
Before I get into the nitty gritty, I will share a very basic description. In an enterprise environment, VMware VCF requires four (4) physical ESXi hosts. During the bring-up, a VMware vCenter Server Appliance (VCSA) will be deployed and configured, along with three (3) VMware NSX Managers, and one (1) Software Defined Data Center (SDDC) Manager.
After the initial infrastructure deployment, or day-1, operations, it is likely that Enterprises will want to build out workloads and have them be used outside of the data center. In other words, all of this work is not to run virtual machines in an air-gaped network, usually. Of course there are always use cases for such a thing, buts let’s assume the Enterprise is trying to provide a service. In order for these services to be consumed, NSX Edge are likely to be deployed to provide north-south networking, allowing the services to be consumed.
As you may be aware, or not aware if you are just learning, these are resource heavy hitters. It can be done in a nested lab, however, with the vSAN storage requirements alone, even I ran into issues with space consumption at 1.6 TB.
So, follow along on this post and we will build a single nested ESXi host, with one (1) VMware vCenter Server Appliance (VCSA), one (1) VMware NSX Manager, and one (1) SDDC Manager. Since the SDDC Manager deploys two (2) NSX Edge nodes, we will still have two (2) of those, but that should not be an issue.
Lab Configuration Basics
For my lab, I am going to use a single ESXi physical host, version 7.0.3, and manage it with a vSphere Client from a vCenter Server Appliance (VCSA), version 8.0.2. There is a pfSense virtual machine that will act as the router between my lab and the nested appliance. My lab consists of a single Windows Server 2022 for DNS, and Fedora Server 39 for file services and NTP.

I am sure that with so many less resources being used, the deployment will be much quicker. I am deploying on a datastore that is on the physical host since my lab only has 1 Gbps links. Even if I used my iSCSI with Multipath I/O, the max bandwidth I would get is 2 Gbps. The hard disks in my host transfer at 6 Gbps and there are six (6) spindles.
Read the Bill of Materials (BOM)
Find out the version of ESXi to install. I am going to install VCF, version 5.1, so I need to install VMware ESXi, build number 22380479.

Deploy a Nested ESXi Host
I am not going to go screen by screen, but I will post the details of the hardware I used.
Guest OS Family: Other
Guest OS Version: VMware ESXi 7.x
CPU: 8 x 8 Cores per Socket = 1 Socket; Expose hardware assisted virtualization to the guest OS
Memory: 128 GB
New Hard disk: 128 GB; Thin Provision
New Hard disk 2: 256 GB; Thin Provision
New Hard disk 3: 512 GB; Thin Provision
New SCSI controller: VMware Paravirtual
New Network: VLAN 4095 – Virtual Guest Tagging (VGT); VMXNET 3
New Network 2: VLAN 4095 – Virtual Guest Tagging (VGT); VMXNET 3
Deploy the VMware Cloud Builder Appliance
In VMware VCF 5.1, the management networks have been split. I deploy this appliance on the VM Management Network subnet to keep the bits in the same broadcast domain. Mileage may vary for your deployment. If you have to cross a router, then it probably won’t matter where or how you deploy as long as there is network connectivity.
Configure ESXi – vSAN Cache Disk
I do not have flash disks in my physical hosts, so I need to fake the virtual machine hardware. Shutdown the nested ESXi guest and add the following Advanced Setting. This assumes the second hard disk added is the vSAN cache disk.
Key:scsi0:1.virtualSSD
Value: 1
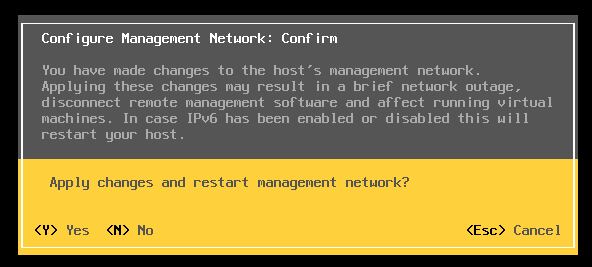
Configure ESXi – Management Network
Be sure to configure only one (1) Network Adapter when configuring this section.
I configured the Network Adapters, VLAN (optional), IPv4 Configuration, DNS Configuration, and Custom DNS Suffixes, and then confirmed restarting the management network.
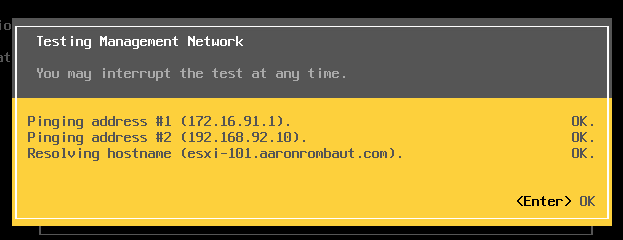
As a good measure, I test the Management Network.
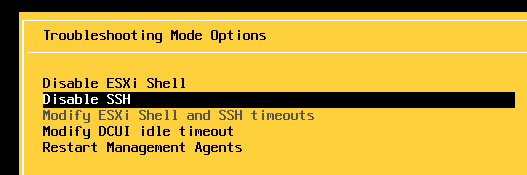
Configure ESXi – Troubleshooting Options
I also enable ESXi Shell and SSH so that I can remote configure from a Linux terminal. All the rest of the settings can be done from the console, the GUI, or SSH.
Configure ESXi – Patch if Necessary
Refer to my other post, Nested VCF Lab: Virtual Machines for more details, if necessary.
esxcli software vib update --depot=/path/to/update/file
Configure ESXi – VM Network
esxcli network vswitch standard portgroup list

esxcli network vswitch standard portgroup set --portgroup-name='VM Network' --vlan-id=<vlan id>

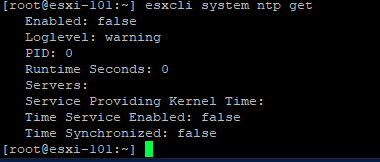
Configure ESXi – Network Time Protocol (NTP)
esxcli system ntp get
esxcli system ntp set --enabled=true --server=<ntp-server-ip>

chkconfig ntpd

Configure ESXi – Regenerate the Self-Signed Certificates
/sbin/generate-certificates
/etc/init.d/hostd restart && /etc/init.d/vpxa restart

Configure ESXi – Take a Snapshot
Now is a good time to take a snapshot of the nested ESXi guest.
Gather the SSH Public Keys
This cannot be done from the ESXi host. Log into a Linux desktop or server, or log into the VMware Cloud Builder appliance to perform the following commands.
ssh-keygen -lf <(ssh-keyscan hostname 2>/dev/null)

openssl s_client -connect hostname:443 < /dev/null 2> /dev/null | openssl x509 -sha256 -fingerprint -noout -in /dev/stdin

Record the the (RSA) Fingerprint from the first command and the output from the second command on the VCF Deployment Parameters workbook.
Deployment Note – Stop 1
Up until this point, everything would be done if this were being built in an Enterprise with four (4) physical hosts. This is the point where I will modify the appliance application.properties file, convert the Excel workbook to JSON, and trim out the additional virtual machines. Please realize this is not supported, in any fashion, by Broadcom and is purely for fun and educational purposes.
Configure VMware Cloud Builder – Modify application.properties
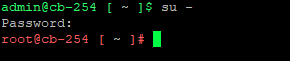
Connect to the Cloud Builder appliance via admin on SSH and su – to root or just log onto the virtual machine console as root. Unfortunately, and extremely frustrating, the cloud builder appliance does not retain history! This means you must be really good at typing or, preferably, be able to copy and paste into a terminal, if using SSH.
vi /etc/vmware/vcf/bringup/application.properties

Add the following line to the end of the file (Shift + G) + (i).
bringup.mgmt.cluster.minimum.size=1
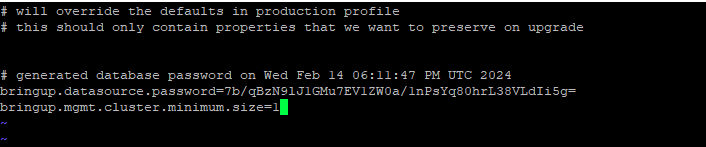
Save the file (Esc + : + w + q).
Restart the VCF Bring-up Service.
systemctl restart vcf-bringup.service
Convert the VCF Deployment Parameters Workbook from Excel to JSON
The idea is to complete the VCF Deployment Parameter Workbook as you normally would. The difference is that we are going to use the Cloud Builder appliance to convert the Excel File to a JSON file. Then we will remove the two entries that build the NSX Managers.
Upload the Excel file to the Cloud Builder appliance. It will likely be in the /home/admin/ directory. Alternatively, the file contents can be written to a blank file if using an SSH window.

I am going to use the Supportability and Serviceability (SOS) Utility to make the conversion.
If you are logged in as admin, then you must switch user (su) to become root.
/opt/vmware/sddc-support/sos --jsongenerator --jsongenerator-input
<filename> --jsongenerator-design vcf-public-ems
Here is an example.
/opt/vmware/sddc-support/sos --jsongenerator --jsongenerator-input /home/admin/vcf-ems-deployment-parameter.xlsx --jsongenerator-design vcf-public-ems
Now the file can be downloaded from:
/opt/vmware/sddc-support/cloud_admin_tools/Resources/vcf-public-ems

Copy the file to admin’s home directory, if necessary, to download.
cp /opt/vmware/sddc-support/cloud_admin_tools/Resources/vcf-public-ems/vcf-public-ems.json /home/admin/vcf-public-ems.json
I recommend making a copy before opening the file in an editor.
Modify Deployment Parameters – NSX Managers
Ctrl-F to find the string, nsxtManagers.
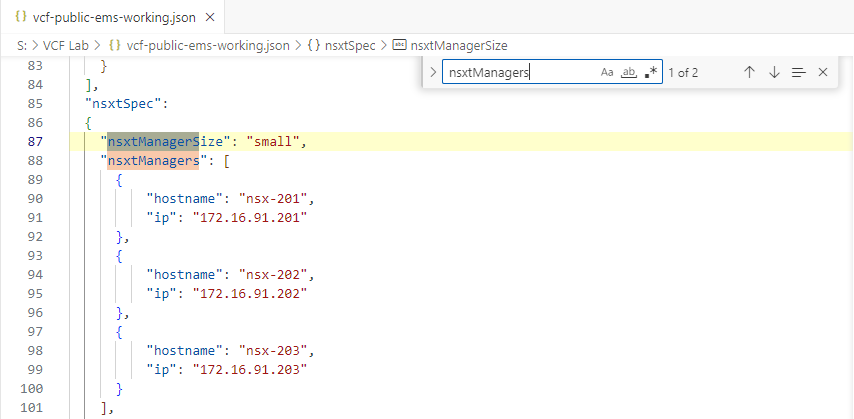
Remove the two NSX Managers that are not wanted. Pay attention to the commas (,) and the curly braces ({ }).

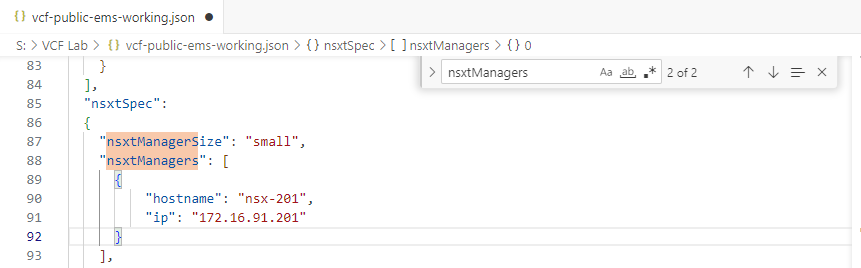
Save the file.
Modify Deployment Parameters – Nested ESXi Hosts
Be very cautious about this next section! After removing the NSX Managers from above, my hostSpecs section was located on line 202.
In my case, my deployment parameters only needs to maintain configuration for esx-101, so I start on line 216, at the comma and remove all the lines down to line 258 at the curly brace. Remember, this should be a working copy, so the original can always be referenced, if necessary.


Here is my trimmed hostSpecs.

Save the file.
Modify Deployment Parameters – Host Failure to Tolerate
Since we are standing up VCF on a single host and VCF requires vSAN as principle storage, we need to modify the hostFailuresToTolerate attribute accordingly.
Again, if you are following in order, the clusterSpec section in on line 175. Add the following line somewhere in the section, between the curly braces.
"hostFailuresToTolerate": 0
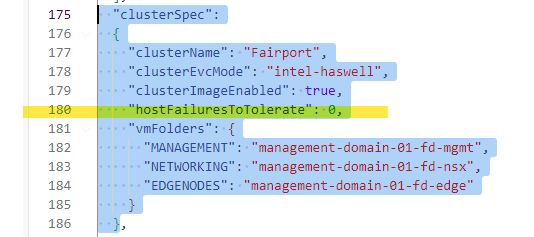
Save the file.
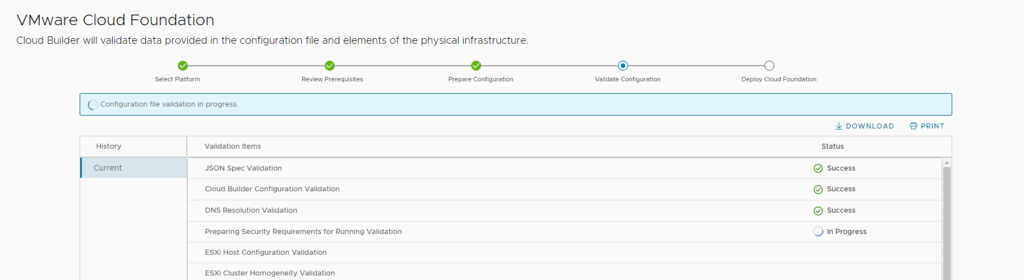
Perform the VCF Bring-up
Depending on how much time has passed, I sometimes find it is best to reboot the ESXi host before performing the Cloud Builder validation. If I log into the host, the SSH service may be stopped, even though the policy is set to Start and stop with host.
Perform the deployment like any other, but now, when asked to Upload Configuration File, select the modified file.

The configuration file validation will proceed as if the information was not removed.
Monitor the VCF Bring-up Logs
There are two logs that are helpful to tail while performing the validation as well as the actual build. Both provide the same information, just one is a debug log, so it will provide a lot more data. These are the two logs to follow (tail -f) on the Cloud Builder appliance.
/var/log/vmware/vcf/bringup/vcf-bringup.log
/var/log/vmware/vcf/bringup/vcf-bringup-debug.log
Monitoring the debug log but only outputting INFO, ERROR, WARN, or DEBUG.
tail -f /var/log/vmware/vcf/bringup/vcf-bringup-debug.log | grep -E "(INFO|ERROR|WARN|DEBUG)"
Conclusion
Hopefully this post will help people out who are trying to learn VMware VCF with constrained resources. The deployment was much quicker for me, only one (1) hour and 37 minutes. This is very impressive since I can quickly iterate builds for various scenarios. Maybe I will be able to automate parts and share that in the future.
Leave a Reply