Overview
There are a few necessary services that need to be running for a Nested VCF lab. These services include Domain Name System (DNS) and Network Time Protocol (NTP). A few additional services, while not necessary, are very helpful. These services include a file server and a management virtual machine.
Domain Name System (DNS)
For this service, I am running Windows Server 2022 Core. I also have a Windows 10 Enterprise virtual machine deployed and configured with Remote Server Administrative Tools (RSAT) installed. This is how I manage my lab domain, DNS records, and group policy, if necessary.
Network Time Protocol (NTP)
For this service, I combined it with my file server since I am running Fedora Server 39. On Linux, the service that provides NTP is called chronyd.
I do not recommend using a Windows Domain Controller as an NTP server since by default, it is configured to provide time services for domain joined computers. Since I am not going to be joining my VMware infrastructure to an Active Directory domain, I wanted a more generic time server.
If you do want to use a Windows Domain Controller, it will have to be configured to be a time server for non-domain joined computers.
File Server
For this service, I am using Fedora Server 39. This is not necessary, but the less Microsoft licensing I have to deal with, the better. I have Samba installed and configured. This makes it easy for me to access files in native Linux and also on Windows computers.
Management Virtual Machine
I have a Windows 10 Enterprise virtual machine for managing the Active Directory domain and a Fedora Workstation 39 for everything else.
Using the Fedora Workstation allows me to configure the physical host, the pfSense firewall, the nested ESXi hosts, and basically anything else I need. I can ssh to VMware devices and still access Windows devices, if needed. Also, no Microsoft licensing…
Nested ESXi Hosts
VMware VCF requires four hosts to make up the Management Domain. The version of ESXi installed is determined from the Bill of Materials (BOM) referenced in the release notes of the intended version of VCF.
The hardware settings below work for me and my lab. These will likely be very different settings for you.
- 8 x 4 vCPU (2 Sockets) with the Enable CPU Hot Add and Expose hardware assisted virtualization to the guest OS options selected.
- 64 GB Memory (vCenter takes 19 GB and NSX-T Manager needs 16 GB) with the Memory Hot Plug option selected.
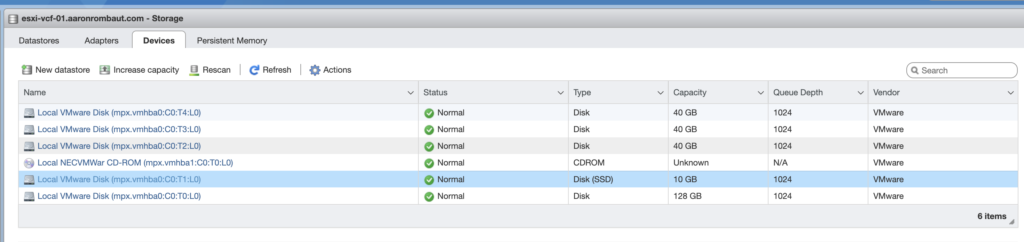
- Six (6) hard disks
- One (1) x 128 GB, Thin Provisioned, OS
- One (1) x 250 GB, Thin Provisioned, vSAN Cache Disk
- Four (4) x 250 GB, Thin Provisioned, vSAN Capacity Disk
- Two (2) VMXNET3 Network Adapters, both on All-VLAN IDs port group (VLAN 4095)
Note: The disk group should be more than 500 GB otherwise you will see the following warning when tailing the log at /var/log/vmware/vcf/bringup/vcf-bringup.log during the VCF configuration validation.
Host <fully.qualified.domain.name> with Cluster_Group_1 has 4 capacity disk with disk group size 160.000000 GB (Expecting ~500 GB)
Base Installation
Since this is a nested lab, I install from a plain vanilla ESXi ISO. The physical host is installed with a Dell customized ISO, but the nested ESXi hosts are going to use VMware virtual hardware, so the customized ISO is not necessary.
vSAN Disk Configuration
vSAN requires an SSD for the cache tier. My lab uses iSCSI and spinning disks. Configure the virtual machine to fake an SSD disk. Otherwise, during the Cloud Builder validation, the following warning will be presented.

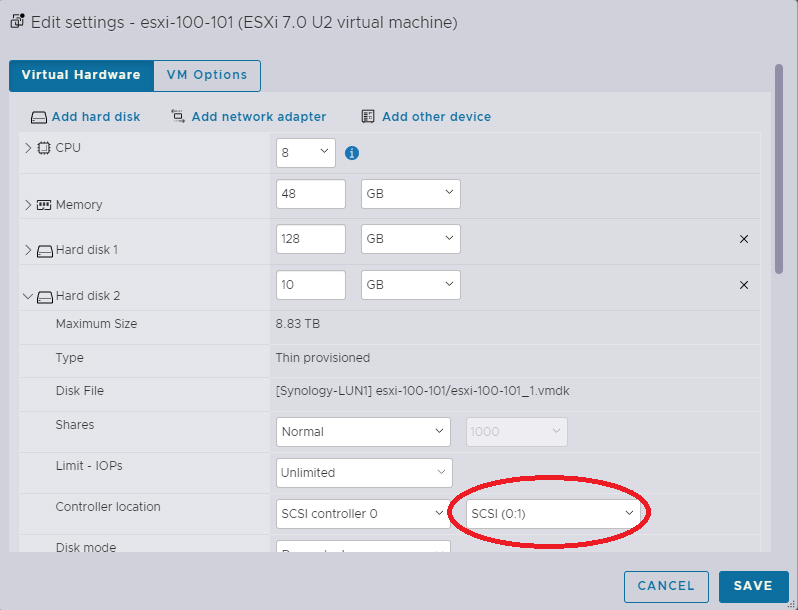
Since this will require editing the VMX files, the virtual machines must be shutdown. Edit the settings for the virtual machine and locate the hard disk intended for the vSAN cache tier. In my case, it is the Hard Disk 2. Record the Controller location address.
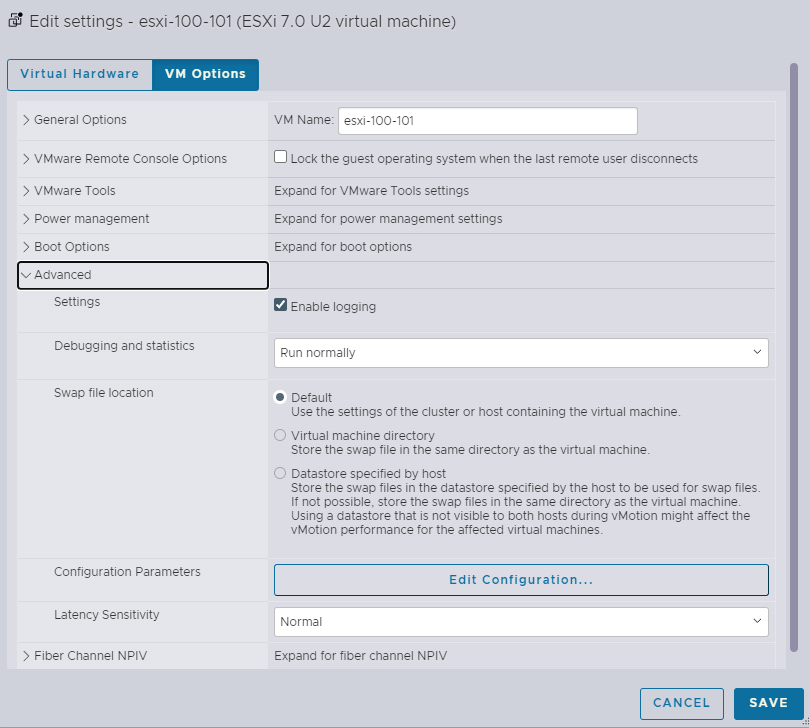
On the VM Options tab, under Advanced, select Edit Configuration.
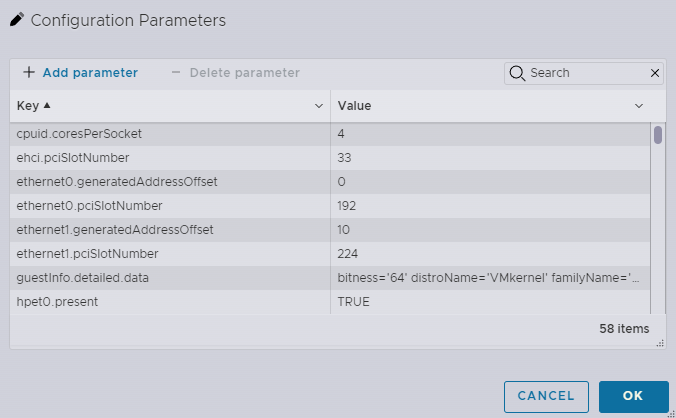
On the Configuration Parameters window, click Add parameter.
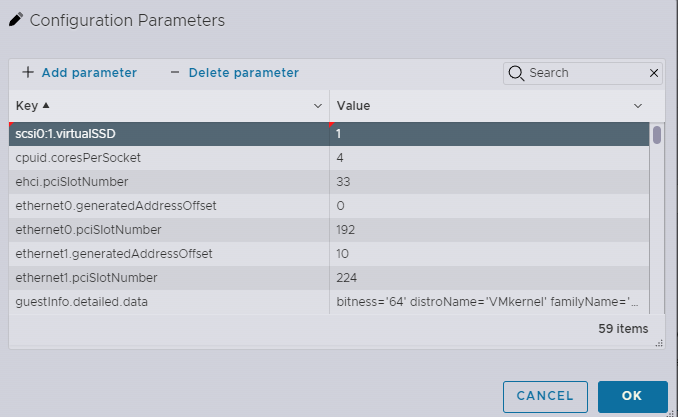
A new Key and Value will be added. Locate it in the list and add the following, paying attention to the address id (scsi0:1). Use the address recorded from above.
Key:scsi0:1.virtualSSD
Value: 1
Do this for all four nested hosts.
The following screen shot was taken later, but I included it here for reference!
Initial Network Configuration
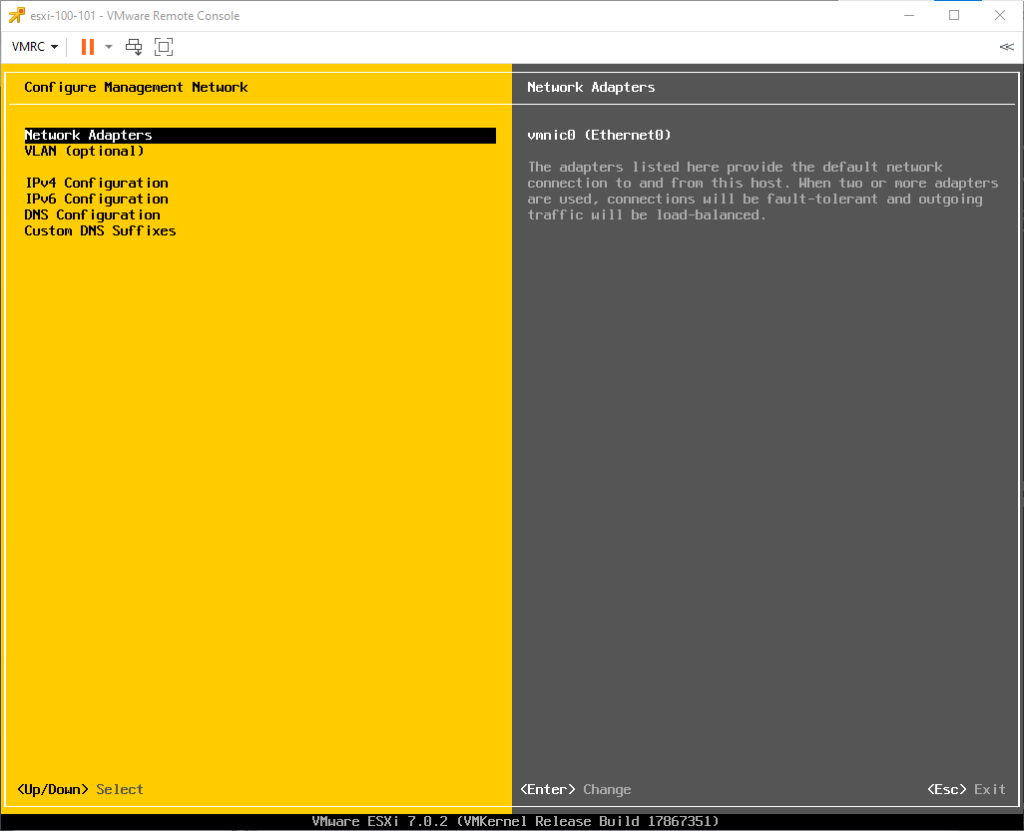
Log into the Direct Console User Interface (DCUI) of each ESXi host and Configure Management Network.
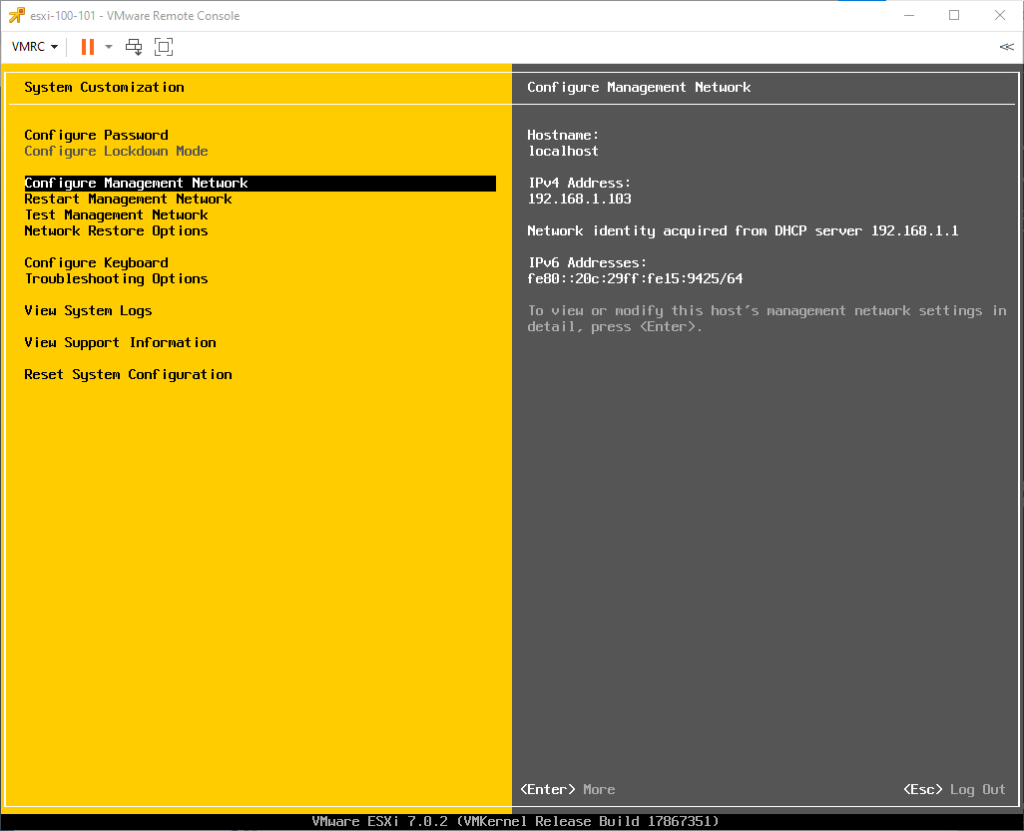
This task includes configuring the Network Adapters, VLAN (optional), IPv4 Configuration, IPv6 Configuration, DNS Configuration, and Custom DNS Suffixes.
Note: Make sure to only configure one physical network adapter, i.e. leave the default.
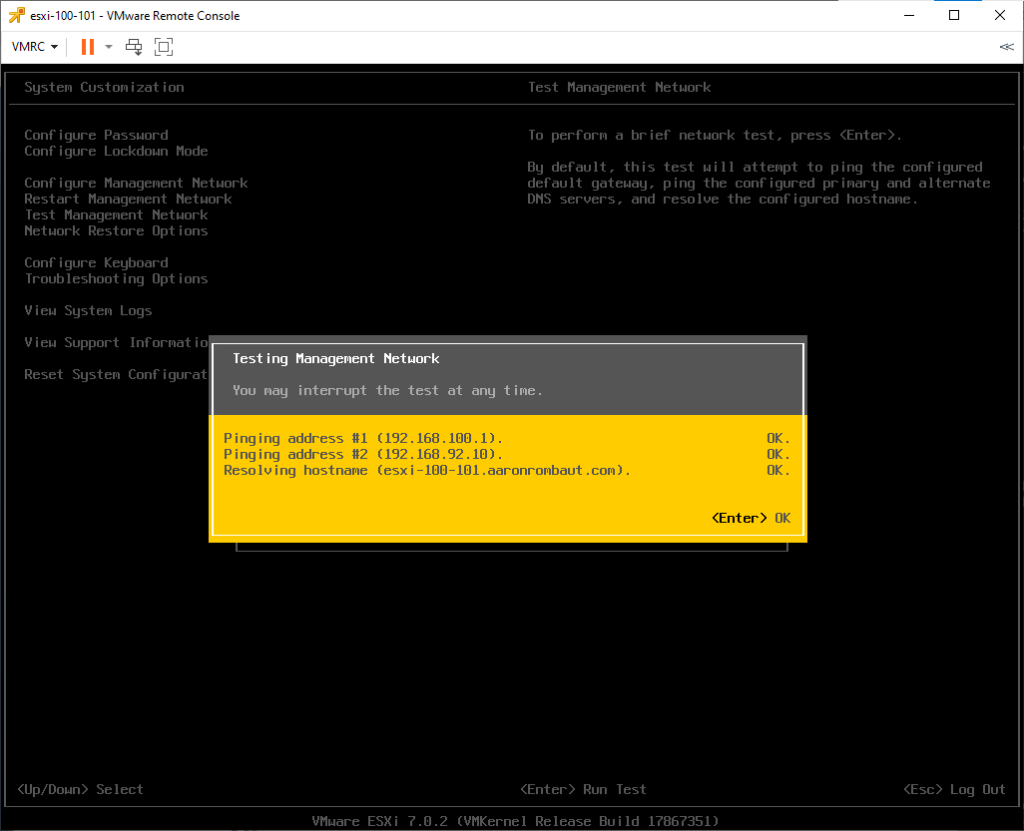
After the Management Network is configured, you can test the settings with the Test Management Network setting.
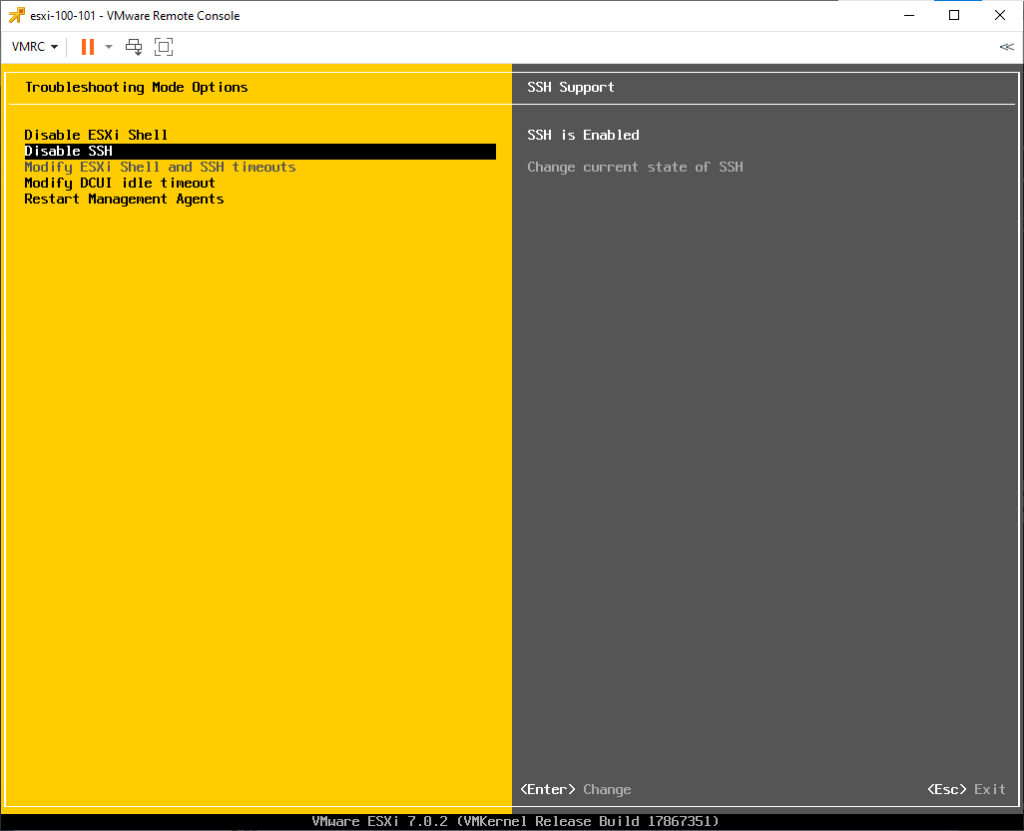
Enable the ESXi Shell and SSH
The last step in the DCUI is to Enable ESXi Shell and Enable SSH from the Troubleshooting Options menu. Remember, this is just a lab, I do not recommend enabling the ESXi Shell in production unless you are performing a break-fix action. SSH is required to be running for VCF bring-up, so this is a necessary step, regardless.
Upload and Install the ESXi Patch
The ESXi versions have to be installed and patched in the same update version. If installed ESXi 7U2, patches for ESXi 7U3 will not work. The ESXi host would have to be upgraded to ESXi 7U3, first.
I find the following tasks to be much easier with a Linux client. I can SCP the files and then quickly pivot to SSH on a Terminal. This also allows me to write commands temporarily to a text file so that I can copy and paste, and even back up for reference later, if needed.
Upload the patch to the ESXi host. This can be accomplished with WinSCP or SFTP. One thing to note is that when uploading the patch, upload to the tmp in the OSDATA drive, not the root /tmp.

The following command is used to install the patch. Remember to use the full path and not the relative path!
esxcli software vib update --depot=/path/to/update/file
Configure the VM Network
To log into the ESXi Shell, press alt+F1. Log in as the root user with the password configured during the initial installation.
This can be done from the ESXi Host Client, but is faster to accomplish on the command line.
To view the current VLAN ID configuration:
esxcli network vswitch standard portgroup list

To update the VM Network port group VLAN:
esxcli network vswitch standard portgroup set --portgroup-name='VM Network' --vlan-id=<vlan id>

Configure NTP
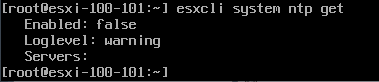
To view the current NTP configuration:
esxcli system ntp get
To set the NTP configuration:
esxcli system ntp set --enabled=true --server=192.168.92.4

To make sure the ntpd service survives reboots, use the following command:
chkconfig ntpd
If you see on, then the service will survive reboots, otherwise, type the following:
chkconfig ntpd on
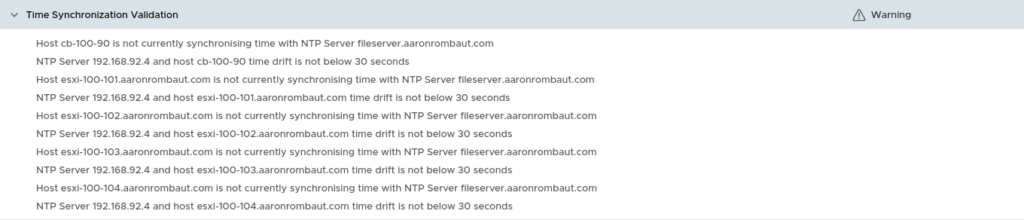
During the VMware Cloud Foundation validation, the Time Synchronization Validation may report synchronization issues. Troubleshoot accordingly; this could include configuring the NTP server allowed subnets to synchronize with, a firewall blocking UDP 123, or the incorrect IP address of the NTP server.
Regenerate the Self-Signed Certificate on All Hosts
Following the procedure from https://docs.vmware.com/en/VMware-Cloud-Foundation/4.3/vcf-deploy/GUID-20A4FD73-EB40-403A-99FF-DAD9E8F9E456.html
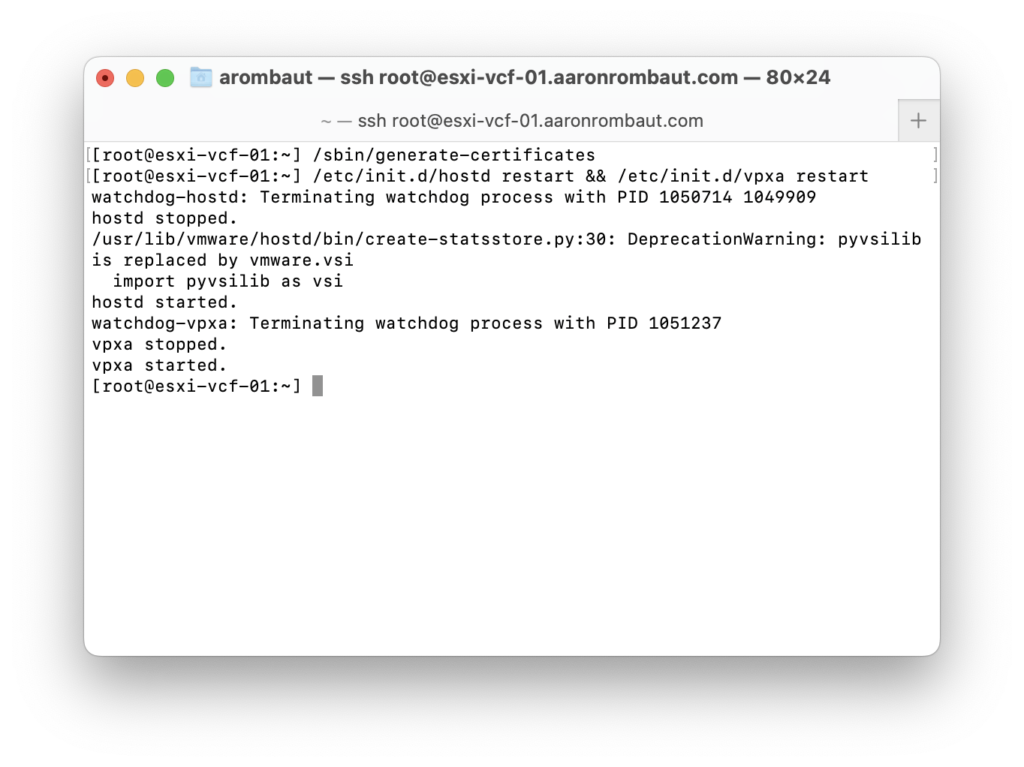
/sbin/generate-certificates
/etc/init.d/hostd restart && /etc/init.d/vpxa restart
Do this on each of the four hosts. The self-signed certificate will be replaced with the configured host name.
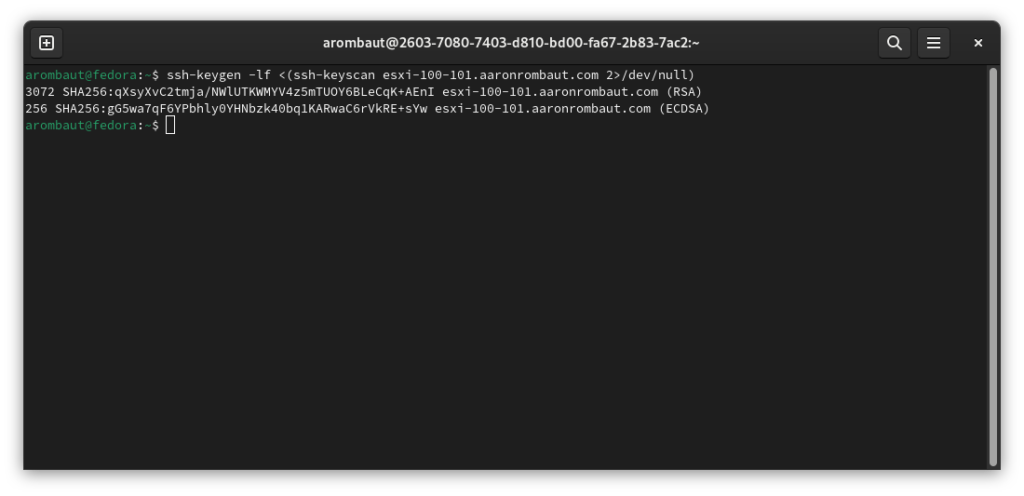
Obtain the TLS Thumbprints from the New Certificates
This cannot be done in the ESXi Shell, the library does not exist! This will have to be done from a Linux Terminal or the VMware Cloud Builder appliance if that is available.
ssh-keygen -lf <(ssh-keyscan hostname 2>/dev/null)
openssl s_client -connect hostname:443 < /dev/null 2> /dev/null | openssl x509 -sha256 -fingerprint -noout -in /dev/stdin
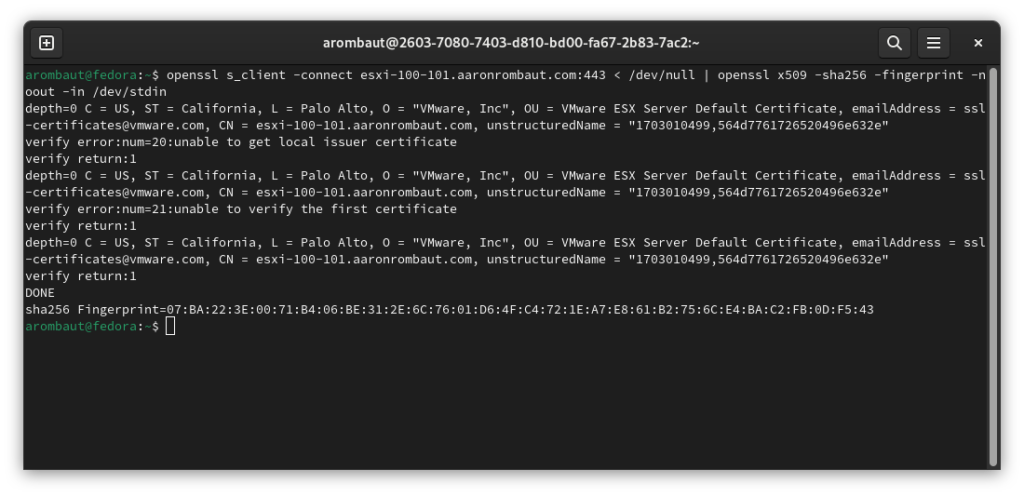
Add the sha256 Fingerprint to the Deployment Parameters workbook.

Snapshot!
After all that prep work, this is now the time to take a snapshot. This is the benefit of running virtual machines in a nested lab. Trust me when I say this will save countless hours!
VMware Cloud Builder
This is an OVA that gets deployed. It is what performs the bring-up of VCF. I am putting it on the same network segment as the nested ESXi hosts.
Note: In VCF 5.1, the Management subnets are split. There is now a VM Management Network (for vCenter Server Appliance, SDDC Manager, and the NSX Managers) and a Management Network (for the ESXi Host VMkernel adapter, vmk0). In this version, I prefer to deploy the Cloud Builder appliance on the VM Management Network to keep the bits in the the same broadcast domain, eliminating appliance bits from having to traverse the router.
Because the VMware Cloud Builder appliance is a virtual machine (a guest), it is not VLAN aware. A port group that corresponds to the nested ESXi subnet must be configured and assigned to the appliance.
Before running the actual bring-up, I recommend taking a snapshot. This will allow you to return to the appliance before anything has been read in and can save the time of deploying a new Cloud Builder appliance.
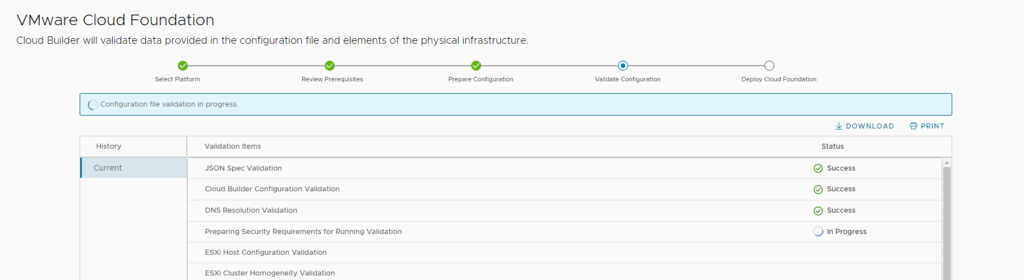
Monitor the VCF Bring-up Logs
There are two logs that are helpful to tail while performing the validation as well as the actual build. Both provide the same information, just one is a debug log, so it will provide a lot more data. The two logs to follow (tail -f) on the Cloud Builder appliance.
/var/log/vmware/vcf/bringup/vcf-bringup.log
/var/log/vmware/vcf/bringup/vcf-bringup-debug.log
Monitoring the debug log but only outputting INFO, ERROR, WARN, or DEBUG.
tail -f /var/log/vmware/vcf/bringup/vcf-bringup-debug.log | grep -E "(INFO|ERROR|WARN|DEBUG)"
Optional: VCF Deployed with Only a Single NSX Manager
If you are running a nested VCF lab like me, you are likely running with finite resources. While it is best practice to deploy three NSX Managers in production, in a lab and for learning, it is perfectly acceptable to deploy only one.
This will require some work, though. The idea is to complete the VCF Deployment Parameter Workbook as you normally would. The difference is that we are going to use the Cloud Builder appliance to convert the Excel File to a JSON file. Then we will remove the two entries that build the NSX Managers.
If you are logged in as admin, then you must switch user (su) to become root.
Upload the Excel file to the Cloud Builder appliance; I chose the /tmp directory.
I am going to use the Supportability and Serviceability (SOS) Utility to make the conversion.
/opt/vmware/sddc-support/sos --jsongenerator --jsongenerator-input <filename> --jsongenerator-design vcf-public-ems
Here is an example.
/opt/vmware/sddc-support/sos --jsongenerator --jsongenerator-input /tmp/vcf-ems-deployment-parameter.xlsx --jsongenerator-design vcf-public-ems
Now the file can be located and downloaded from:
/opt/vmware/sddc-support/cloud_admin_tools/Resources/vcf-public-ems
Copy the file to admin’s home directory, if necessary.
cp /opt/vmware/sddc-support/cloud_admin_tools/Resources/vcf-public-ems/vcf-public-ems.json /home/admin/vcf-public-ems.json
I recommend making a copy before opening the file in an editor.
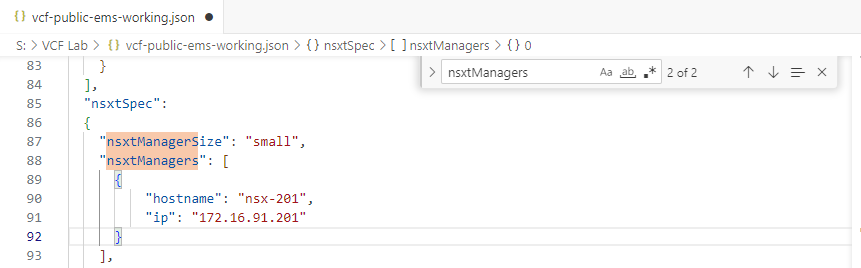
Ctrl-F to find the string, nsxtManagers.
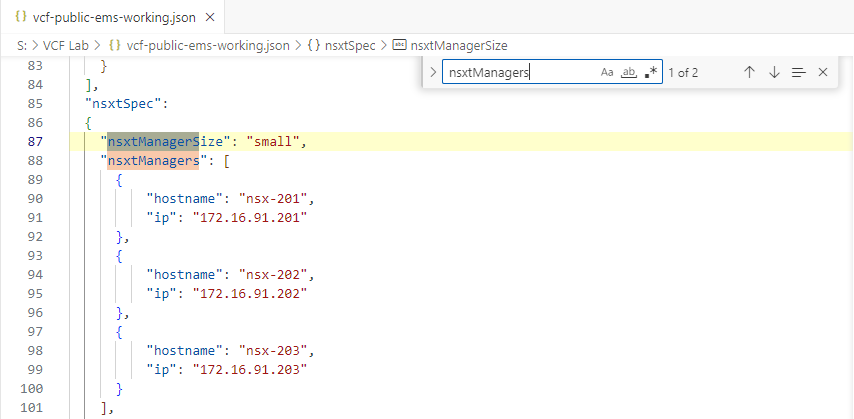
Remove the two NSX Managers that are not wanted. Pay attention to the commas (,) and the curly braces ({ }).
Now, when asked to Upload Configuration File, select the modified file.

The configuration file validation will proceed as if the information was not removed.
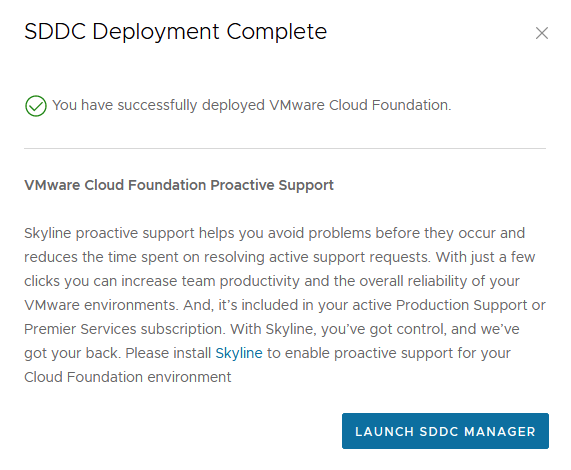
Completed VCF Bring-Up
Eventually, and I mean eventually, the lab resulted in a successful build. When I nested the ESXi hosts on the host’s storage, I was able to get it to deploy in roughly 2.5 hours. When I nested the ESXi hosts on an iSCSI datastore, even using Multipath I/O (MPIO), it took over seven hours! My iSCSI provider is a fairly old Synology 1511+ and only has two, 1 Gbp/s network interfaces. So onboard at over 6 Gpb/s compared to the NAS at maximum 2 Gbp/s is definitely quite a difference.
I had to trim my deployment to one NSX Manager when deploying on iSCSI due to the length of time to deploy the NSX Manager nodes. This was not necessary when I hosted on the physical host. But when hosted on the physical host, I also very quickly ran out of 1.36 TB of storage.

After clicking Finish, the following window should pop up.
Leave a Reply