Preparing to Deploy the VMware Workspace ONE Access Appliance
Preparation tasks include the following:
- Download the VMware Workspace ONE Access OVA file (customerconnect.vmware.com)
- Create DNS records (forward (A) and reverse lookup (PTR) records are required)
- Obtain IP addresses
- Create the Workspace ONE Access Service Database (either using Windows Authentication Mode or Local SQL Server Authentication) — Explained later in this post
- Change SQL Server Database Auto Growth Settings for Workspace ONE Access — Explained later in this post
Not documented in official VMware documentation (that I could find) at this step, but very helpful:
- Create a VMware Workspace ONE Access Service Account (svc.wsoa)
- Create a VMware Workspace ONE Access DB Account (svc.wsoa-db)
- Create a VMware Workspace ONE Access LDAP Account (svc.wsoa-ldap)
- Create a VMware Workspace ONE Access Kerberos account (svc.wsoa-kerberos)
- Review the Deployment Checklists.
- Create a TLS certificate for the Workspace ONE Access Appliance or create a TLS certificate to use on a load balancer.
- Have NTP server addresses available.
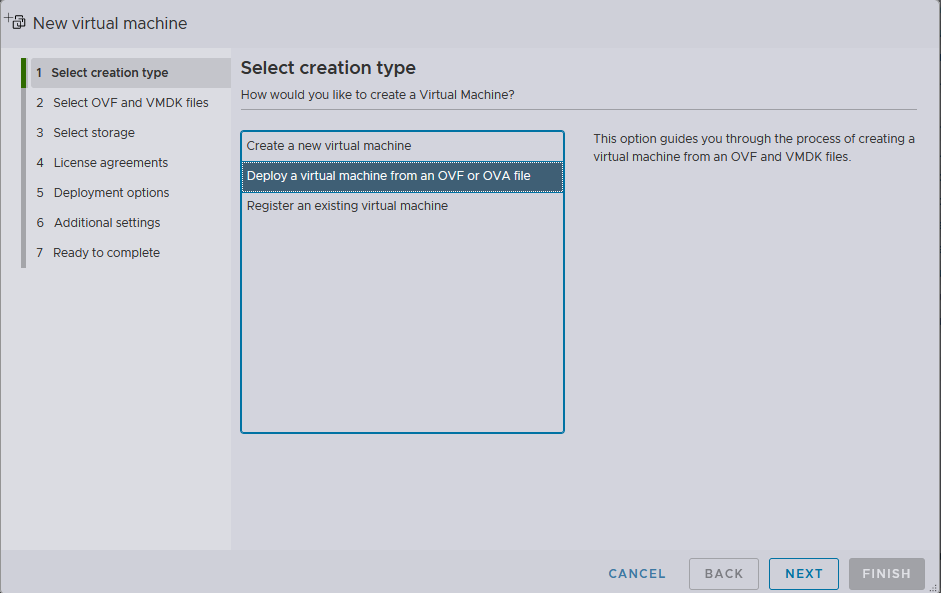
How to Deploy VMware Workspace ONE Access Appliance
The Identity Manager OVA is very easy to deploy. Either using the ESXi Host Client or vSphere Client, deploy the appliance. For this example, I am going to use the ESXi Host Client.
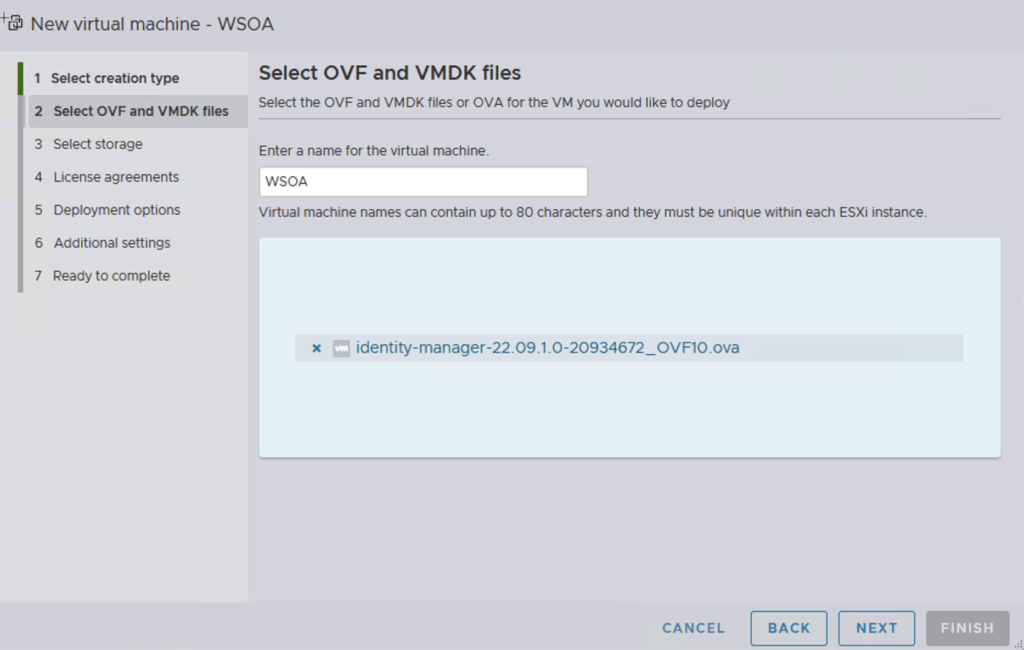
Enter a name for the virtual machine and click to add the OVA.
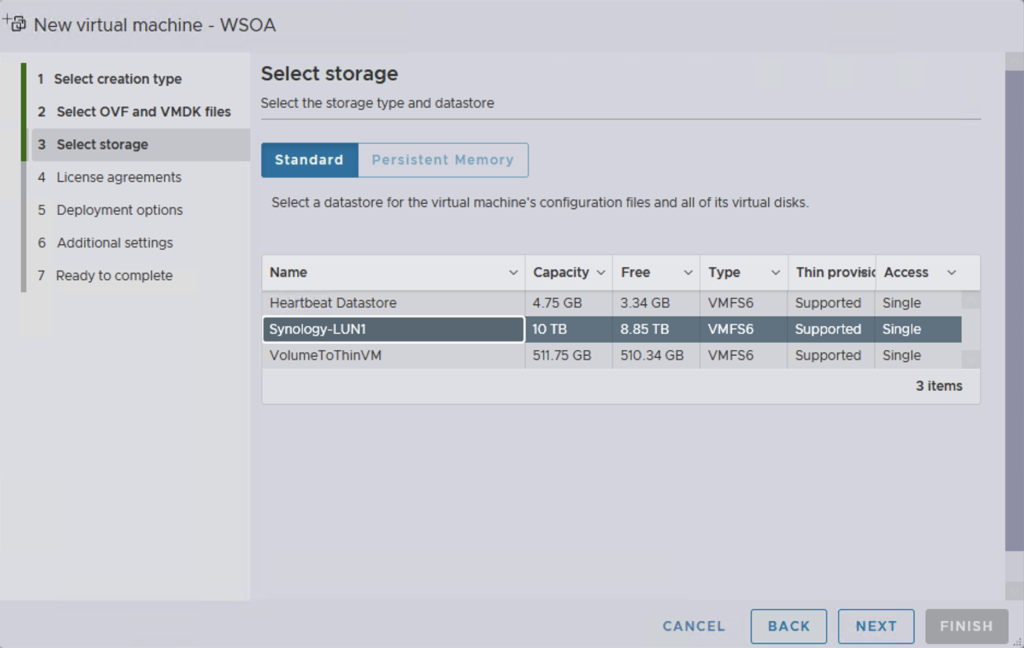
Select the storage type and datastore.
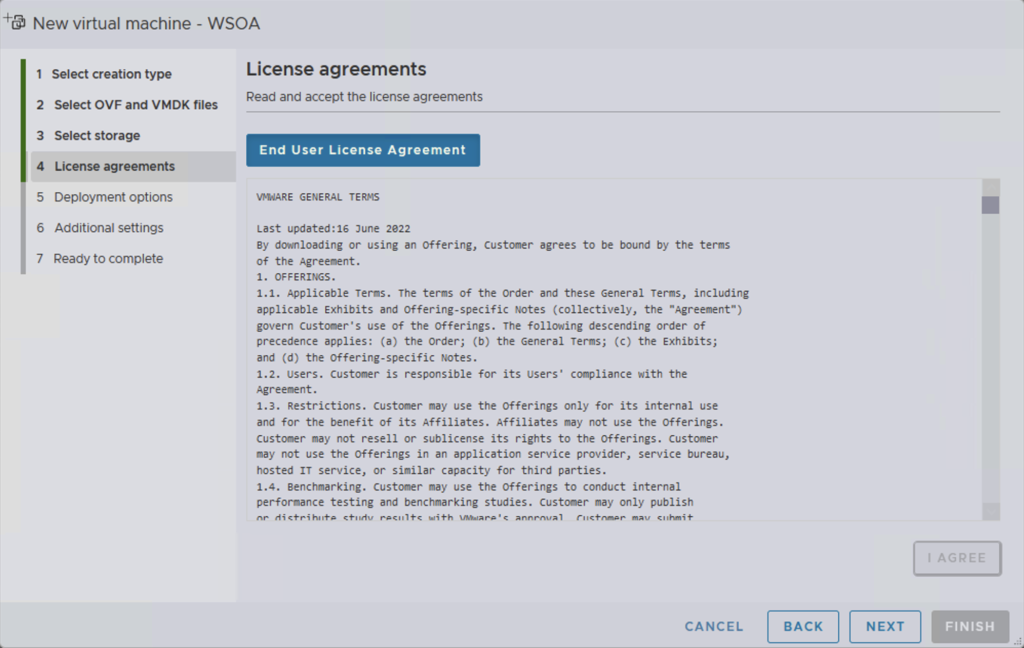
Review the License Agreements and click I Agree before proceeding.
Select the appropriate deployment options.

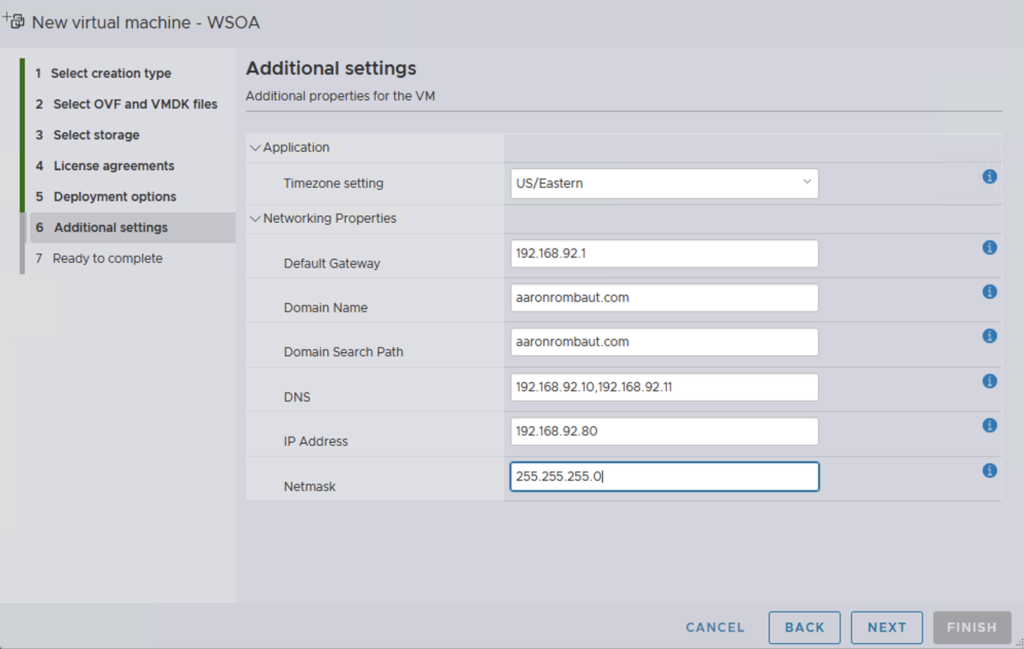
Expand Application and Networking Properties to complete the deployment parameters.
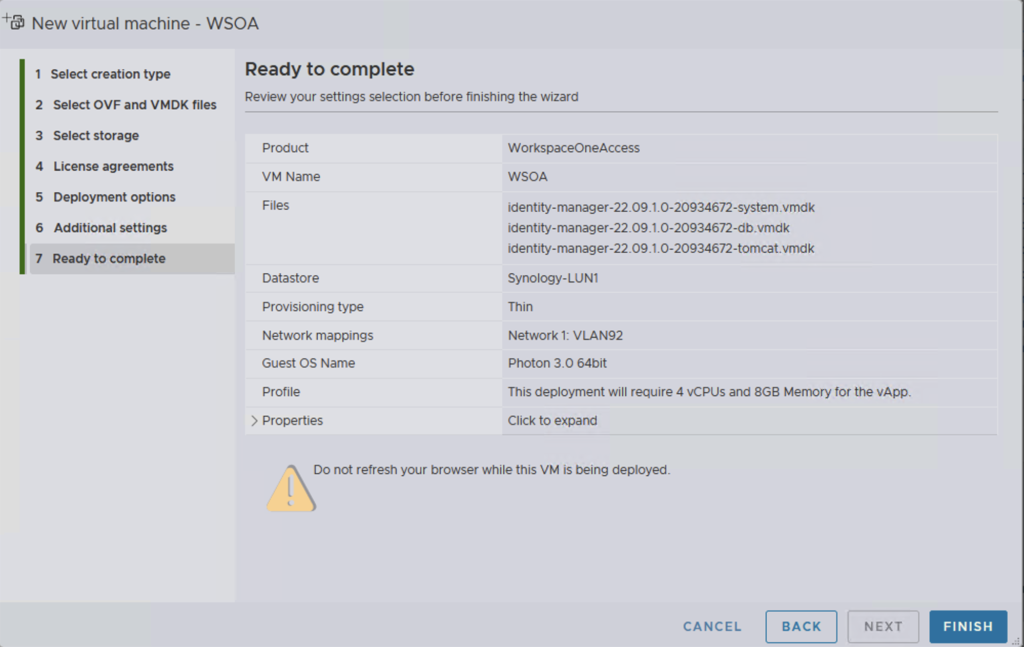
Review your settings selection and finish the wizard.
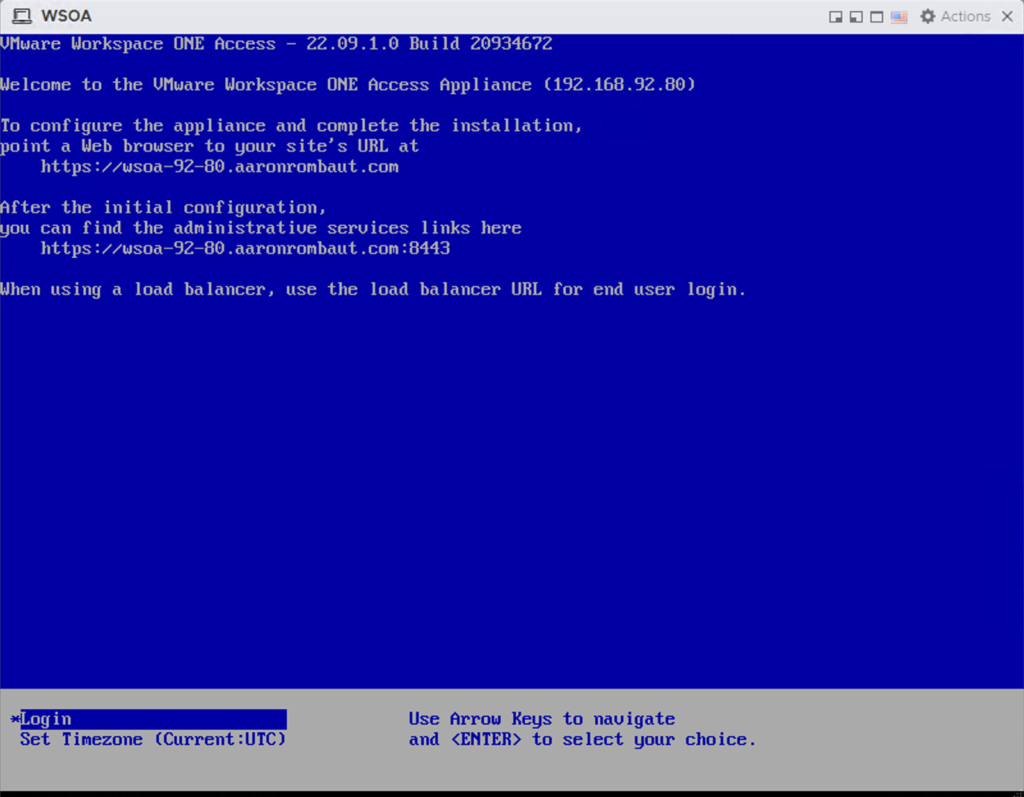
Monitor the Recent tasks pane for deployment details. When the deployment completes, select the virtual machine and review the console while it boots. A few bring up tasks will take place, but when it completes, you will be presented with a blue console window displaying an address to navigate to with an Internet browser.
Now is a good time to take a Snapshot!
How to Initially Configure the Workspace ONE Access Appliance
In a production scenario, it is recommended to use an external database. For this example, I am going to configure a database on Microsoft SQL Server 2019 Standard.
Refer to VMware documentation for the appropriate script. I am opting to use an account with Windows Authentication. My SQL Server is already properly secured with a TLS certificate.
Note: Be sure to use an UPPERCASE domain for the user!
/*
Values within angle brackets (< >) are example values. When replacing the example value,
remove the angle brackets. The database name is case sensitive, and the name must be one word with no spaces.
Make sure you enter the database name the same in all instances.
*/


CREATE DATABASE wsoadb
COLLATE Latin1_General_CS_AS;
ALTER DATABASE wsoadb SET READ_COMMITTED_SNAPSHOT ON;
GO

IF NOT EXISTS
(SELECT name
FROM master.sys.server_principals
WHERE name=N'AARONROMBAUT\svc.wsoa-db')
BEGIN
CREATE LOGIN [AARONROMBAUT\svc.wsoa-db] FROM WINDOWS;
END
GO

USE wsoadb;
IF EXISTS (SELECT * FROM sys.database_principals WHERE name=N'AARONROMBAUT\svc.wsoa-db')
DROP USER [AARONROMBAUT\svc.wsoa-db]
GO

CREATE USER [AARONROMBAUT\svc.wsoa-db] FOR LOGIN [AARONROMBAUT\svc.wsoa-db]
WITH DEFAULT_SCHEMA=saas;
GO

CREATE SCHEMA saas AUTHORIZATION "AARONROMBAUT\svc.wsoa-db"
GRANT ALL ON DATABASE::wsoadb TO "AARONROMBAUT\svc.wsoa-db";
GO

ALTER ROLE db_owner ADD MEMBER "AARONROMBAUT\svc.wsoa-db";
GO
And then another script to increase the Autogrowth of files to 128MB.
ALTER DATABASE <saasdb>

        MODIFY FILE ( NAME = N'wsoadb', FILEGROWTH = 128MB )

GO
The following script will confirm the Microsoft SQL Database is correctly configured for Workspace ONE Access.
 execute as user = 'AARONROMBAUT\svc.wsoa-db'


/* Check if user is db owner. Return true */
SELECT IS_ROLEMEMBER('db_owner') as isRoleMember

/* Make sure user is not sysadmin. Should return false */
SELECT IS_SRVROLEMEMBER('sysadmin')  as isSysAdmin

/* check if saas schema exists, should be not null */
SELECT SCHEMA_ID('saas') as schemaId

/* check schema owner, should be user provided to installer */
SELECT SCHEMA_OWNER FROM INFORMATION_SCHEMA.SCHEMATA where SCHEMA_NAME='saas'

/* check if saas is user default schema, should return saas */
SELECT SCHEMA_NAME() as SchemaName

/* check db collation, should return Latin1_General_CS_AS */
SELECT DATABASEPROPERTYEX('wsoadb', 'Collation') AS Collation

/* check if read committed snapshot is on, should return true */
SELECT is_read_committed_snapshot_on FROM sys.databases WHERE name='wsoadb'
Use the Setup Wizard to Configure the Workspace ONE Access Appliance and Complete the Installation
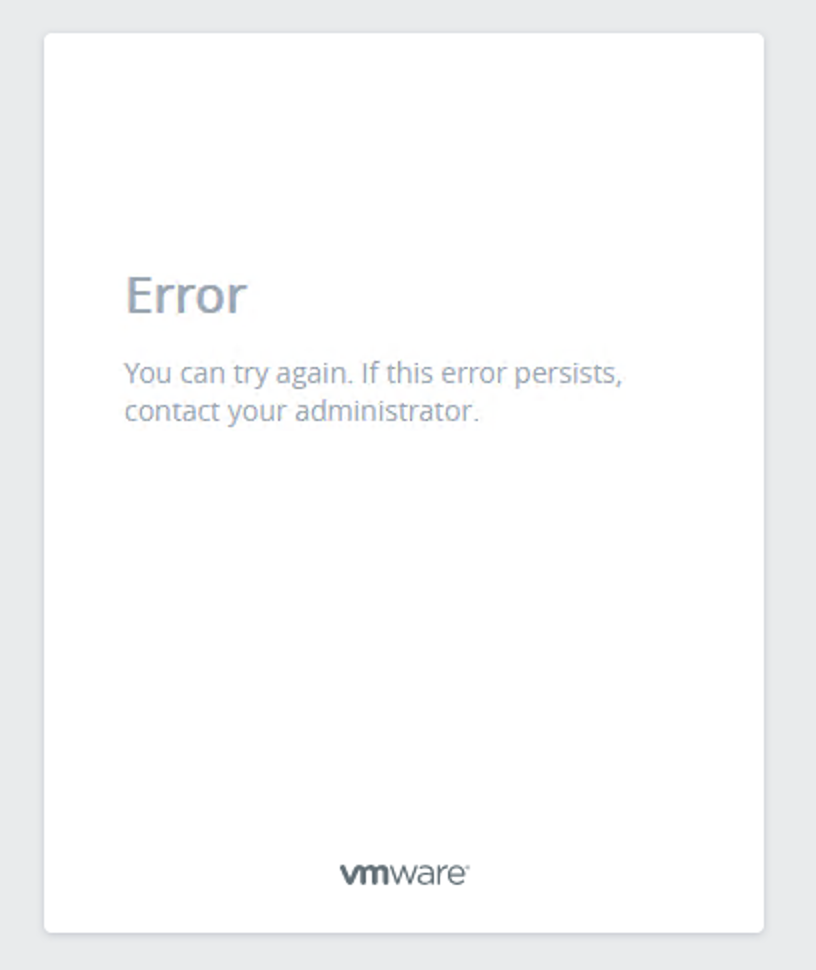
Navigate to the URL that is displayed on the console; use the fully qualified domain name (FQDN) or there will be an error as displayed below.
The following view shows Firefox configured with HSTS and not allowing me to continue.
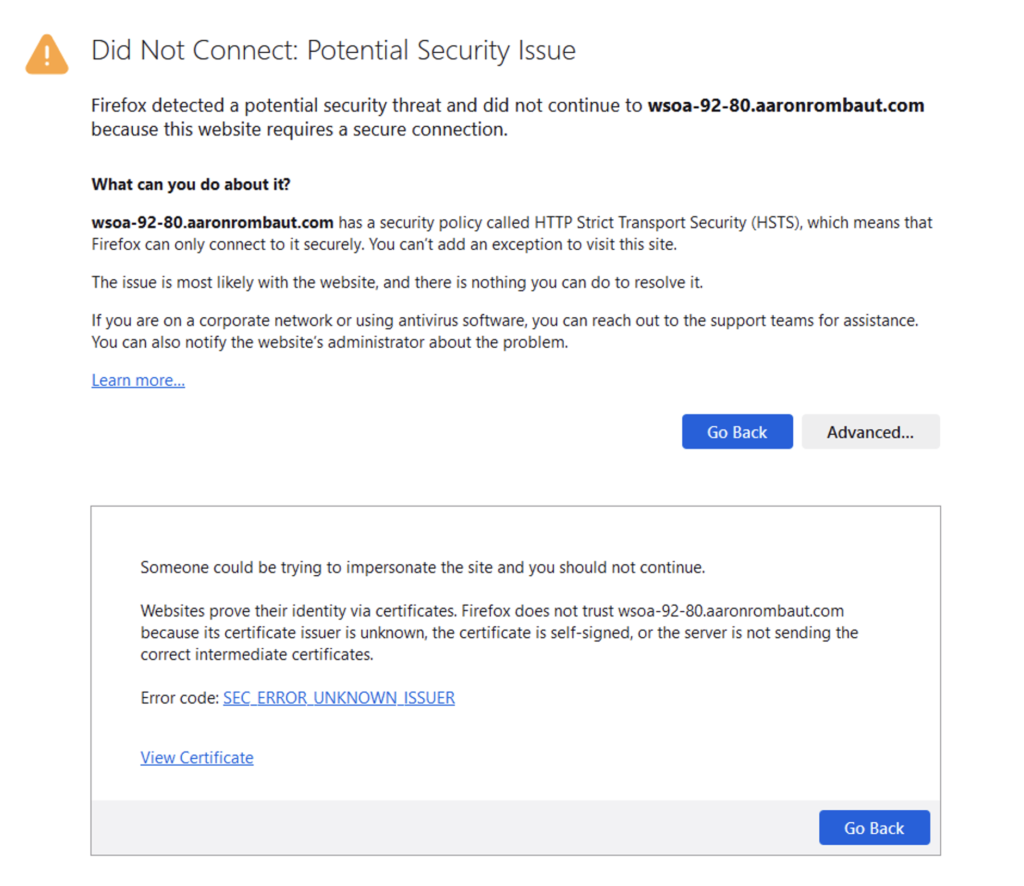
Accept the certificate (if possible). A browser without an HSTS policy is required to configure the appliance.
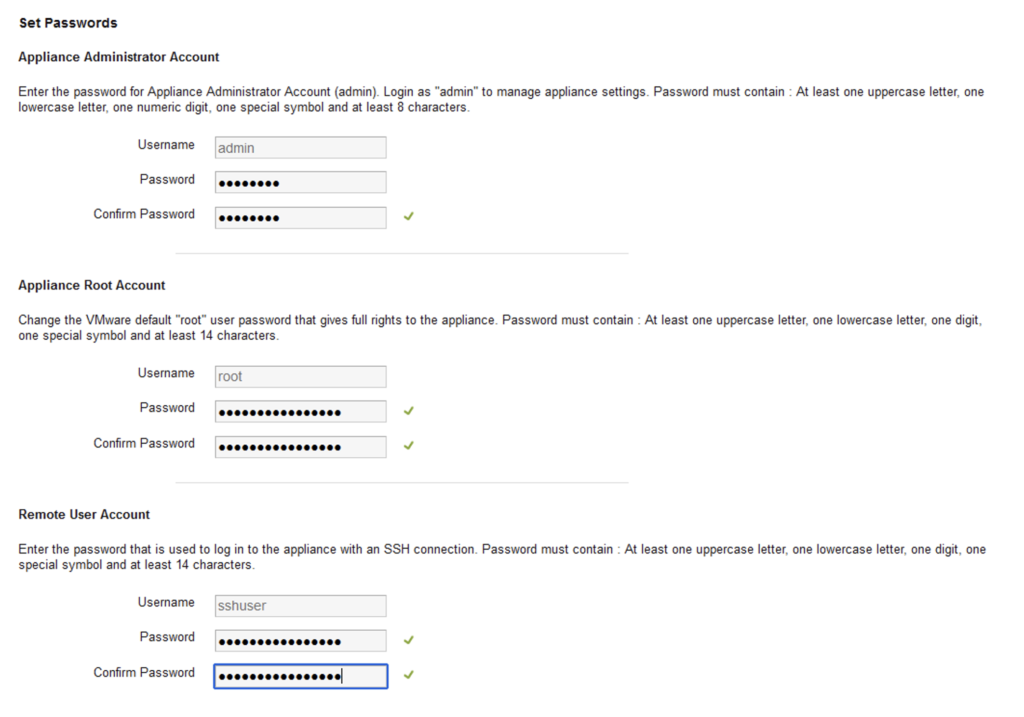
Set the passwords for the following users, paying attention to the character requirements:
Appliance Administrator Account (admin) – 8 characters
Appliance Root Account (root) – 14 characters
Remote User Account (sshuser) – 14 characters
Note: The step below is by far the most difficult step of this process for me! Mileage may very in your environment and I do hope it is easier for you!
Select the database type. As I mentioned above, it is recommended to use an External Database and for this example, one has already been configured. Please review the earlier part of this post for more details.
The syntax is:
jdbc:sqlserver://<hostname_or_IP_address:port#>;DatabaseName=<saasdb>;integratedSecurity=true;authenticationScheme=NTLM;domain=<domainname>
Here is an example of this JDBC URL.
jdbc:sqlserver://sql-92-14.aaronrombaut.com:1433;DatabaseName=wsoadb;integratedSecurity=true;authenticationScheme=NTLM;domain=aaronrombaut.com
Provide a Database Username and Database Password. Please note that the following may not work for you. Continue reading for more information.
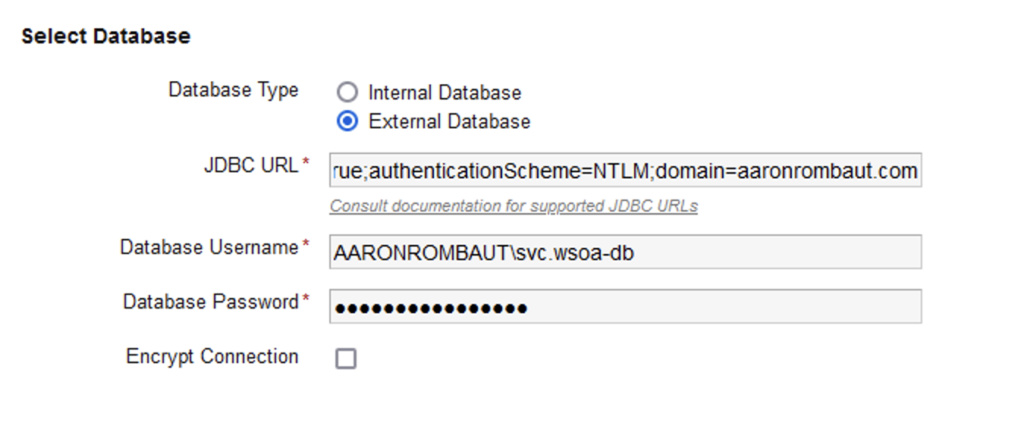
In my case, I received an error at the top of the window:
Error testing DB Connection with jdbc url: jdbc:sqlserver://sql-92-14.aaronrombaut.com:1433;DatabaseName=wsoadb;integratedSecurity=true;authenticationScheme=NTLM;domain=aaronrombaut.com, user: AARONROMBAUT\svc.wsoa-db.Reviewing the Log File from Microsoft SQL, I see a Login failed message. Unfortunately, I do not get any more details like what the format of the log in string may look like. Either way, this is quite interesting as I am certain I used the correct username and password.

It turns out that I only needed to include the username portion and not the domain. So what finally worked for me looks like the following.
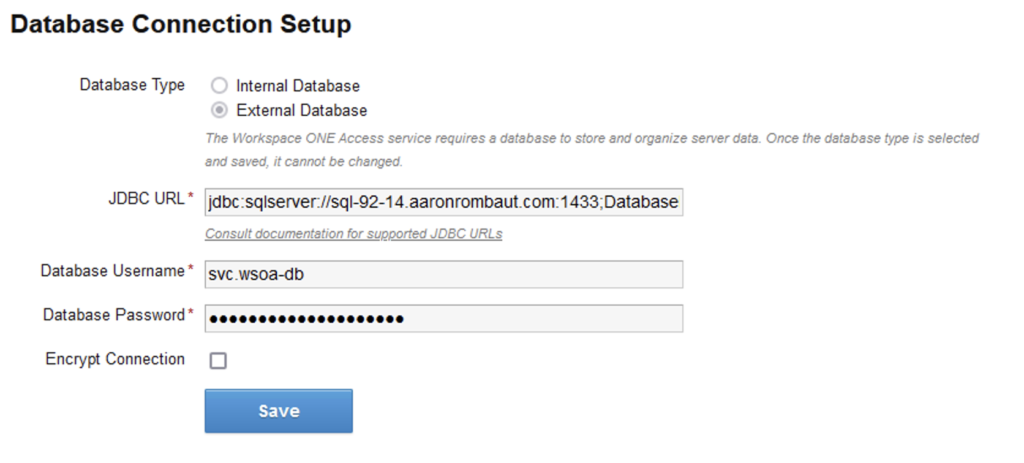
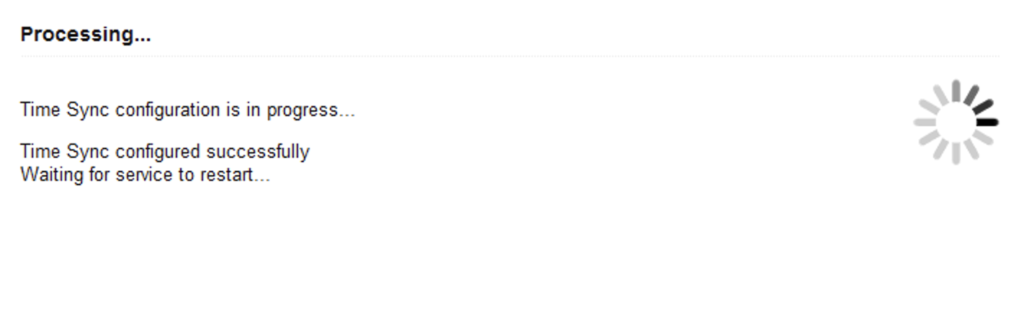
Once the database and credentials are set correctly, a window will pop up while the database is configuring.
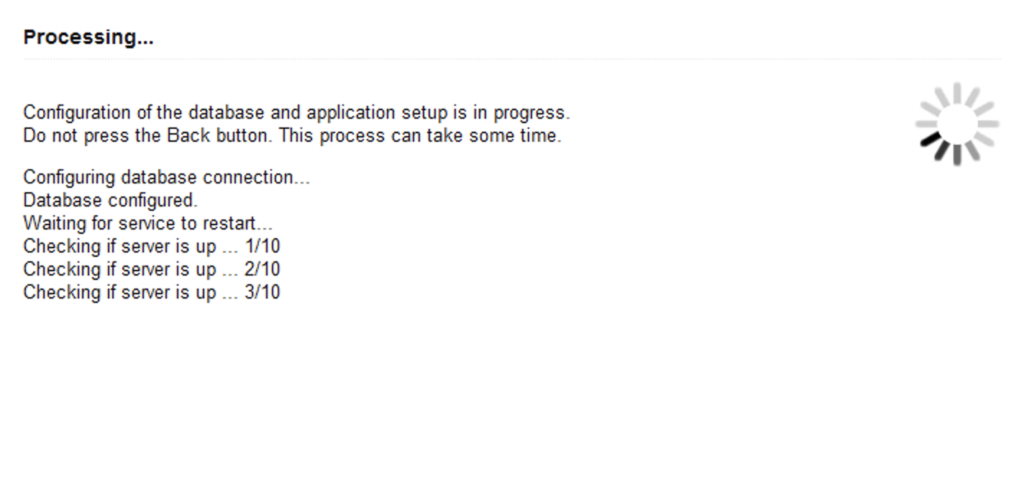
Once the database is configured and the appliance is back online, you should receive the following window.

Housekeeping Items I Like to Perform
Click the Appliance Configurator link to perform a couple housekeeping tasks while we are here and before we move on. The following shows a view of the Configurator.

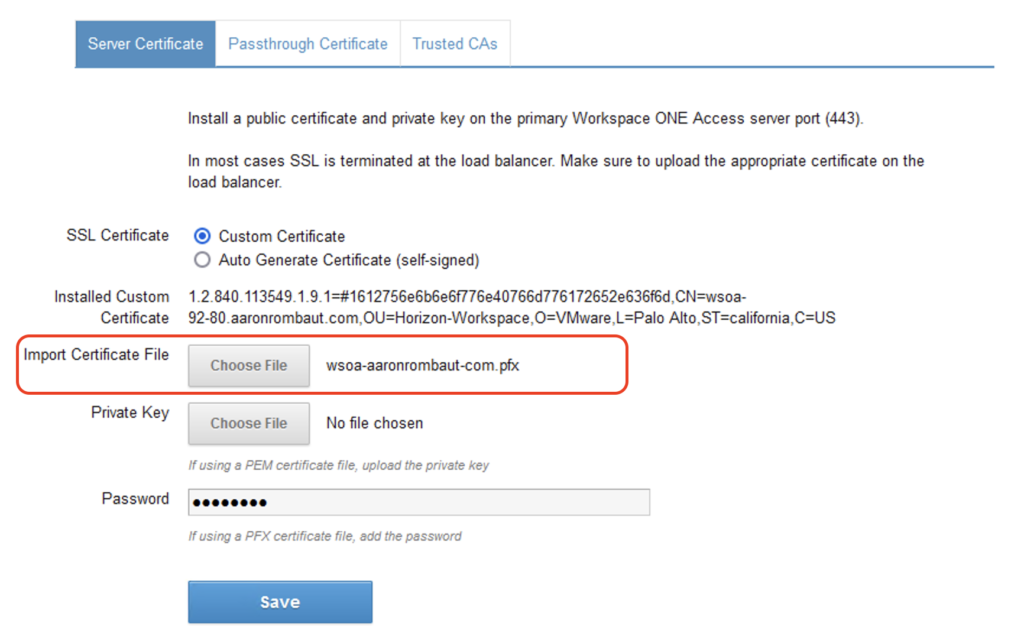
Click on Install SSL Certificates, import the certificate file and key (if using PEM) or just the certificate file and password.
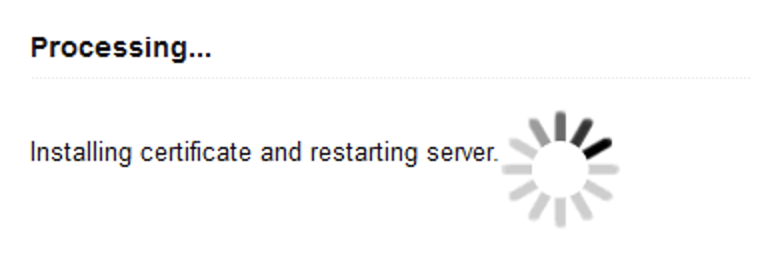
After you click Save, the following window should show up, indicating the certificate is being installed and the server is restarted,
The browser page should refresh automatically and show a lock symbol, indicating the connection to the appliance is now secure.

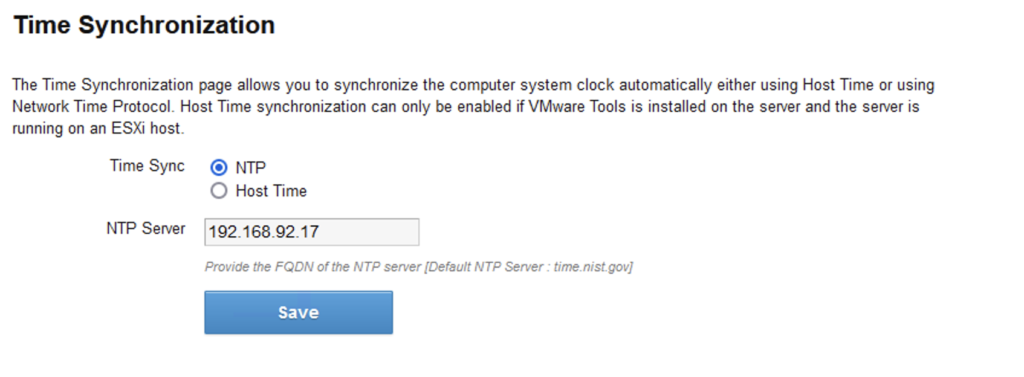
Click on Time Synchronization and add an NTP server.
At this point, the Workspace ONE Appliance is fully deployed and minimally configured, ready for integration. The rest of this post will describe administration of the appliance.
Installing VMware Workspace ONE Access Connector – Ramblings
A Windows Server is required and should already be joined to the domain. Review VMware documentation for more details on Windows Server requirements and compatibility.
I am also going to create a VMware Workspace ONE Access service account for the Kerberos Auth service (svc.wsoa-kerberos) since it has different password requirements. The following are the password requirements for the Kerberos service account.
! ( & % @ / = ? * , .
The ‘#‘ symbol is also not supported in version 22.09.1.0.
I found that the the only way to install the connector and have the services stay running is by adding the domain user account that is going to be used to install the connector to the local computer Administrators group. Add the account even if the account is in a nested Security Group.
Additionally, for this example, the the certificate I used for the Workspace ONE Access appliance included the Windows Server in the Subject Alternative Name (SAN), so I am just going to reuse that certificate. Otherwise, a trusted TLS certificate is required for the Kerberos Auth service. This can be configured after the connector is installed, but I think it is easier to
Ok…enough rambling…let’s get to it, already!
Download the VMware Workspace ONE Access Connector
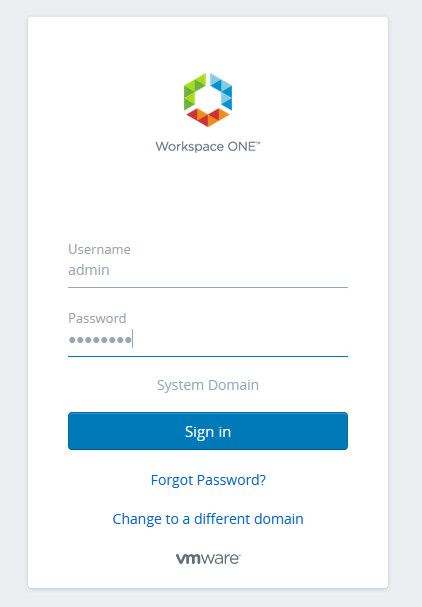
Navigate to the Workspace ONE Access appliance and log in with the admin account from the System Domain.
Navigate to Integrations > Connectors and click New.

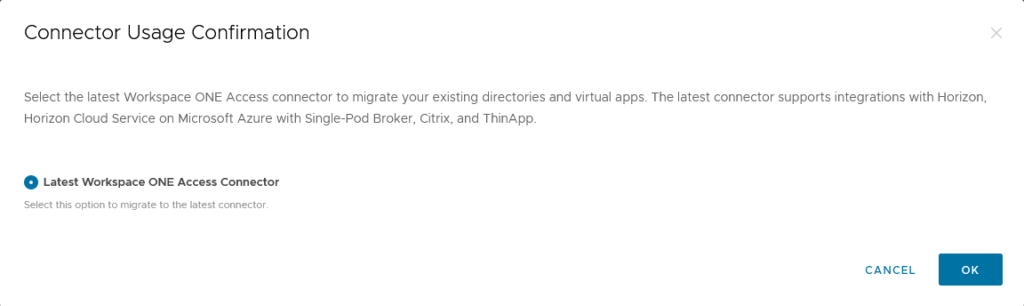
Click OK on the Connector Usage Confirmation window.
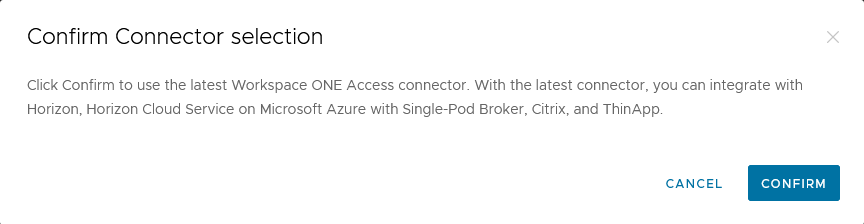
Click OK on the Confirm Connector selection window.
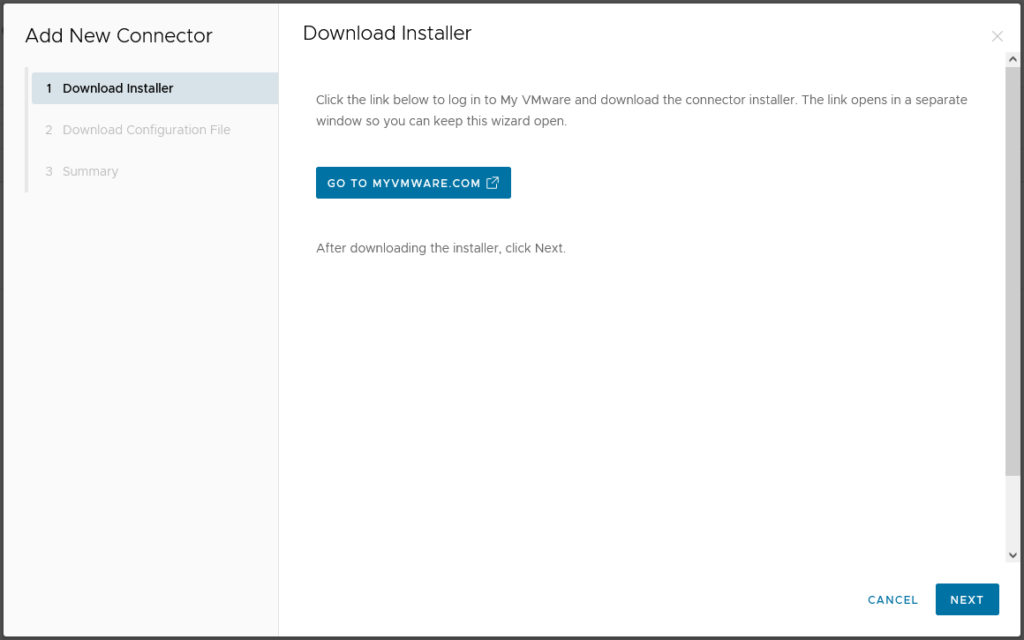
The Add New Connector window opens. If you have not already downloaded the connector installer, click on the link to Go To MyVMware.com.
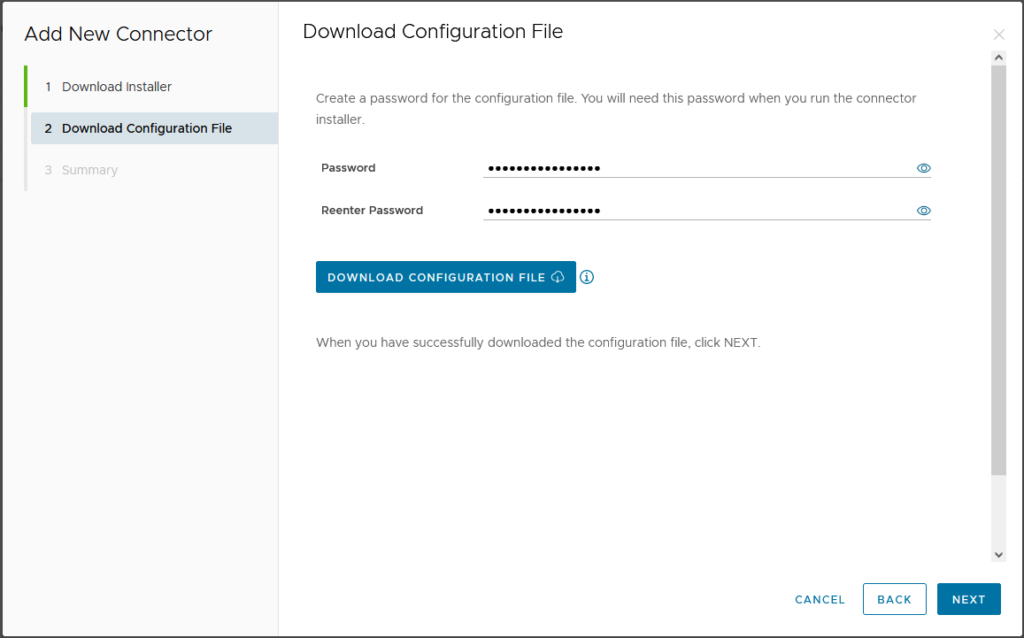
On the Download Configuration File page, create a password following the guidance below and then click Download Configuration File.
The password must have a minimum of 14 characters and include at least one number, one uppercase character, and one special character. Only the following special characters are allowed:
@ ! , # $ { } ( ) _ + . < > ? *
All characters must be visible, printing ASCII characters.
On the Summary page, click Close.
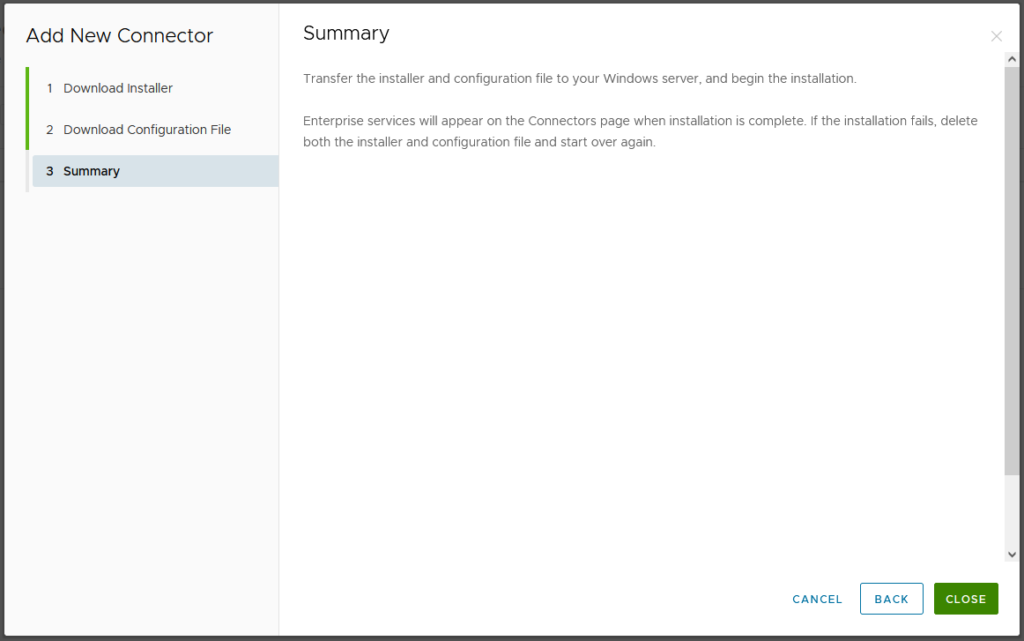
Transfer the installer and configuration file to your Windows server to begin the installation.
Install the VMware Workspace ONE Access Connector
ref: https://docs.vmware.com/en/VMware-Workspace-ONE-Access/22.09/ws1_access_connector_install/GUID-62084B58-850F-4688-BECF-C8EA594C688D.html
All of the services can be installed on a single Windows Server or distributed. For this example, I am using a single Windows Server.
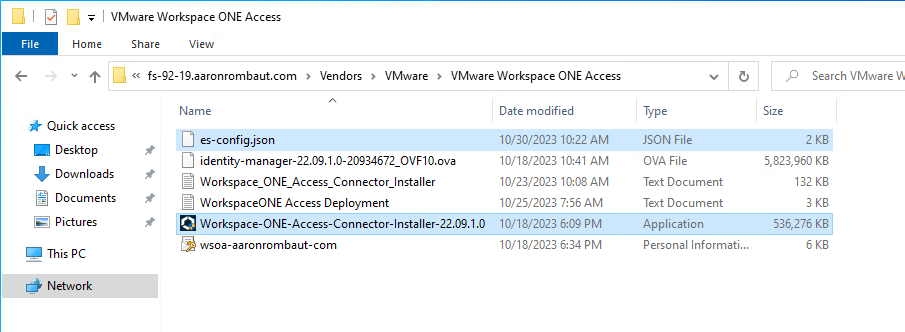
On the Windows Server designated for the WS1 Access Connector, add the installer and configuration file into the same directory.
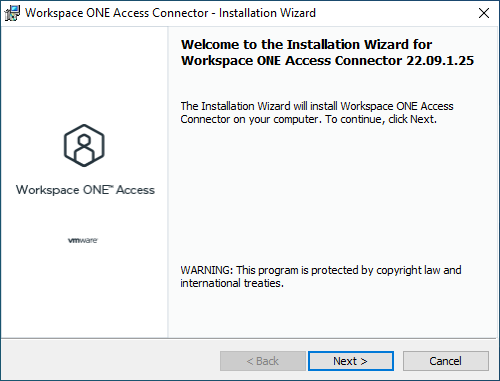
Double-click the WS1 Access Connector installer file to begin the installation.
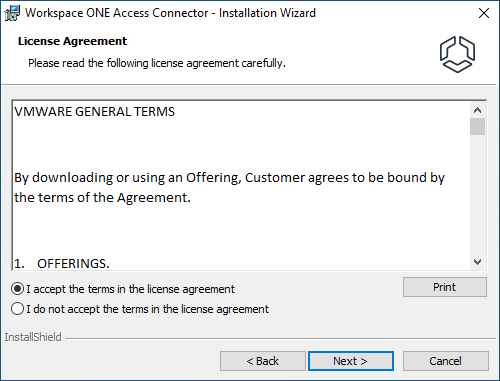
Select I accept the terms in the license agreement and click Next.
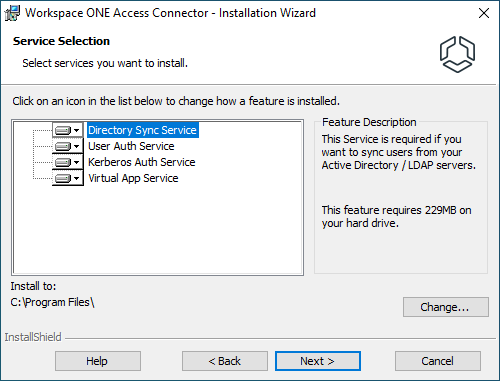
Review the following services and deselect services as necessary. I am going to install all the services on this server, so I am going to leave the defaults.
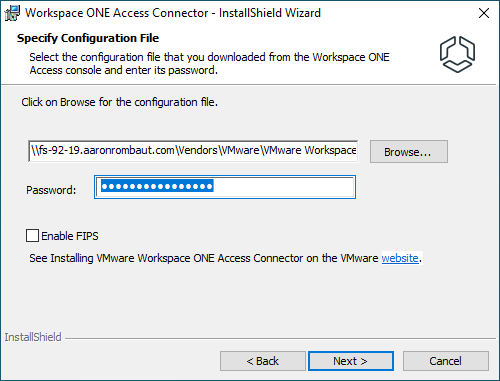
If the es-config.json file is in the same directory, the installer should pick it up automatically. Otherwise, navigate to where the file was downloaded. Provide the password that was used when creating the file.
Note: Do not enable FIPS — Workspace ONE Access connector in FIPS mode is supported with Workspace ONE Access FedRAMP tenants only. Other types of tenants and on-premises Workspace ONE Access installations do not support the connector in FIPS mode.
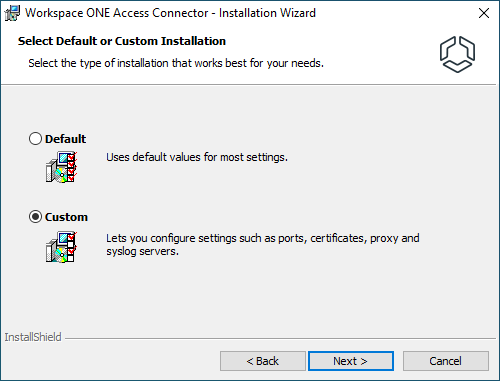
Select Custom installation.
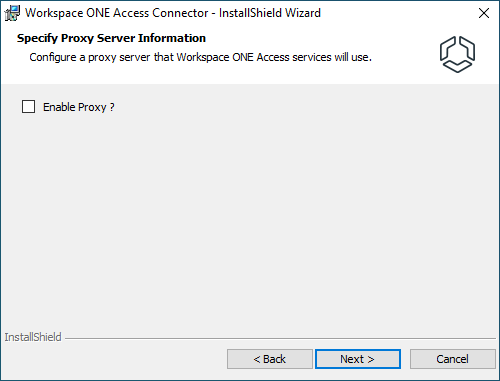
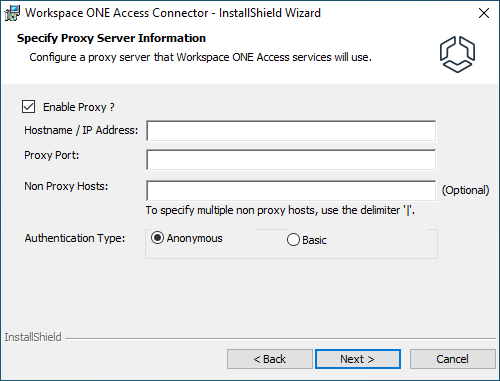
Select Enable Proxy? if required. I will show both windows, here, but I am not enabling the Proxy in my lab.
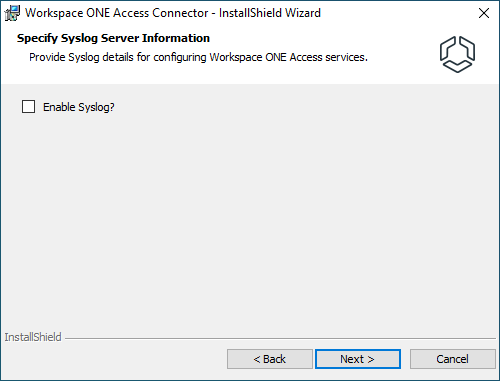
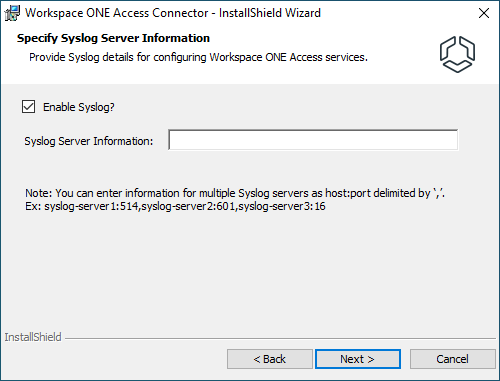
Select Enable Syslog? if required. I will show both windows, here, but I am not enabling the Syslog in my lab.
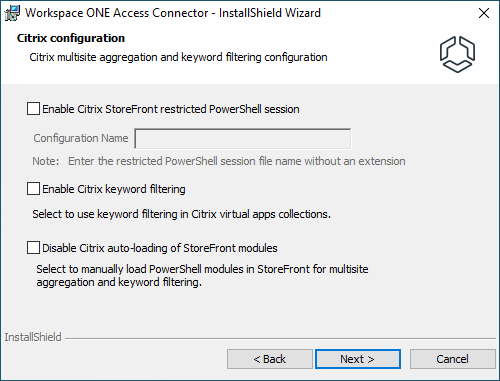
On the Citrix configuration page, select the options that apply to your scenario. I do not have a Citrix configuration to use, so I will leave the options de-selected.
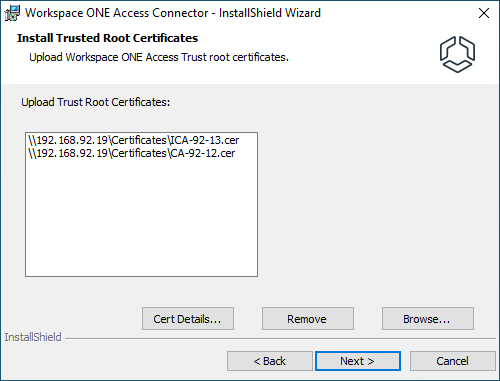
On the Install Trusted Root Certificates page, click Browse… and add intermediate and root certificates that signed the WS1 Access Appliance certificate.
I am leaving the default ports set.

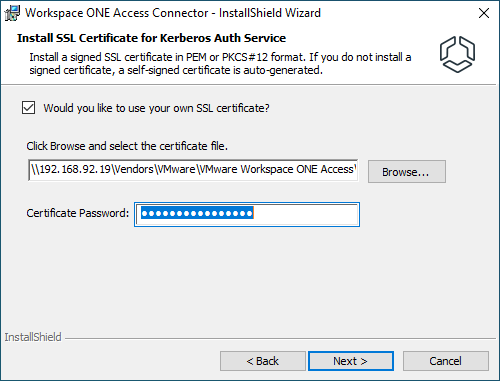
On the Install SSL Certificate for Kerberos Auth Service page, select Would you like to use your own SSL certificate? I included this server’s Distinguished Name (DN) in the Subject Alternative Name (SAN) of the certificate I am using for the WS1 Appliance.
Browse to the certificate and provide a password, if necessary.
This next step is a little kludgy. I find it easiest to click Browse… and type in the Domain or server, then click Browse for the User name. Mileage may vary, however, depending on the environment.
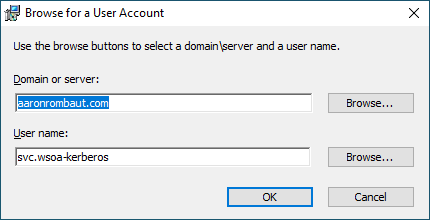
Add the password for the service account.
The Kerberos Auth service only supports the following special characters in the domain user account password:
! ( & % @ / = ? * , .
If the password contains any other special characters, Kerberos Auth service installation fails.

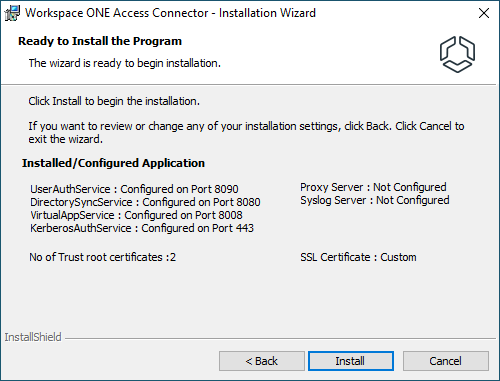
Review the Ready to Install the Program page. When ready, click Install.
After a short time, the installer will complete.
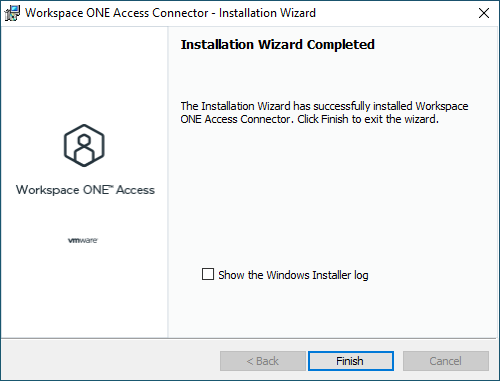
After the Installation Wizard Completed window shows, click Finish.
At this point, it’s a good idea to check the running services. I went with a consolidated installation, so all the services are on the same server. The services that get installed are:
- VMware Directory Sync Service
- VMware Kerberos Auth Service
- VMware User Auth Service
- VMware Virtual App Service
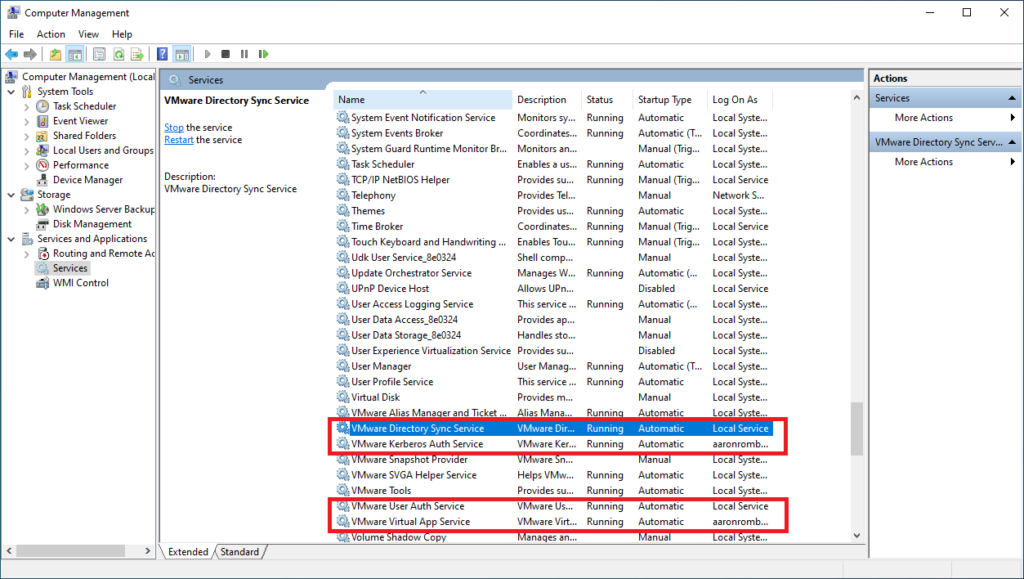
If you find that the services are installed, but not running, check that the account used to run the installer is added to the local Administrators Security Group prior to installing the software. This is the only way I have found to install the connector and the subsequent services and have them running after completion.
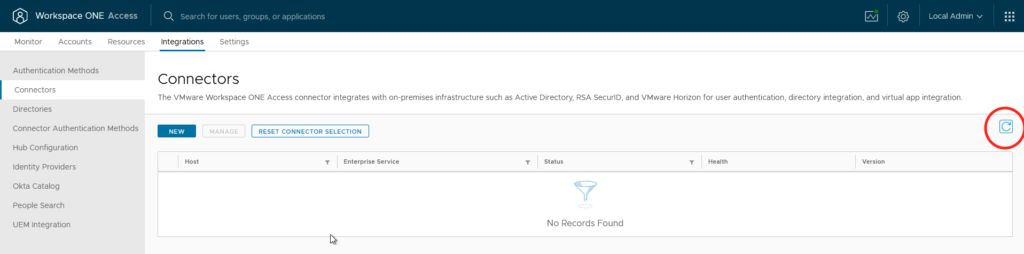
Next, we need to check WS1 Access to see if the services are communicating to the appliance. Log back into the WS1 Access console and navigate to Integrations > Connectors. Click the refresh icon if there are no connectors present.
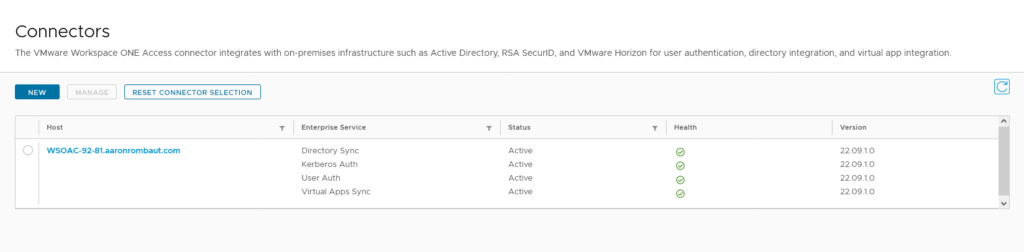
Once the page is refreshed, there should be a connector with a list of the installed services and they should all be healthy as indicated by the green check marks in circles.
At this point, Workspace ONE Access and the Workspace ONE Access Connector are fully installed and configured. The next sections will explain how to integrate Active Directory, configure Certificate based authentication (for use with Smart Cards or PIV), and integrate VMware Horizon.
Integrate Active Directory
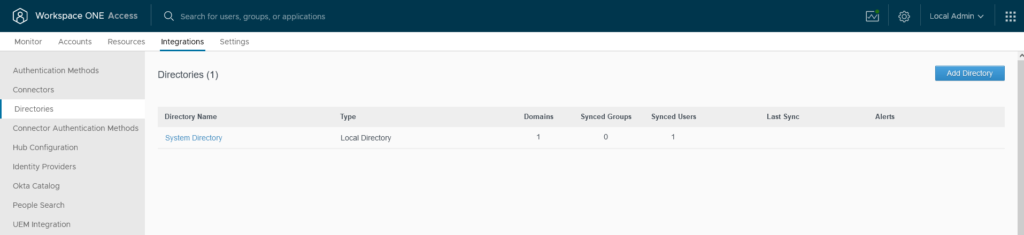
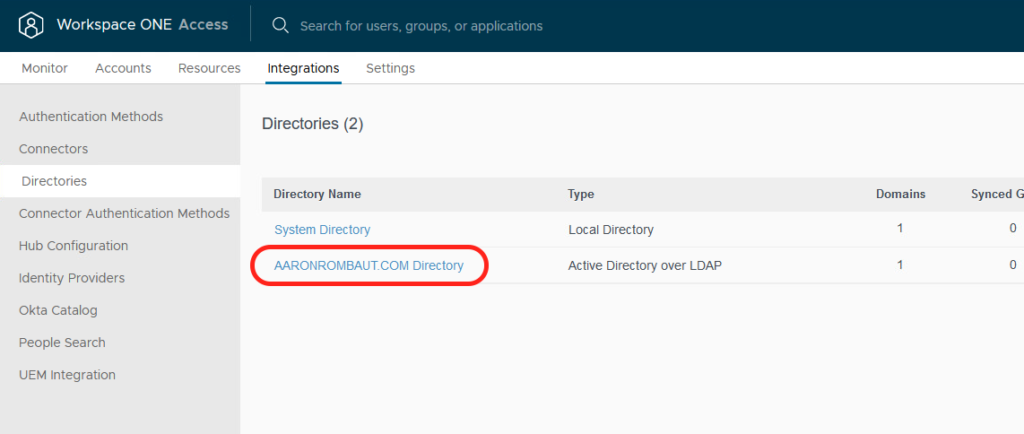
In Workspace ONE Access (WS1 Access), navigate to Integrations > Directories.
Click Add Directory > Active Directory.
Provide a Directory Name and make sure Active Directory over LDAP is selected. The Directory Name setting is metadata only and does not get used in making the connection to the directory. Leave all of the other settings at their default value.
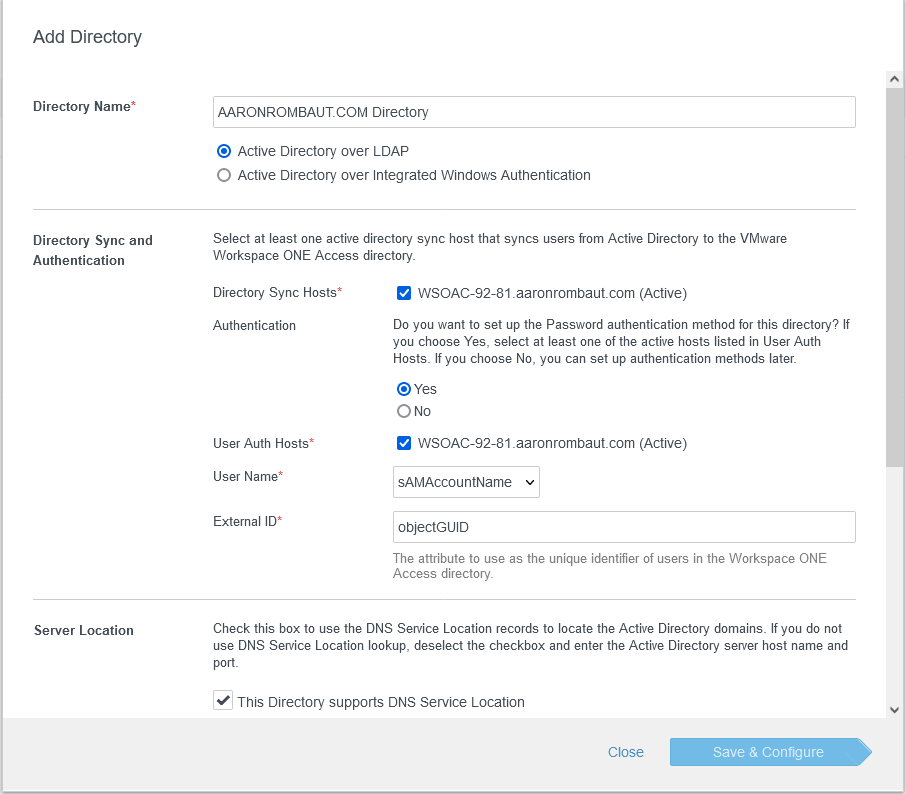
Scroll down and select STARTTLS required for all connections. Add the Intermediate and Root certificate for the domain controllers in the domain.
Add the Base DN, Bind User DN, and Bind User Password for the LDAP account that can search for users. I use a service account (svc.wsoa-ldap) for this.
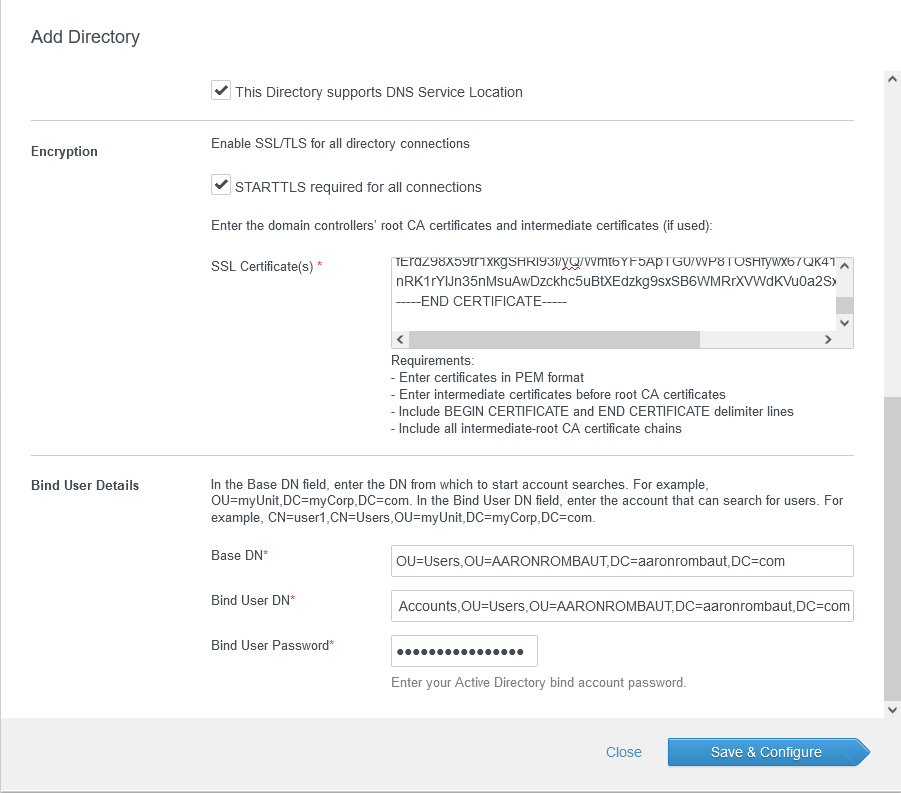
When all the necessary information is added, click Save & Configure. If all the settings are correct, you should see a few message boxes pop up and fade away.
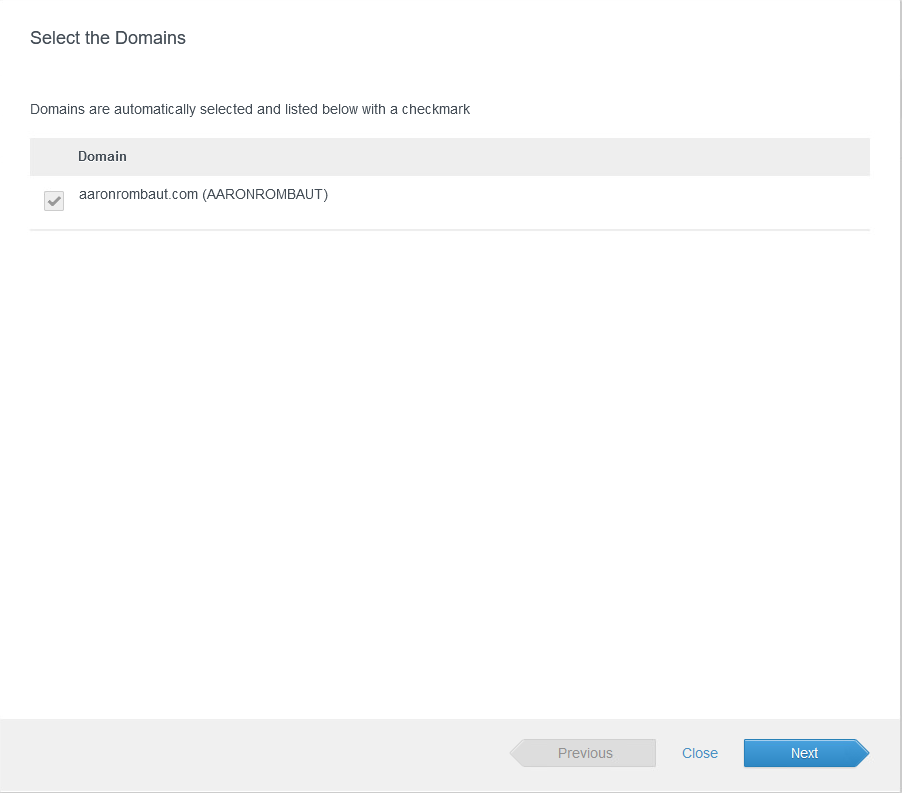
On the Select the Domains page, verify the correct domain is selected and click Next.
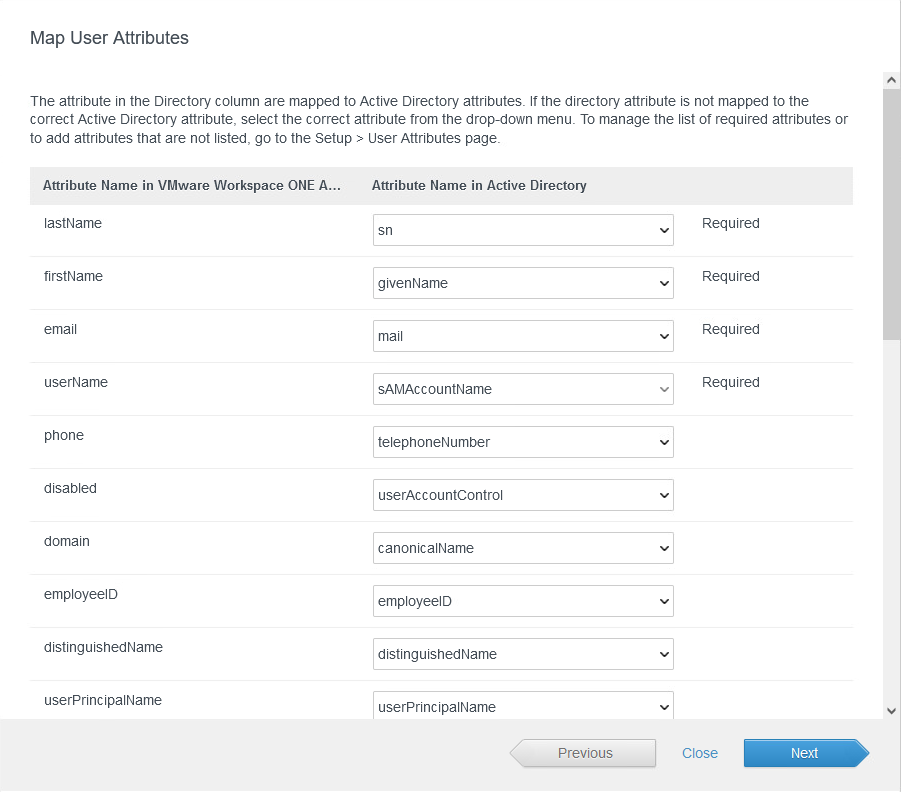
On the Map User Attributes page, notice that the top four attributes are required! This is important to note because if these attributes are not populated in Active Directory for users, they will not sync.
Adding the required attribute information does not need to be completed at this moment, but will need to be completed after the initial sync so that they will sync to WS1 Access, later.
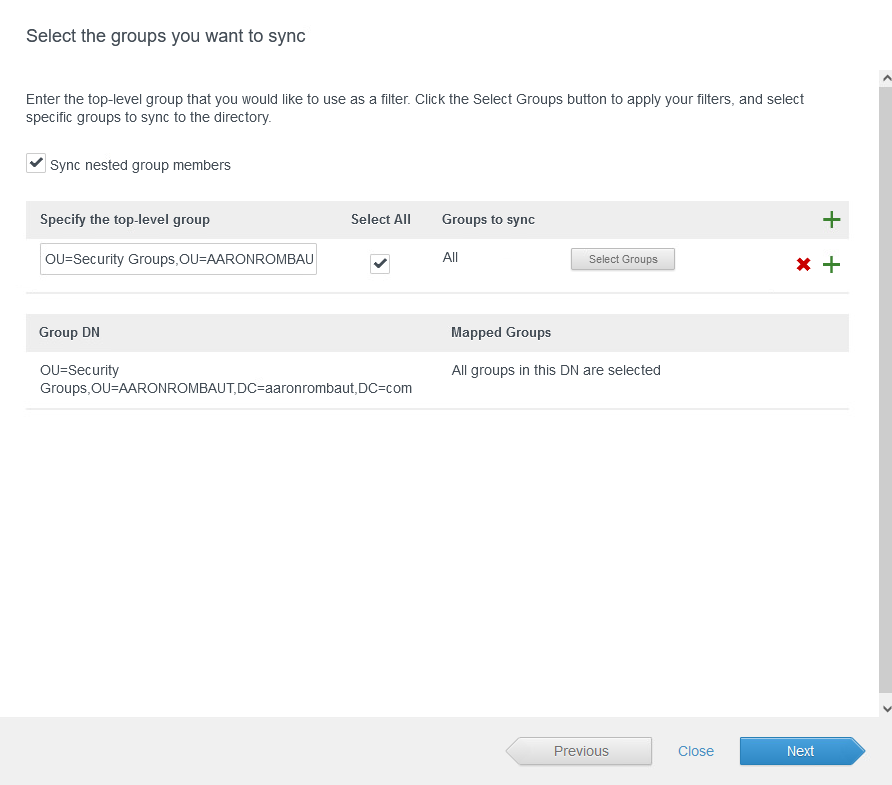
On the Select the groups you want to sync page, add the DN for the top-level group from Active Directory and click the green plus on the same line. Select the checkbox to Select All. This will select all nested groups in Active Directory. Alternatively, click Select Groups and select the groups to sync.
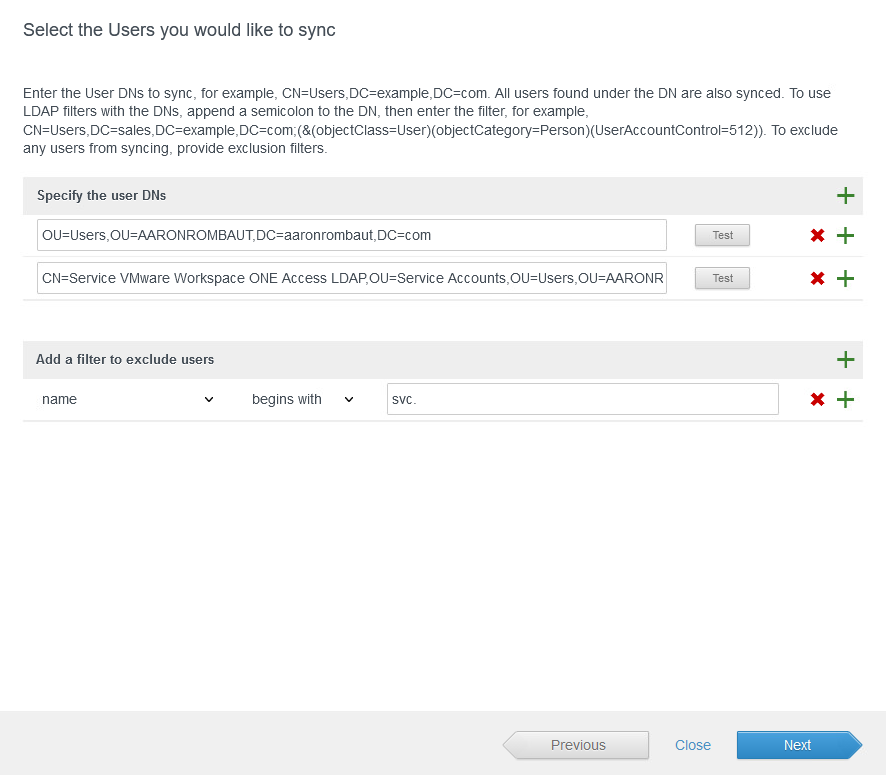
On the Select the Users you would like to sync page, click the green plus on the Specify the user DNs line. Add the DN for the top most level in active Directory and click Test on the same line. This is where user searches will start. Any users not at this level or below will not be found and therefore, not synced.
If there are special accounts, like service accounts, that should not be synced, click the green plus on the Add a filter to exclude users line. I am going to add my service accounts as they should not be synced to WS1 Access.
Set the Sync Frequency accordingly.

When ready, click Sync Directory. A few messages should pop up. If they close before being able to ready them, they basically state that a sync is taking place and you can monitor the progress by viewing the sync log.

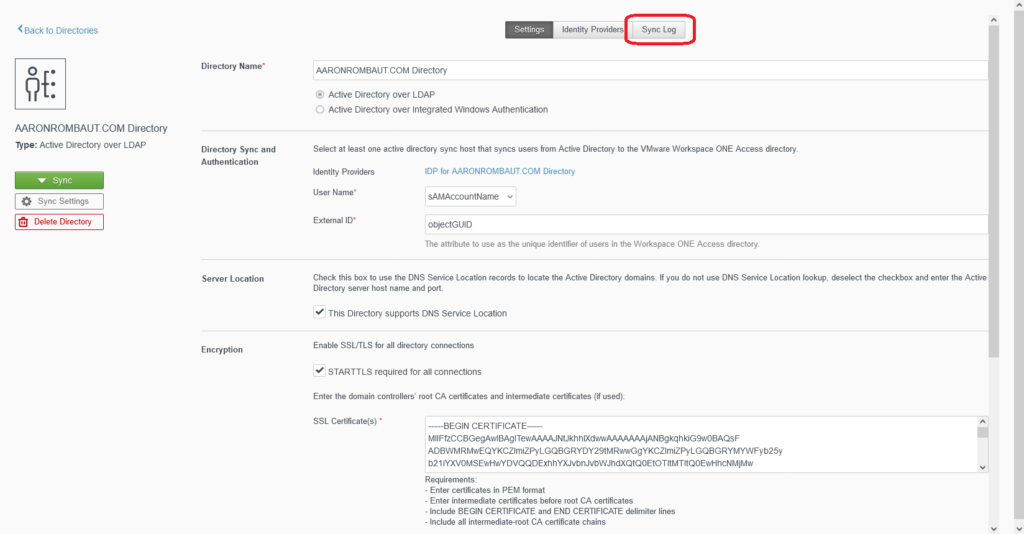
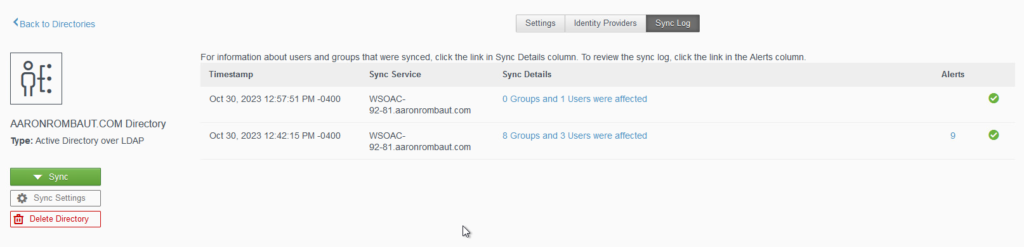
To get to the sync log, click on the link for the directory that was just added.
Click Sync Log to see the progress of the sync.
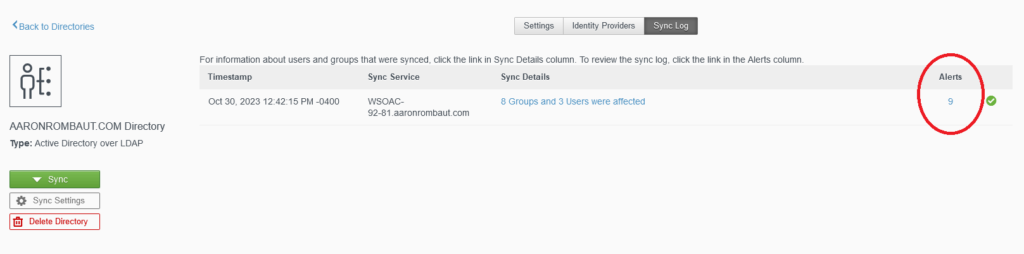
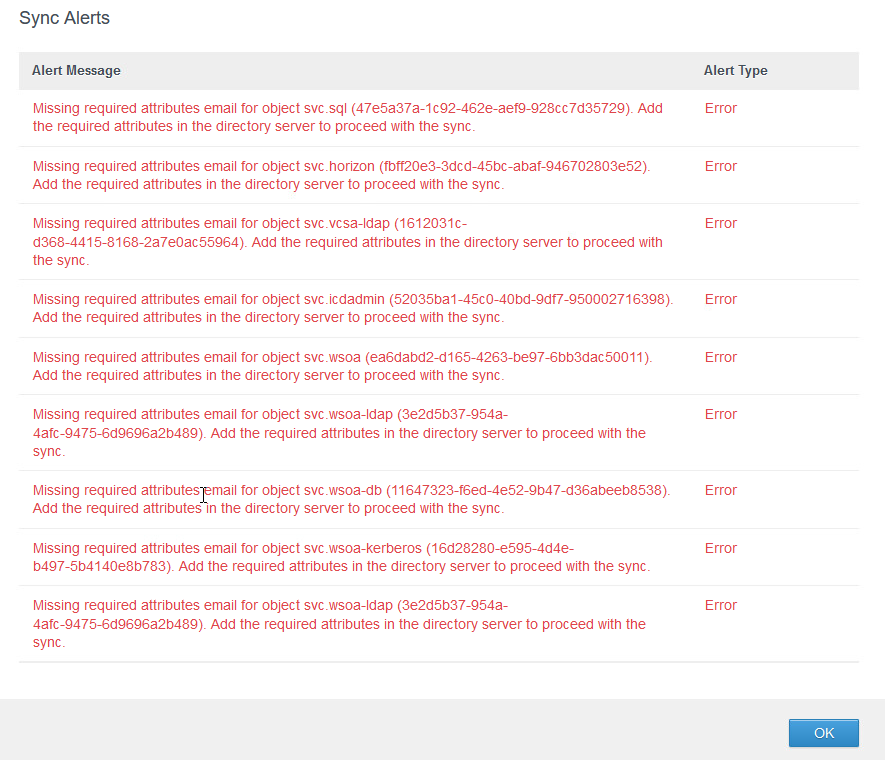
In my lab, notice in the example screenshot that I have alerts. Click the link to view the alerts. Some may be cleared by adding missing information or filtering out users that are not necessary.
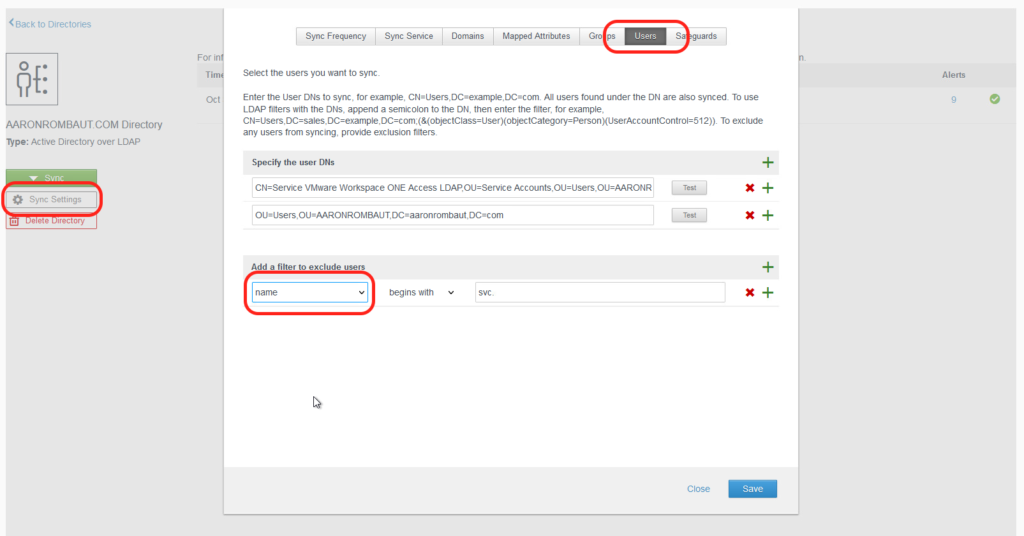
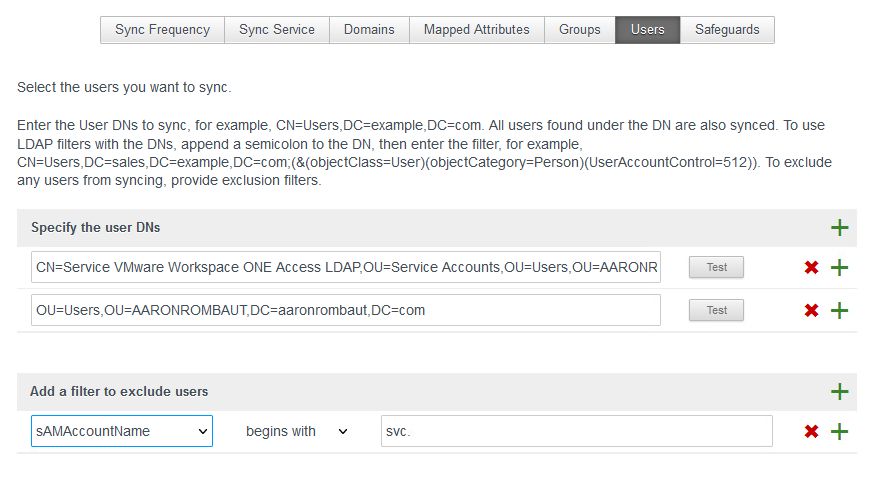
If there are users that are syncing, like my service accounts above, click Sync Settings > Users. In the case of this example, I used the wrong attribute. Notice in the following screenshot, my filtered attribute is set to name. I need to change this to sAMAccountName since I use a standardized format for my service accounts (svc.<name>). The begins with filter is still appropriate since I want to exclude any accounts beginning with svc.
When configured as desired, click Save and Close. Run a new Sync by clicking the green Sync button.
This time, the Sync has no alerts and shows that 1 User was affected.
At this point, Active Directory is configured and will sync according to the schedule that was set. If accounts or groups seem to be missing, check the DNs in the Sync Settings and run a new Sync. In the next section, we will look at the users and groups that were synced.
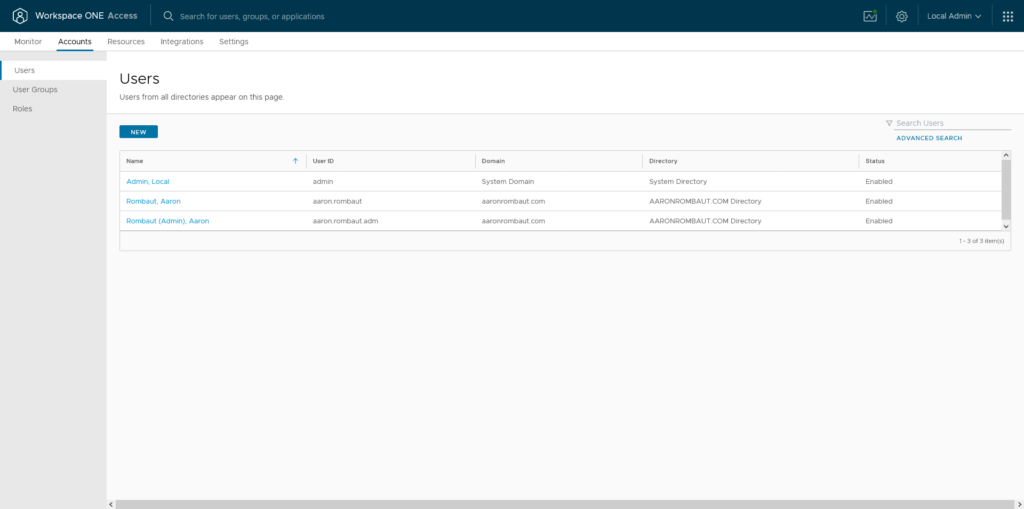
Review Synced Users and Groups
Log in to Workspace ONE Access console and navigate to Accounts. This view will show synced Users.
Click User Groups to see Synced Groups.
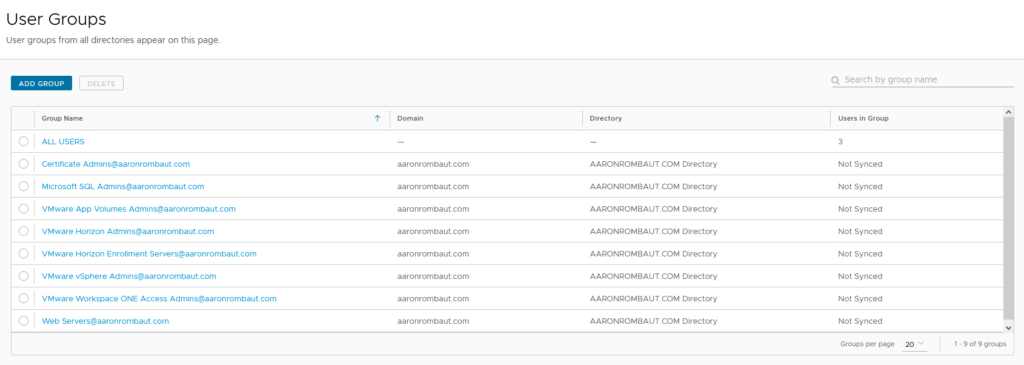
Notice that the Users in Groups shows Not Synced. Click on a group that you want populated. In the next example, I want to assign a Super Admin role to the VMware Workspace ONE Access [email protected] User Group, so I need the users Synced. Click the Users tab and then click Sync Users.
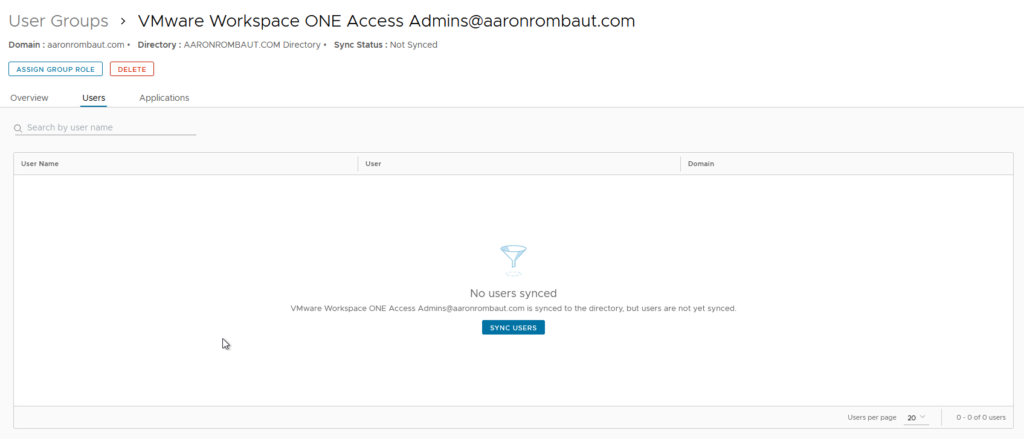
Click Refresh.
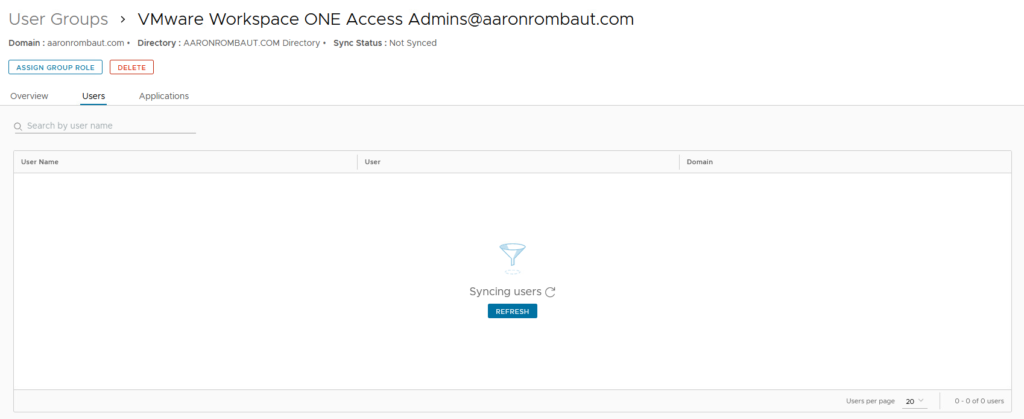
Notice that the group now has users synced.

Assign Roles to User Groups
Navigate to Accounts > Roles. Select the radio button for the role to assign the group to.
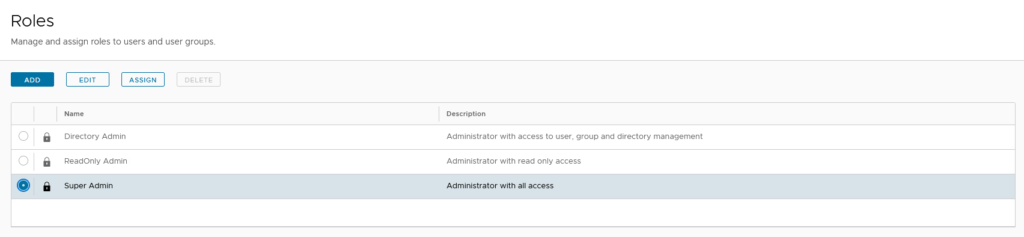
Click Assign.
Start typing the name of the Security Group. If it is not found, review the Sync Settings for the Directory and re-sync the directory, then sync the users in the group.
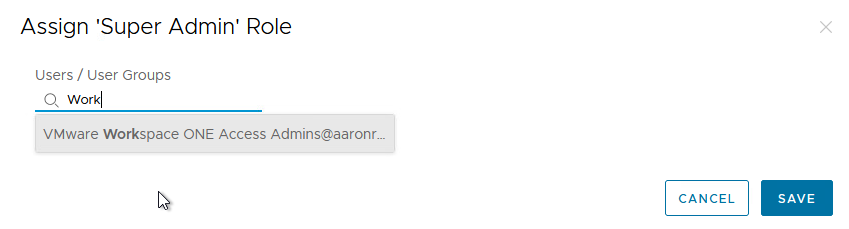
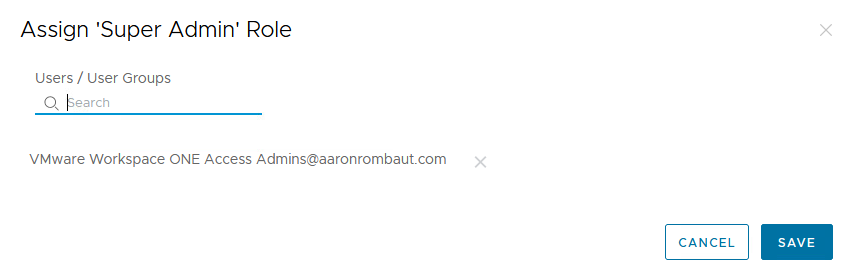
Choose the Security Group and click Save.
To verify the assignments for the role, select the Role and click Assign.
Configure Certificate Based Authentication
Enable the Authentication Method
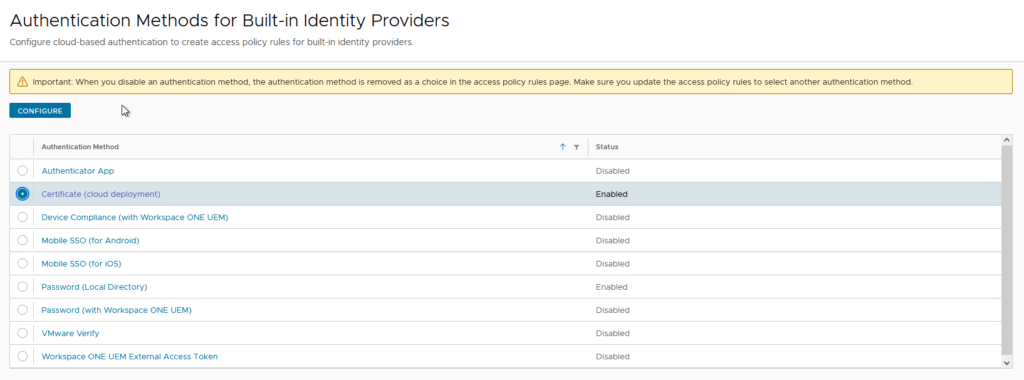
Log in to Workspace ONE Access console and navigate to Integrations > Authentication Methods.
Select Certificate (cloud deployment) and then Configure.
Toggle the Enable Certificate Adapter to say Yes.
Add all root and intermediate certificates that may be used for user authentication. This has to be accomplished one file at a time, unfortunately.
Select upn | subject from User Identifier Search Order. Leave Validate UPN Format toggled to Yes.
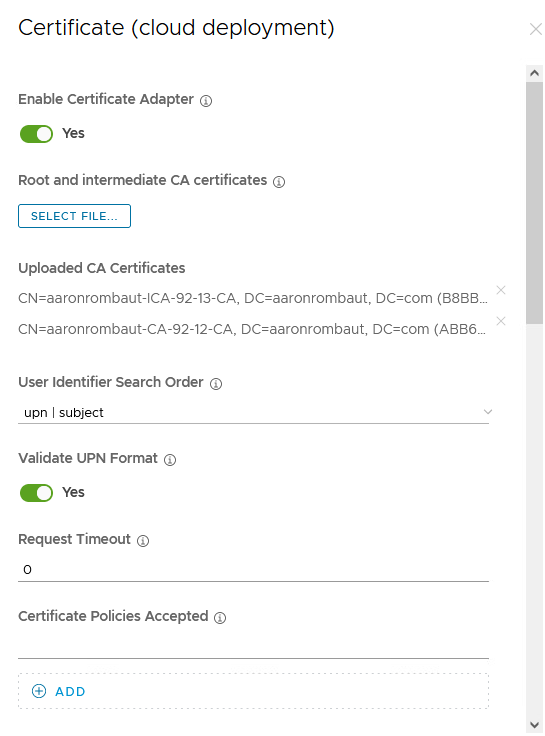
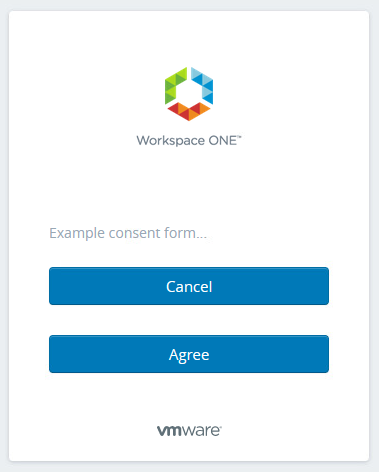
Toggle Enable Consent Form before Authentication to Yes and add any necessary verbiage to the Consent Form Content textbox.
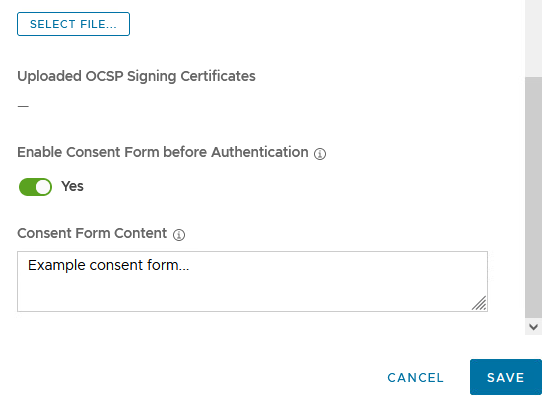
After enabling this Authentication Method and loading certificates, the appliance must be restarted! Smart card authentication will not work without this configuration step!
Modify the Identity Provider to include the Certificate (cloud provider) Authentication Method.
Navigate to Integrations > Identity Providers. Click on the link for the Identity Provider that is used with the Smart Cards or PIV.
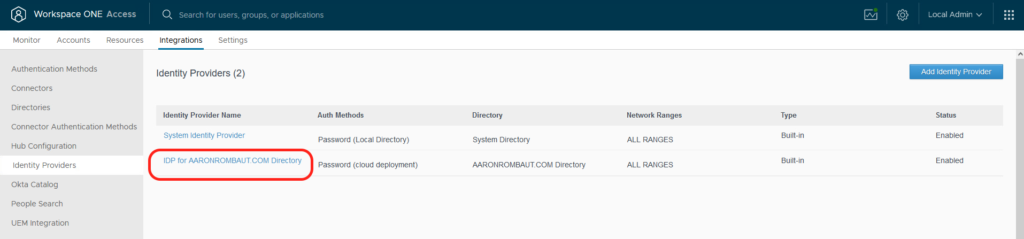
Under Authentication Methods, select the check box for the Associate Authentication Method.
Ensure ALL RANGES is selected under Network.
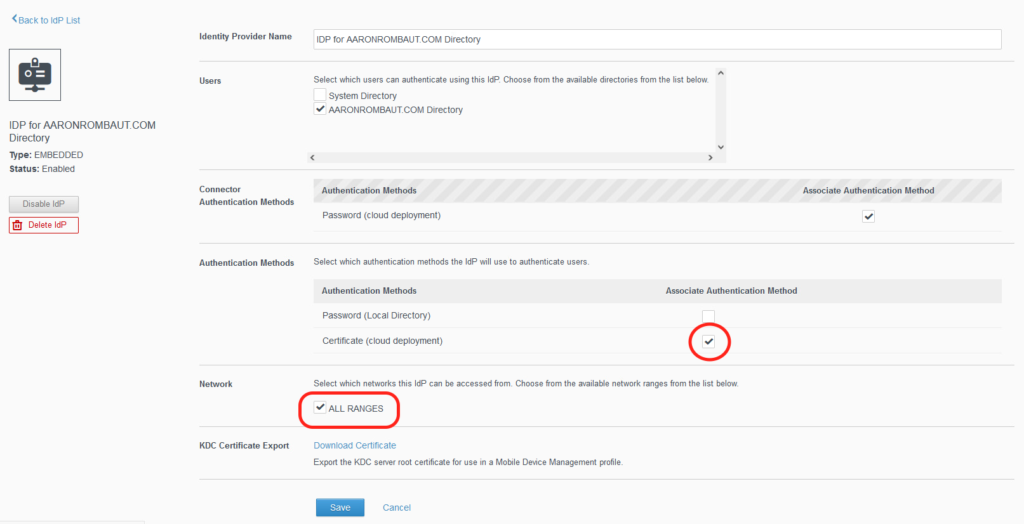
Click Save.
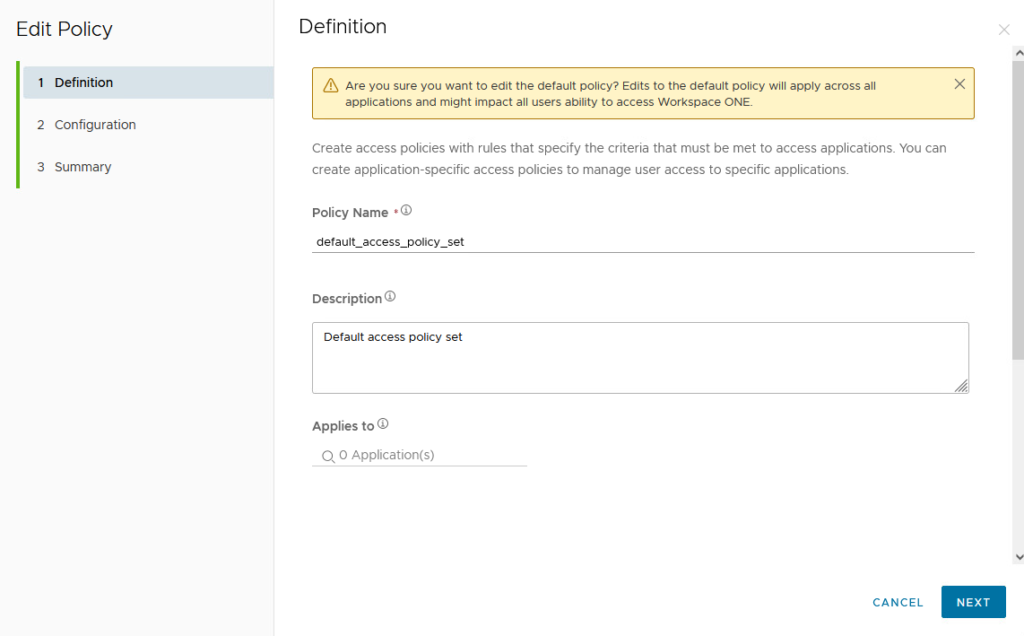
Modify the Default Access Policy
Navigate to Resources > Policies and click on default_access_policy_set.

Click Edit.
Click Configuration. Click ALL RANGES on the Web Browser line.
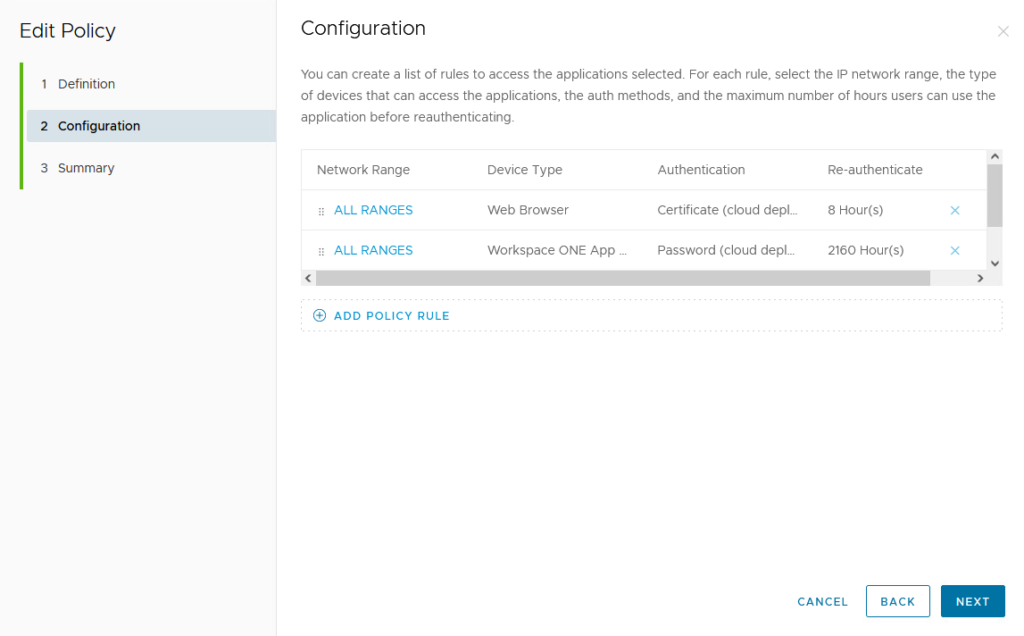
Add Certificate (cloud deployment) as a secondary authentication method. Add Password (cloud deployment) as a tertiary authentication method. Ensure the Password (Local Directory) is set as the last option. Refer to the following screenshot if necessary.
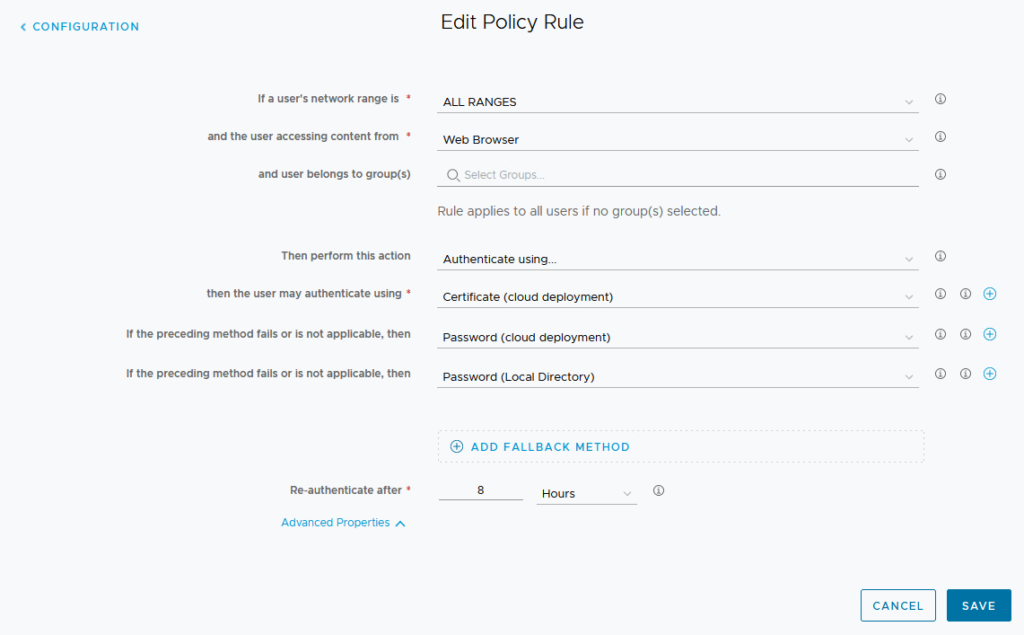
Click Save, then Next, and finally, Save again.
As long as the appliance was restarted after adding the certificates, the Super Admin role was assigned to a User Group that was synced (users are populated), it should be safe to log out of the appliance as the Local Admin and log back in as a member of the User Group that was assigned. This time, the browser (also assuming this is configured for Smart Card or PIV, correctly) should prompt for a user token to authenticate with. If the browser is still not prompting for a token, try to clear the browser cookies or open a private window. There is likely an authentication cookie that is cached.
The following screenshot shows the Consent Form that we configured for the Certificate (cloud deployment) authentication method.
The following screenshot indicates that our Directory sync is configured correctly and is being recognized.
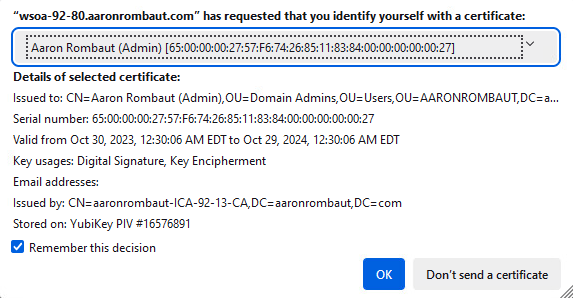
Being prompted for a certificate indicates that the Certificate (cloud deployment) authentication method is configured correctly.
Integrate VMware Horizon
This assumes that there is an already configured and established VMware Horizon environment and True SSO has been configured. Review the links provided for reference if necessary.
Navigate to Resources > Virtual Apps Collections. Click New.
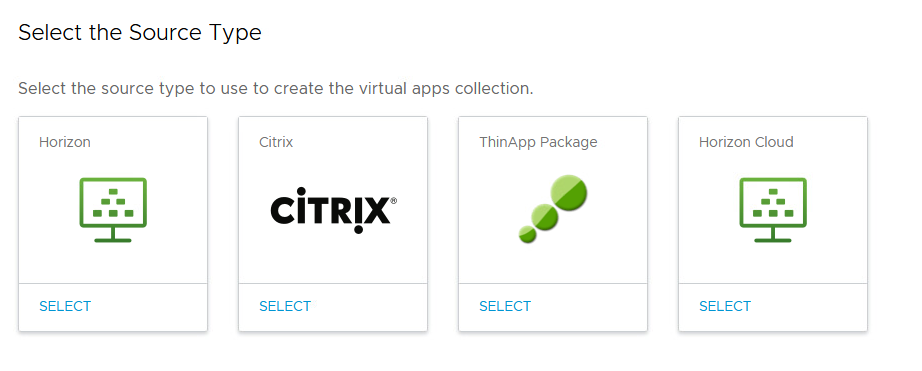
For this example and for my lab, I am using VMware Horizon. Click Select under the Horizon source.
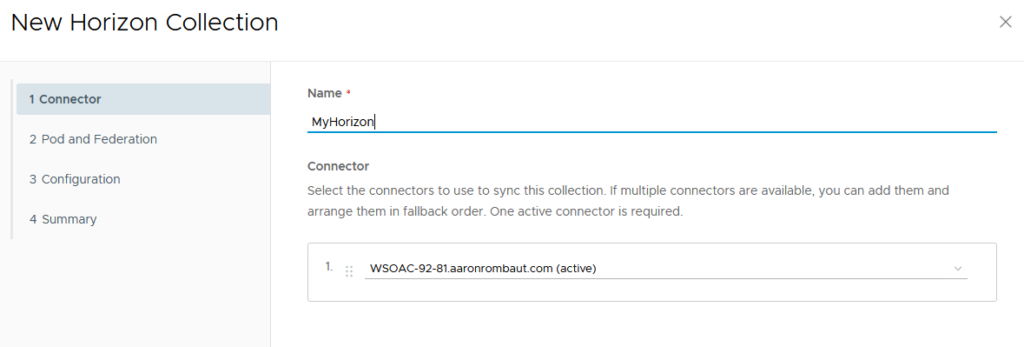
Provide a Name. This is a metadata field and is not passed along. I only have one connector, but if you have numerous connectors, you can specify the connector to use.
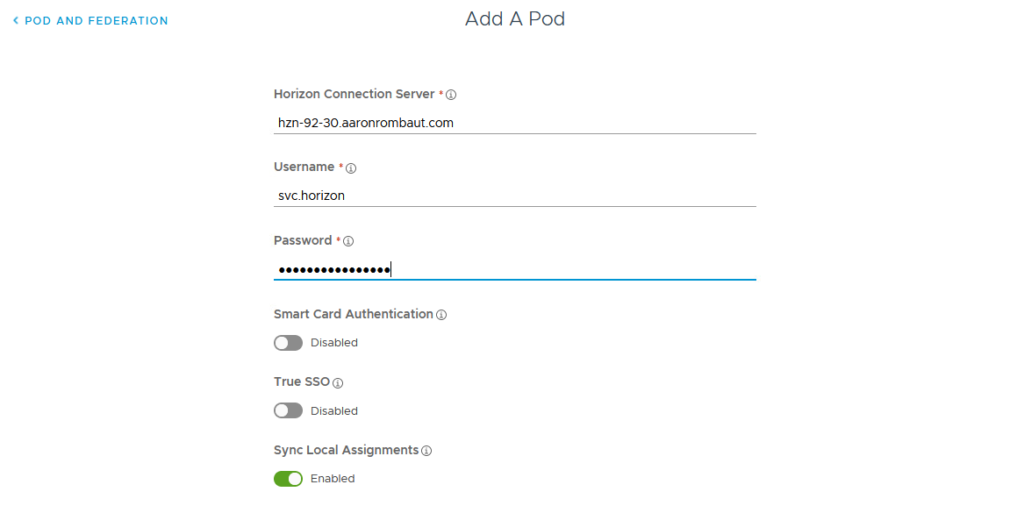
On the Pod and Federation tab, click Add a Pod.

On the Add a Pod page, add the Horizon Connection Server for your environment. It is recommended to have a purpose-built Horizon Connection server or servers built for this purpose. Provide an appropriate Username and Password. Be sure the account used can already log into the specified Horizon Connection server or add the account to a security group that has a Horizon Admin role.
Enable Smart Card Authentication and True SSO.
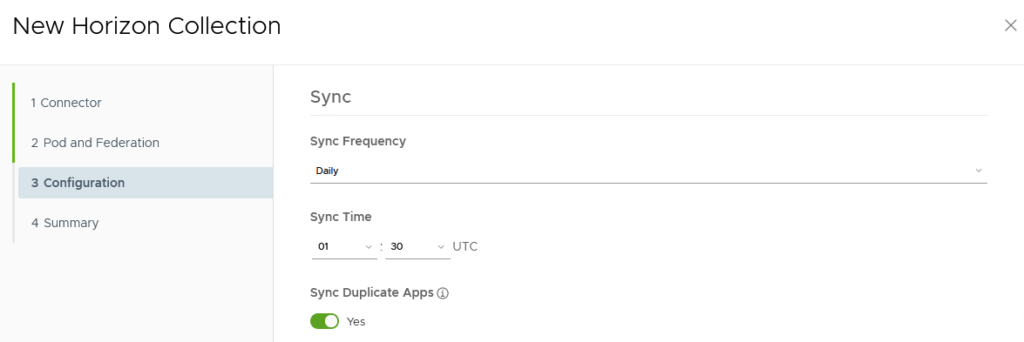
Click Next and modify the Sync Frequency, if necessary.
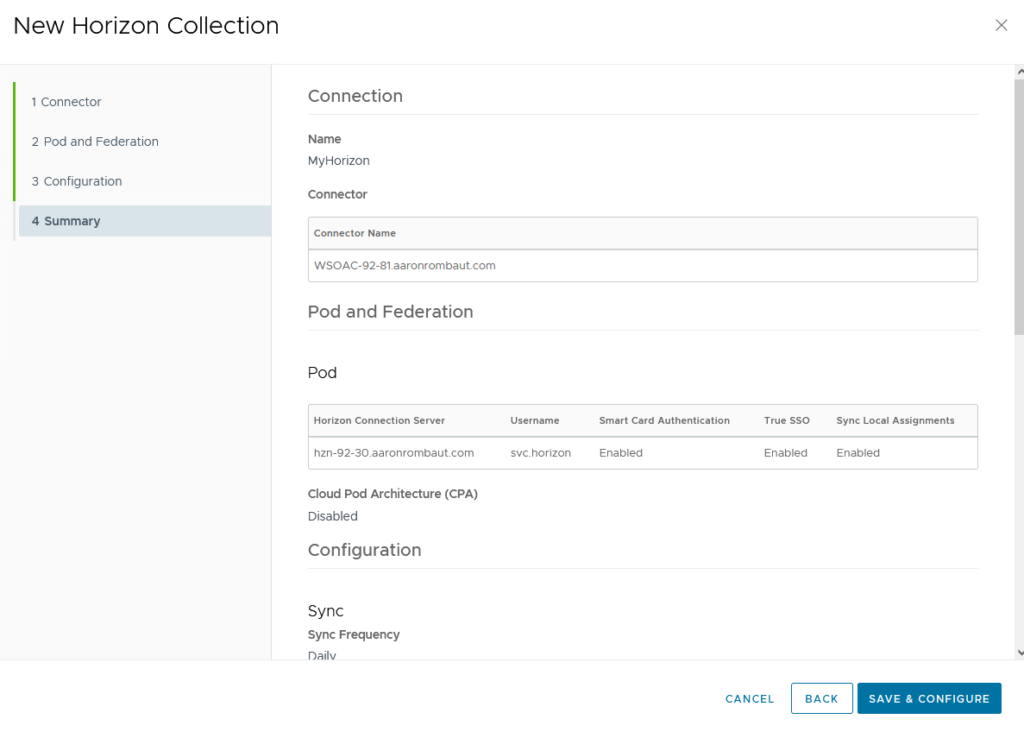
Click Next, review the Summary page, and when ready, click Save & Configure.
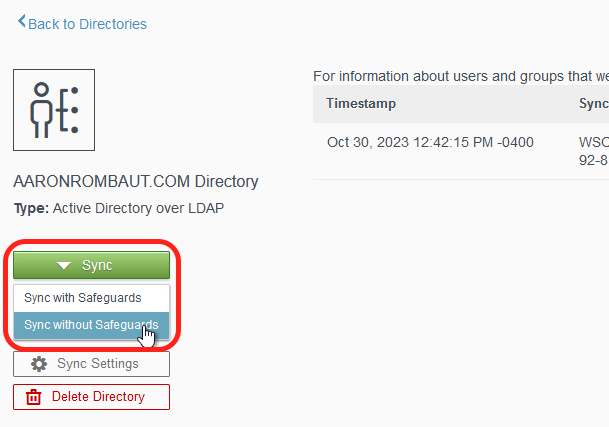
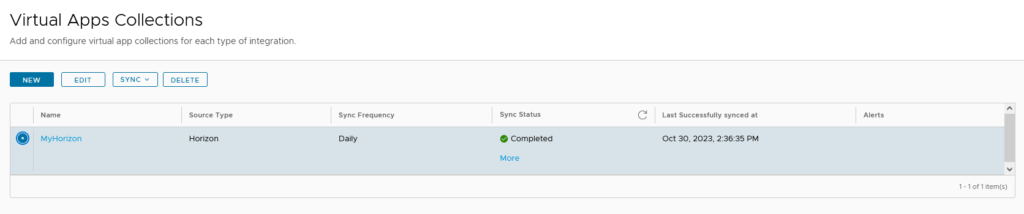
Back on the Virtual Apps Collections, page, select the collection that was just added and notice the Sync Status. If necessary, click Sync > Sync without safeguards. The Sync Status should change to Started.

Refresh the column to see the updated status.
Navigate to Resources > Virtual Apps.

This table will show all the resources (Published Applications and Desktops) from VMware Horizon. The entitlements will carry forward from VMware Horizon. They are not assigned here in WS1 Access.
You can add Categories to help organize the resources. If a category does not already exist, select the Categories field and type in the desired Category name. When set, click Add Category <name of category>.

As an end user, log into Workspace ONE Access and verify that you can log in. Also verify that the expected published applications or desktops are visible. If using a Smart Card or PIV, VMware Horizon HTML Access cannot be used. The Horizon Client must be installed on the computer the end user is planning to use.
Leave a Reply