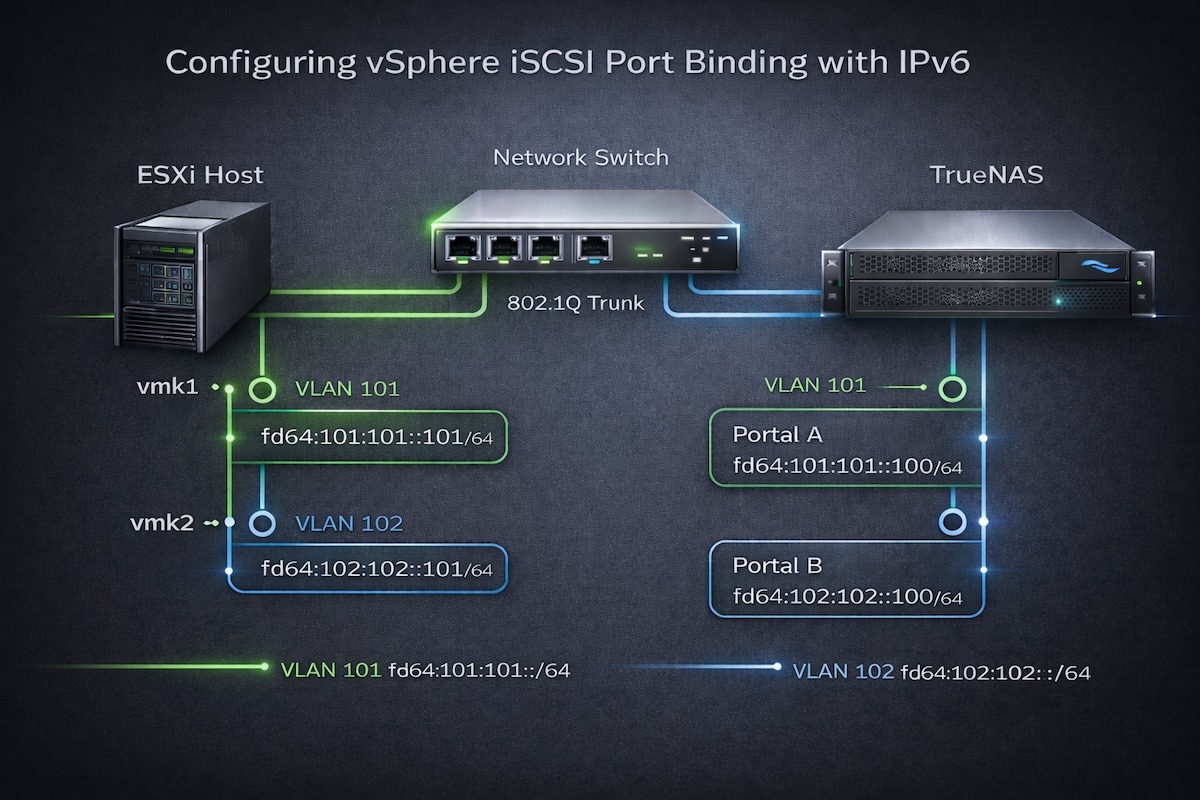
Building a Nested ESXi Lab for VMware Cloud Foundation (VCF) (updated 2023-Dec)

Introduction

The following post is very long and will contain updates as the technology changes and I figure out better ways to accomplish these tasks. VMware Cloud Foundation, or VCF, requires at least four nodes for the Management Domain. Unfortunately, I do not have hundreds of thousands of dollars for physical hardware to test and learn VCF.

Since this is a nested lab, there are a few things that will need to be set up to make this work. These items, in particular networking, have to be configured in a way to allow the nested virtual machines to communicate. This is not applicable in production where the physical hosts are cabled into Top of Rack switches.

Continue reading “Building a Nested ESXi Lab for VMware Cloud Foundation (VCF) (updated 2023-Dec)”

Changing the Primary Network Identifier (PNID) on vCenter

Preface

This has been occurring to me a lot lately. vCenter gets deployed and configured with a hostname. You are likely not giving it much thought until later when a particular situation arises. When it’s time to upload Transport Layer Security (TLS) certificates and you receive the following warning, “Error occurred while fetching tls: Invalid input certifcate : The Subject of the provided certificate does not contain the correct CN value”

I find that this is caused by the case-sensitive nature of the VMware vCenter Server Appliance (VCSA) and the Common Name (CN) in the certificate. When vCenter is deployed, if a lowercase hostname is provided (my personal preference, now), i.e. vcsa.aaronrombaut.com, the request for the certificate, the Certificate Signing Request (CSR), should also use the lowercase fully qualified domain name (FQDN). The idea is that the case needs to match, lowercase host name needs to match a lowercase CN and the opposite applies as well. An uppercase host name needs to match an uppercase CN.

The Fix

It’s ok if this situation occurs and you have two choices, really. If this is a brand new deployment, it may be easier to redeploy the VCSA and pay attention to the step when the host name is being applied. If this doesn’t apply and you just want to fix it, then follow along…

Connect to the VCSA. Ensure SSH is enabled on the VCSA. You can enable this from the Virtual Appliance Management Interface (VAMI) (fqdn:5480) or by logging in to the appliance’s console.

Check the current value of the Primary Network Identifier (PNID) with the following command.

/usr/lib/vmware-vmafd/bin/vmafd-cli get-pnid --server-name localhost

Set the pnid value to the same name, but change the case with the following command, obviously changing the case as appropriate.

/usr/lib/vmware-vmafd/bin/vmafd-cli set-pnid --server-name localhost --pnid <pnid>

Reboot the VCSA by typing the following.

reboot

Get up and take a short break…

To verify the change, log into vSphere Client > Menu > Inventory. The VCSA name should now match the case you set on the command line. At this point, it should be safe to apply the TLS certificates without receiving a warning.

I have found that on newer vCenters, one more step needs to take place. This may be a new necessary step and it may even be safe to just apply, but I don’t have the time to install x versions of VCSA and test.

Log on to the vSphere Client and navigate to Home > Inventory > <choose a vCenter> > Configure > Settings > General > Edit > Runtime settings.

Change the vCenter Server Name and then click Save. Reboot the appliance.

You can now definitely install the TLS certificates!

Using PowerCLI in Smart Card Based Environment

ref: https://kb.vmware.com/s/article/67789

Problem

You work in a hardened environment and you don’t have an administrative username and password because you only have smart cards or tokens.

Resolution

According to VMware, this is expected behavior. Uh, what?

Workaround

According to VMware, “Use Windows SSPI to pass through the Windows logged session Smart Card credentials to PowerCLI to authenticate to vCenter.”

What does that even mean? That was a lot of words that didn’t really explain how to “work around” the issue. So, let’s break it down.

Windows SSPI is Security Support Provider Interface. More details can be found here, https://docs.microsoft.com/en-us/windows/win32/rpc/security-support-provider-interface-sspi-

The optimal way to address this is to have a dedicated workstation or server in the data center that you can log into with PowerShell and PowerCLI installed. Since you are hopefully logging in with your administrator token and your administrator account has either been given permission directly on vSphere or through a security group, then you should be able to just log into the server when you try to use Connect-VIServer (https://vdc-repo.vmware.com/vmwb-repository/dcr-public/85a74cac-7b7b-45b0-b850-00ca08d1f238/ae65ebd9-158b-4f31-aa9c-4bbdc724cc38/doc/Connect-VIServer.html). The credential of the currently logged on user, that’s you, will get passed along with the request.

VMware Authentication Proxy in a DoD Hardened Environment

If you work in IT in the DoD in any capacity, then you know your systems can be a pain to work with if you followed a Security Technical Implementation Guide (STIG). This can be even more of a pain when following a commercial vendor’s installation or configuration documentation, since they write in the general sense and can’t possibly know every quirk in our environment.

From the Windows Server 2016 STIG, (Finding ID: V-73691) the LAN Manager authentication level must be set to send NTLMv2 response only and to refuse LM and NTLM.

From the VMware vSphere 6.5 ESXi STIG, (Finding ID: V-94023) the ESXi host must use the vSphere Authentication Proxy to protect passwords when adding ESXi hosts to Active Directory.

So even though the current STIG is only referencing vSphere 6.5, this can still be used for newer versions. During the configuration of a vCenter Server 7.0 Authentication Proxy, I found that the proxy kept not authenticating. After reviewing the logs on the Domain Controller, it was found that Likewise was sending the authentication to the Domain Controller with an NTLM response and not NTLMv2.

Reconfigure the Likewise service to send NTLMv2 and try to configure the Authentication Proxy again. This time, the configuration should be successful. You can further test by adding an ESXi host to vCenter and ensure it properly joins the domain.

Before configuring NTLMv2 on Likewise

ref: https://docs.vmware.com/en/VMware-vSphere/7.0/com.vmware.vsphere.security.doc/GUID-DFA95E13-EC95-4951-B94F-6D08CCFAC188.html

  1. Click the ENABLE link.
  2. Click the EDIT link.

Fill in the Domain, Domain User, and Domain Password settings. Click the SAVE button.

Notice the Operation failed! message.

You can also view the log located at /var/log/vmware/vmcam/vmcam-sca.log. Below is an excerpt, notice the Enter password for Service.vSphereAuth line. That indicates that it was not sending the correct password because we know that we typed it into the window.

I ended up tailing the log with the following so I could see in real-time what was occurring.

tail -f /var/log/vmware/vmcam/vmcam-sca.log

Configuring Likewise to Send NTLMv2

Run the following bold commands, the rest is for context.

/opt/likewise/bin/lwregshell
\> cd HKEY_THIS_MACHINE\Services\lsass\Parameters\NTLM
HKEY_THIS_MACHINE\Services\lsass\Parameters\NTLM> list_values
    "SendNTLMv2" REG_DWORD 0x00000000 (0)
    "Support128bit" REG_DWORD 0x00000001 (1)
    "Support56bit" REG_DWORD 0x00000001 (1)
    "SupportKeyExchange" REG_DWORD 0x00000001 (1)
    "SupportNTLM2SessionSecurity" REG_DWORD 0x00000001 (1)
    "SupportUnicode" REG_DWORD 0x00000001 (1)
HKEY_THIS_MACHINE\Services\lsass\Parameters\NTLM> set_value SendNTLMv2 1
HKEY_THIS_MACHINE\Services\lsass\Parameters\NTLM> list_values
+   "SendNTLMv2" REG_DWORD 0x00000001 (1)
    "Support128bit" REG_DWORD 0x00000001 (1)
    "Support56bit" REG_DWORD 0x00000001 (1)
    "SupportKeyExchange" REG_DWORD 0x00000001 (1)
    "SupportNTLM2SessionSecurity" REG_DWORD 0x00000001 (1)
    "SupportUnicode" REG_DWORD 0x00000001 (1)
HKEY_THIS_MACHINE\Services\lsass\Parameters\NTLM> quit
/opt/likewise/bin/lwsm restart lwio
Stopping service reverse dependency: lsass
Stopping service reverse dependency: rdr
Stopping service: lwio
Starting service: lwio
Starting service reverse dependency: rdr
Starting service reverse dependency: lsass

Go back to vSphere Client and configure the Authentication Proxy again. You may have to disable and enable the service again if you didn’t restart the service while connected through SSH. This time, it should work without an error. If you are tailing the log, then you should see Active Directory domain added successfully at the bottom.

From here you can Import the vSphere Authentication Proxy Certificate to ESXi Host.

VMware ESXi SSL Certificate Signing Request (CSR)

Need to replace the certificates with a custom certificate from a commercial or corporate Certificate Authority (CA)? You are going to need a Certificate Signing Request (CSR).

I use the certificate-manager tool (see below) included with vCenter to generate all of my requests. I found recently that you can skip this altogether if you can include the certificate’s key from the CA. In the traditional method, though, you will generate a CSR, submit to CA, and receive back a custom signed certificate.

/usr/lib/vmware-vmca/bin/certificate-manager
  • Connect to your Platform Services Controller (PSC) via SSH. This could be the same as your vCenter server.
  • Create a temporary directory to store your files in when you run the certificate-manager tool. Create a directory for each system you intend to generate CSR files for. I use the following format for my directory:
/tmp/hostname1
/tmp/hostname2
...
/tmp/hostnamen
  • Run the certificate-manager tool:
/usr/lib/vmware-vmca/bin/certificate-manager
  • Select option 1 to replace the Machine SSL.
  • Provide the administrator username if the SSO domain is not default or press Enter.
  • Provide the administrator password.
  • Select option 1 to Generate Certificate Signing Request(s)…
  • Provide an Output directory path such as
/tmp/hostname

The next information you will be requested to enter is for the certificate.

  • Country – Use two digit code (https://www.iso.org/obp/ui/#search)
  • Name – Use the fully qualified domain name of the server here
  • Organization – Name of your organization
  • OrgUnit – Name of your department
  • State – The state where the system resides (no abbreviations)
  • Locality – The city where the system resides
  • IPAddress – IP address of the system
  • Email – Email address for person or department responsible for administration of the system
  • Hostname – It’s best to always include a fully qualified domain name as well as a short name.
  • Proper value of VMCA ‘Name’ – I use the fully qualified domain name here

Press option 2 to Exit certificate-manager. Your csr and key files will be stored at the location you specified.

Apple Computer

If you use an Apple computer, you can use scp in the Terminal to copy the files.

$mkdir ~/Documents/Certificates/hostname/
$cd ~/Documents/Certificates/hostname/
$scp [email protected]:/tmp/hostname/*.* .

Windows Computer

If you use Windows, I recommend WinSCP. You will first need to set the shell on the Platform Services Controller to Bash.

chsh -s /bin/bash root

Follow the instructions of your CA on how to submit the CSR to be signed.