Overview
If you are here, you are probably trying to install certificates and all you see or have seen for hours is, “Certificate installation is in progress.” If you think it’s not working, you are probably correct. Hopefully after reviewing this post, you will be able to have properly installed certificates.

Read this First!
You must generate the Certificate Signing Request (CSR) from SDDC Manager! No matter which path is taken, the CSR must be generated using the SDDC Manager. There is no other way to do this. You can try, but it will be futile and waste time.
You have been informed!
Why Legacy Certificate Management in the First Place?
The new way, at least in version 5.1, wants to request the Certificate Signing Request (CSR) from SDDC Manager, download the CSR, get it signed by a Ceritificate Authority (CA) (external or enterprise), and subsequently upload and apply back into SDDC Manager. This can also apply if you have the Certificate Authority feature configured with either a Microsoft CA or an OpenSSL CA.
Unfortunately, the customers I work with do not have this option at all. They do not manage their own Certificate Authorities and have to rely on alternate methods.
Enabling the Legacy Certificate Management Workflow
It is likely that this is already configured if the above message applies, but for completeness sake, I will include, here.
In the upper right corner, click on your logged on user name, select Preferences. Toggle Revert to Legacy Certificate Management. Please note that I have seen this toggle back off, so you may have to go back in to toggle it again.

How-to Replace the Certificates
Certificate Signing Request (CSR)
Select the Workload Domain from Inventory that you want to replace the certificates on. Select the Certificates tab. Select the Resource Types and select Generate CSRS.
A few tips when creating the Certificate Signing Request (CSR):
* Include the fully qualified domain name, short name, and IP address information (IPv4 and IPv6) in the Subject Alternative Name (SAN).
* When the device is behind a load balancer, ensure the load balanced name is the Common Name (CN) for the certificate and include it as well as all load balanced machines in the SAN.
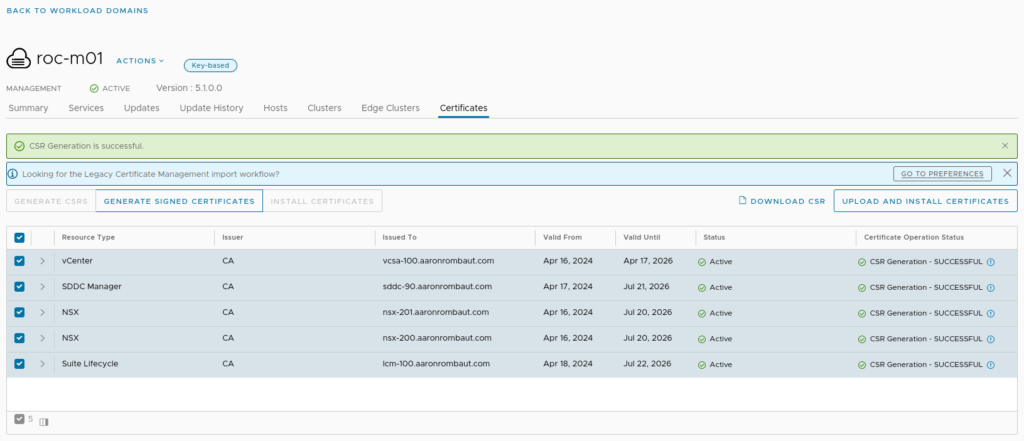
Once the CSR Generation is successful message appears, you should be able to get them signed by your Certificate Authority. Copy or download the Certificate Requests,

When the Download All button is selected, a .tar.gz file will download with correct directory structure and files in the correct place. This file and folder structure is required for a successful upload in the next steps.
Upload and Install Certificates
Once you have all of the Certificate Signing Requests signed, it’s time to Upload and Install Certificates.
Place the signed certificates in the correct directories. Also ensure the certificate signing chain is included at the root of the directory and named rootca.crt. (The order of the rootca.crt file starts with intermediates and ends with the root.) The following is a representation of the folder structure. Note that I am using a nested lab, so I only have a single NSX Manager. If you are doing this in production, you will likely have more directories.
roc-m01
├── lcm-100.aaronrombaut.com
│   ├── lcm-100.aaronrombaut.com.crt
│   └── lcm-100.aaronrombaut.com.csr
├── NSX
├── nsx-200.aaronrombaut.com
│   ├── nsx-200.aaronrombaut.com.crt
│   └── nsx-200.aaronrombaut.com.csr
├── nsx-201.aaronrombaut.com
│   ├── nsx-201.aaronrombaut.com.crt
│   └── nsx-201.aaronrombaut.com.csr
├── rootca.crt
├── sddc-90.aaronrombaut.com
│   ├── sddc-90.aaronrombaut.com.crt
│   └── sddc-90.aaronrombaut.com.csr
├── SDDC Manager
├── Suite Lifecycle
├── vCenter
└── vcsa-100.aaronrombaut.com
    ├── vcsa-100.aaronrombaut.com.crt
    └── vcsa-100.aaronrombaut.com.csr

9 directories, 11 files
Let’s archive and zip the directory with tar and gzip.
tar -zcvf <filename>.tar.gz <directory to tar and gzip>/
tar -zcvf roc-m01.tar.gz roc-m01/
Back in SDDC Manager, select Upload and Install Certificates.

Select Browse and Upload the tar.gz file that we just created. Select Install Certificate to start the process. If this takes more than two hours, it is likely the task has failed. I waited 24 hours before I started to write this post after the task failed. A good indicator that it is working is when you see a Subtask for the Certificate Operation: REPLACE_CERTIFICATE Task.
Stopping and Deleting the Task
If you are seeing the message, “Certificate installation is in progress.”, you will be unable to proceed until the task is deleted. If the status is still “In Progress”, this will have to be stopped before removing the Task. You cannot stop an in progress task and will receive an error. Reboot the SDDC Manager virtual machine from vCenter.
Note the following section will work for some Tasks, but not a Certificate Operations task, unfortunately. I had already written this section and decided to just keep it.
You you can restart the operationsmanager and domainmanager service.
systemctl restart operationsmanager
systemctl restart domainmanager
The task finally shows up as Failed in the Tasks list.

If your task is already showing as failed, then we can proceed with removing the Failed task. We will need to open the API Explorer from the Developer Center.
Scroll down until you find the Tasks heading.

The first operation we need to accomplish is to GET all the tasks since we do not have an id. Click on the first GET operation that shows /v1/tasks so that the operation expands. Scroll down to find the Execute button. Select PageOfTask and look for the operation regarding replacing the certificates.

Select the link so the details display. Locate the “id”: line and copy the string contents between the quotation marks.

Scroll down and locate the DELETE operation. Select it to expand it. Under the Try it out section, paste the clipboard value on the id (required) parameter line. Select Execute when ready.

You will get a pop-up if you did not previously select Don’t show this again. This is the last chance to back out, if needed, prior to deleting the task.

I ended up getting an error and was unable to remove this particular task. I received the following Response.
{
    "errorCode": "VCF_RUNTIME_ERROR",
    "arguments": [],
    "message": "Something went wrong. Please retry or contact the service provider and provide the reference token.",
    "referenceToken": "26RBDB"
}
Leave a Reply