Quick Method: If running on a modern Windows 10, Windows 11, or Windows Server, check that PNPUTIL supports the /enum-devices and /remove-device command. I found that Windows Server 2019 did not support the /enum-devices and therefore did not have a /remove-device command.
If it does, however, the following one liner should work.
foreach ($dev in (Get-PnpDevice -Status UNKNOWN)) { &"pnputil" /remove-device $dev.InstanceId }
If you are on a system that lacks the listed switches in PNPUTIL or you just want the easy method, then you can try using DevManView by NirSoft. This utility allows you to select more than one device at a time as well which is convenitent if there are hundreds of “ghost” devices showing up. (https://www.nirsoft.net/utils/device_manager_view.html)
Have you ever set up VMware App Volumes and found that your virtualized applications didn’t appear to be attached to your virtual desktops? You start out with your basic troubleshooting, beginning with the lower layers of the OSI (Open Systems Interconnection) model. Are the servers hosting the App Volumes Managers online? Is the virtual machine that’s connected visible to App Volumes Manager? Is the service (svservice) running on the virtual machine? Was App Volumes Agent the very last agent installed as per VMware KB 2118048? Can I send and receive basic ICMP (Internet Control Message Protocol) requests from the virtual machine to the manager? Maybe there is a firewall blocking the dataflow? Huh, everything seems to be configured correctly, what could it possibly be?
Finding “Ghost” Devices with PowerShell
Get-PnpDevice -Status UNKNOWN

Look for Disconnected Virtual Disks
Suddenly, while frantically trying to figure out what is going on, you notice that there are virtual disks attached to the virtual machine. Well, now that’s interesting…let us check the Disk Management utility (diskmgmt.msc). Sure enough, there are virtual disks attached, but they are in an offline state. Huh, well that’s odd. We can’t just online them because these are Instant Clones, and that metadata will not persist.
Open Device Manager (devmgmt.msc) to look at the hardware, enabling the Show hidden devices option from the View menu. Let’s poke around a little bit by expanding each device type. Sure enough, there are disk drives, storage controllers, and other devices that appear to be disconnected. They appear as slightly transparent icons and are sometimes referred to as ghosted devices.
The Golden Image should be opened, and all the disconnected devices should be flushed out. Removing all disconnected devices ensures that your Golden Image will be clean and only contain hardware that exists. When the desktop pool is published and an end-user attaches a new device, Windows Plug and Play (PnP) will adapt to the hardware changes with minimal intervention. Refresh the desktop pool and this time when we log on, we have success! The virtualized applications are attached, visible, and function as expected. Open Device Manager and notice there are no disconnected devices. Open the Disk Management utility (diskmgmt.msc) and notice the disks are now online.
Automate The Solution
So now we have a root cause, the effect, and a working solution. However, the solution is very manual, can be painful, and may be error prone. Anytime a human gets in front of a computer, things are bound to go awry. Let’s automate a solution, after all, the computer should be working for us, not the other way around.
IF NOT EXIST C:\TempWork (MKDIR C:\TempWork)
First, let’s make a temporary directory to do our work.
PNPUTIL /enum-devices /disconnected > C:\TempWork\disconnected-devices.txt
Second, let’s get a list of the devices that are disconnected. This will print the disconnected devices into a text file. Unfortunately, there is too much information in this, so we will pare it down to what we do need.
FINDSTR /C:Instance "C:\TempWork\disconnected-devices.txt" > C:\TempWork\devices-to-delete.txt
Third, let us get just the lines that have the Instance ID that we need and store that in another file. Great! So now we have a file of zero, one, or more instance identifiers. Unfortunately, there is still more work to do. Don’t fret, though, the challenging work is almost done and certainly worth the reward, here. If you open this file, you will see each line begins with Instance ID:, a long space, and then the actual information we need to remove the device. The Windows Command Line utility, FOR, will treat each non-space word as a token. So, the first token is the word Instance, the second is ID:, and the third is what we are looking for.
FOR /F "tokens=3" %%G IN (C:\TempWork\devices-to-delete.txt) DO (PNPUTIL /remove-device %%G)
All we need to do from here is iterate through the file, acting upon each Instance ID and removing the device.
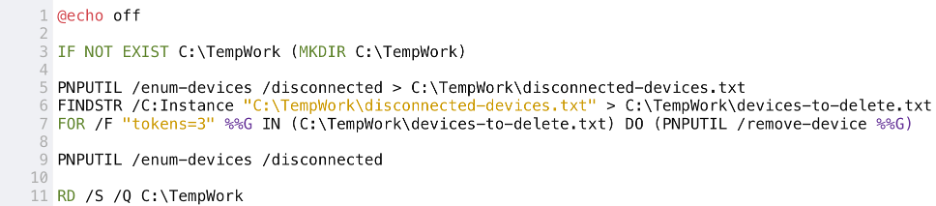
@echo off

IF NOT EXIST C:\TempWork (MKDIR C:\TempWork)

PNPUTIL /enum-devices /disconnected > C:\TempWork\disconnected-devices.txt
FINDSTR /C:Instance "C:\TempWork\disconnected-devices.txt" > C:\TempWork\devices-to-delete.txt
FOR /F "tokens=3" %%G IN (C:\TempWork\devices-to-delete.txt) DO (PNPUTIL /remove-device %%G)

PNPUTIL /enum-devices /disconnected

RD /S /Q C:\TempWork
We can put all these statements into a batch file and then all we need is to run it from an elevated command prompt. The work is done instantly, and we can be assured that we did not miss a device or accidentally remove a necessary connected device. If you desire to keep the files for a record of what was detected and removed, just comment out line 11 with REM.
When to run this Batch File
As a best practice, perform this task after removing unnecessary devices from the virtual machine, such as hard disks and CD/DVD devices, running the VMware OS Optimization tool, but before sealing the Golden Image. This way, you can be assured that the virtual machine’s hardware reflects what is actually installed and end-users will get the best experience possible.
Leave a Reply