Using Third-Party Certificates with VMware Cloud Foundation (VCF)
I consider this a “Day 1.5” task—VMware Cloud Foundation (VCF) has been successfully deployed (Day 1), but there’s still some essential configuration work to be done before handing it off to the Operations and Maintenance (O&M) team for Day 2 operations.
Certificate Management in VCF
By default, SDDC Manager uses OpenSSL as its internal certificate authority. It can also integrate with Microsoft Active Directory Certificate Services (AD CS). But there’s a third option—the one this post focuses on:
Using certificates signed by an external, third-party Certificate Authority (CA).
Why Use a Third-Party Certificate Authority?
There are a few reasons you might go this route:
- Your organization follows a strict security posture and requires certificates to be issued by a centralized, enterprise-grade CA.
- Your organization doesn’t maintain its own internal CA and instead relies on commercial or public certificate providers.
Using third-party certificates can help ensure better integration with broader enterprise security controls and compliance requirements.
What Can SDDC Manager Manage Certificates For?
VCF allows SDDC Manager to manage certificates for the following components:
- vCenter Server
- NSX Manager
- VMware Avi Load Balancer
- SDDC Manager itself
- VMware Aria Suite Lifecycle
🔒 Note: ESXi host certificates are not managed by VMware Cloud Foundation. These are typically handled separately, either manually or through external tools.
Understanding the Certificate Signing Process
The certificate signing process might seem intimidating at first, but it’s actually pretty straightforward once you understand a few basics.
The process begins with something called a Certificate Signing Request (CSR). This is the file you submit to a Certificate Authority (CA) to get your certificate.
Next, you need to know what to include in the CSR. If you’re working with a single server (like a standalone web server), you’ll only need to include that one node. However, if you’re running multiple servers behind a load balancer, you’ll need to include all of the server nodes, plus the load-balanced address itself. It’s not any more complicated—just more detailed.
No matter which setup you’re working with, the most important thing to remember is this:
🔐 Modern browsers rely on the Subject Alternative Name (SAN) field when verifying certificates.
While the Common Name (CN) field is still required on some forms, browsers don’t actually use it for validation. For the most accurate and current information on TLS identification, check out RFC 9525.
Here’s How to Do It
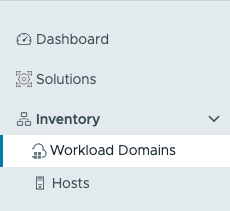
In the navigation pane, select Inventory > Workload Domains.
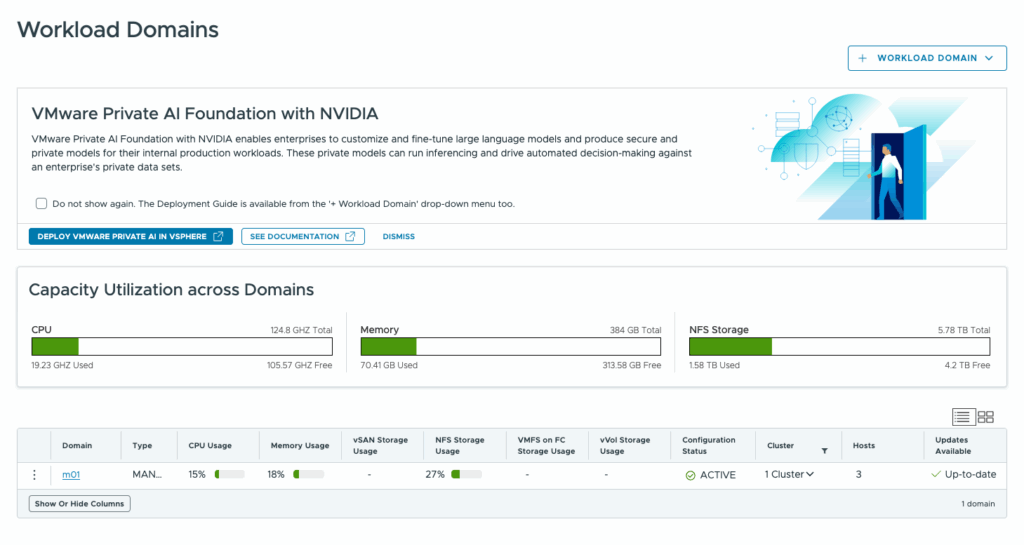
On the Workload Domains page, select the domain name you want to work with.
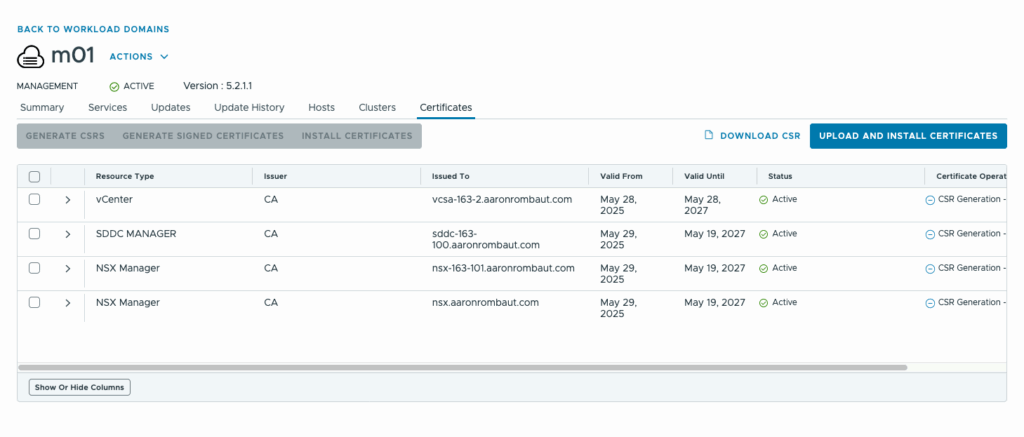
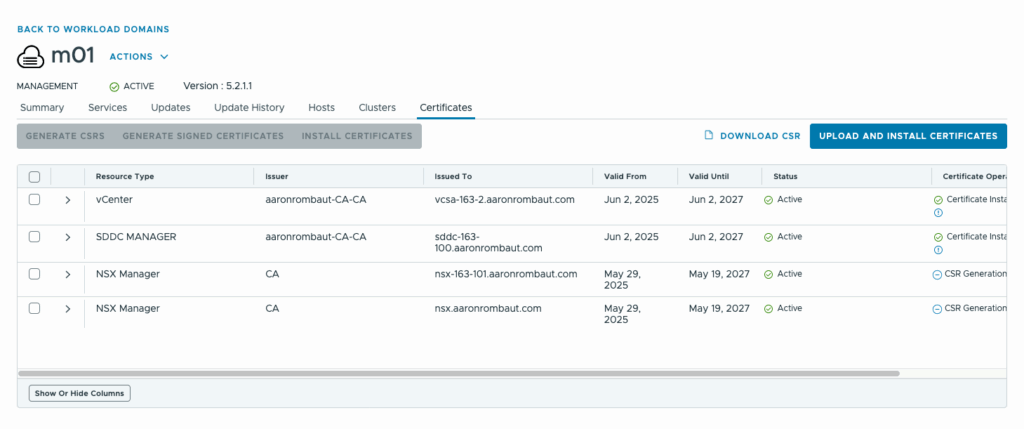
On the Domain Summary page, select the Certificates tab.
Check the box for the resource type to start the process of generating a Certificate Signing Request (CSR). For this post, I am going to concentrate on vCenter and SDDC Manager.
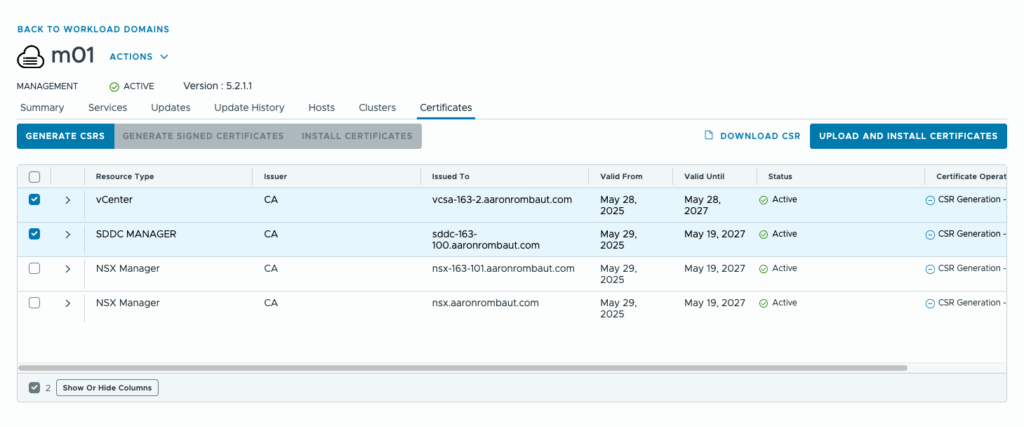
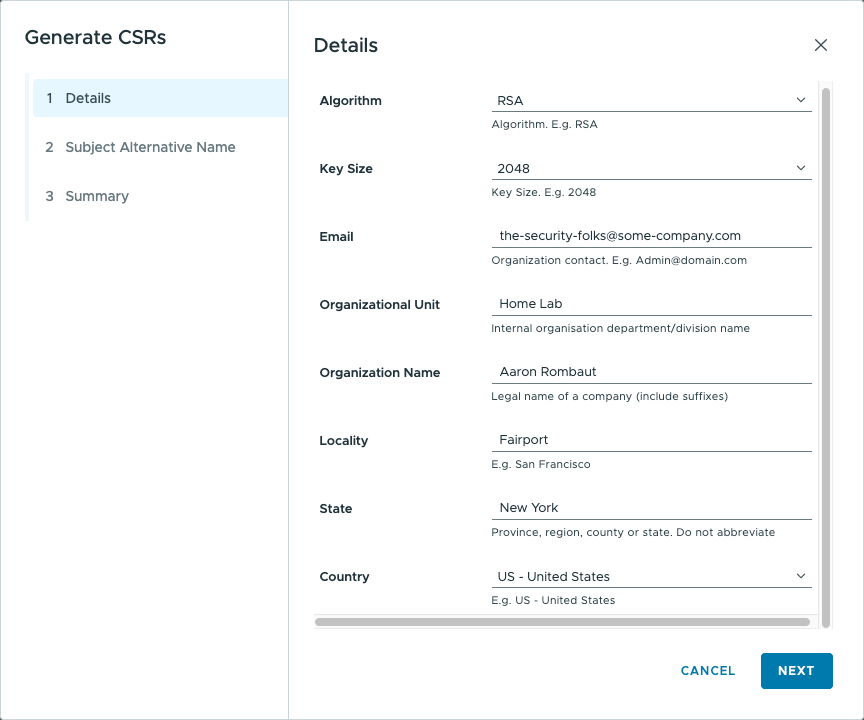
Click the Generate CSRs button. The Generate CSRs wizard opens. Fill out the applicable details according to your organizations requirements. Check the Key Size requirement before clicking Next. I have worked with customers that tried to use higher key sizes and found that their signing CA could not sign them and they needed to restart the request process.
One thing to note is that the State is never abbreviated. The Country is always abbreviated. In this wizard, the choices for the countries are already provided.
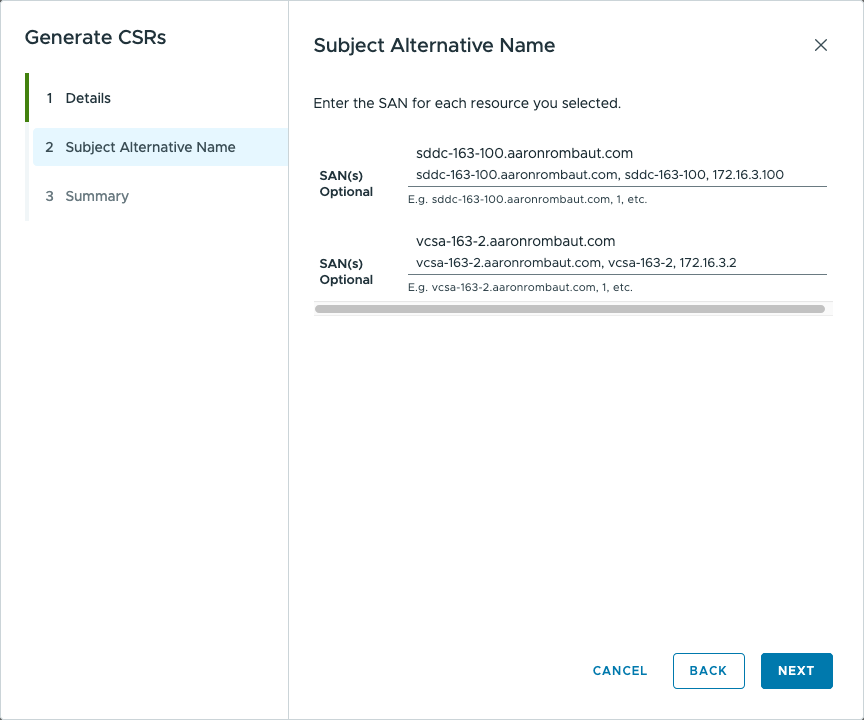
Click Next to add the Subject Alternative Names (SAN) for the selected resources. Wildcards, i.e. the asterisk (*), are not recommended and rarely supported. In my experience, the best information to include is:
- Fully Qualified Domain Name
- Short name
- IPv4 address
- IPv6 address (if dual-stacked)
On the Summary screen, review the details and make corrections, if necessary, before clicking the Generate CSRs button.
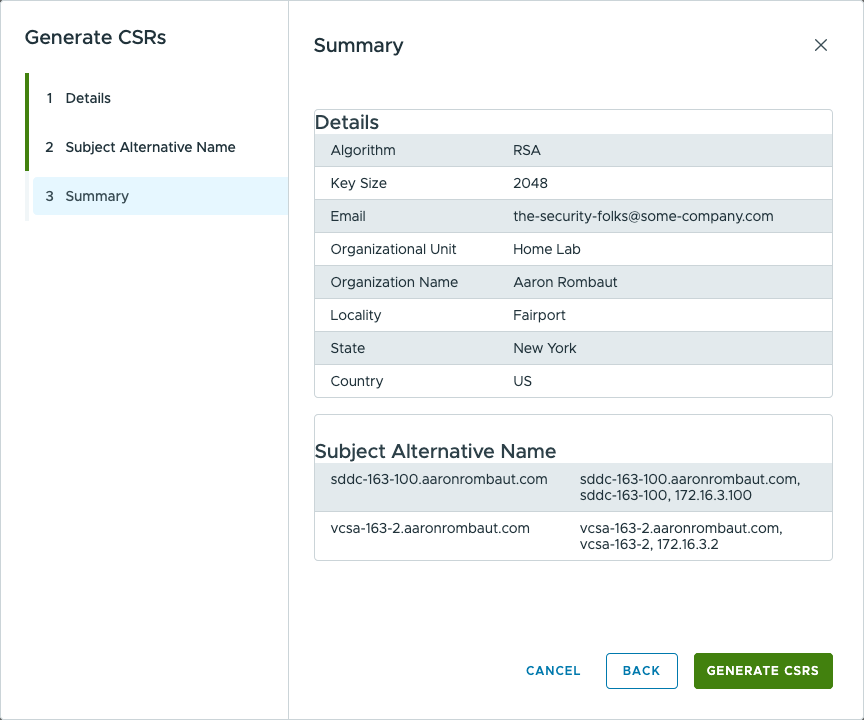
SDDC Manager will generate the CSRs and then let you know a status.

Click the Download CSR link. This screen will provide base64 data that you can copy and paste into the external certificate authority form.

Upload and Install Certificates
Once the certificates have been signed, it’s time to upload and install them. Click the Upload and Install Certificates button.
Choose the resource to configure. The source options alters how the information is loaded into the wizard. I will use the default Paste Text option.
The Server Certificate is the certificate that was signed. Open the file in a text editor or if its on a Linux, just cat the contents. The contents should open up and look like the following:
-----BEGIN CERTIFICATE-----
MIIF7jCCBNagAwIBAgITfgAAAAgEske7GS/kGwAAAAAACDANBgkqhkiG9w0BAQsF
ADBQMRMwEQYKCZImiZPyLGQBGRYDY29tMRwwGgYKCZImiZPyLGQBGRYMYWFyb25y
b21iYXV0MRswGQYDVQQDExJhYXJvbnJvbWJhdXQtQ0EtQ0EwHhcNMjUwNjAyMTEx
MTM4WhcNMjcwNjAyMTExMTM4WjCBhDELMAkGA1UEBhMCVVMxETAPBgNVBAgTCE5l
dyBZb3JrMREwDwYDVQQHEwhGYWlycG9ydDEWMBQGA1UEChMNQWFyb24gUm9tYmF1
dDERMA8GA1UECxMISG9tZSBMYWIxJDAiBgNVBAMTG3Zjc2EtMTYzLTIuYWFyb25y
b21iYXV0LmNvbTCCASIwDQYJKoZIhvcNAQEBBQADggEPADCCAQoCggEBAIrsZjmJ
Gzr37oXs1uS1WVIGI1bOj2kTdChZM68gXuaNzW9zAzfBUBKN+MIEPuAkUtH0uNJr
rYKPJJDYsljNMhDJ/bDKNsDxWZFT8n6ql3d4ddeM+YHTyJgkcKqEomo5VIbIYku3
giW6CRjv0WvkMCXEESlHUIfnraELBMl1Ae7evmr/WFMZ/09/mcqSMIVUnTzxJ3Mr
OhqtVQ3KRMHhwkkTYgDK4p45famhZ95LgCvXIMrgdKMOmennz4bxgkjwn6yXVb20
cHFIwz/OfFp7pGVAJRSToAnWJLmqsN+jNj7F4bsCZu9ndiL2KNcjE4dpeX2SYwRi
ECKmLP9ceYRaKSkCAwEAAaOCAoowggKGMA4GA1UdDwEB/wQEAwIFoDAdBgNVHQ4E
FgQU6i6LiTkvD/cEc+HroG9BWOZrji4wXQYDVR0RBFYwVIEjdGhlLXNlY3VyaXR5
LWZvbGtzQHNvbWUtY29tcGFueS5jb22HBKwQAwKCG3Zjc2EtMTYzLTIuYWFyb25y
b21iYXV0LmNvbYIKdmNzYS0xNjMtMjAfBgNVHSMEGDAWgBS1cUBc0vNFgCArR2I4
m5NweXRYXzCB0AYDVR0fBIHIMIHFMIHCoIG/oIG8hoG5bGRhcDovLy9DTj1hYXJv
bnJvbWJhdXQtQ0EtQ0EsQ049Q0EsQ049Q0RQLENOPVB1YmxpYyUyMEtleSUyMFNl
cnZpY2VzLENOPVNlcnZpY2VzLENOPUNvbmZpZ3VyYXRpb24sREM9YWFyb25yb21i
YXV0LERDPWNvbT9jZXJ0aWZpY2F0ZVJldm9jYXRpb25MaXN0P2Jhc2U/b2JqZWN0
Q2xhc3M9Y1JMRGlzdHJpYnV0aW9uUG9pbnQwgckGCCsGAQUFBwEBBIG8MIG5MIG2
BggrBgEFBQcwAoaBqWxkYXA6Ly8vQ049YWFyb25yb21iYXV0LUNBLUNBLENOPUFJ
QSxDTj1QdWJsaWMlMjBLZXklMjBTZXJ2aWNlcyxDTj1TZXJ2aWNlcyxDTj1Db25m
aWd1cmF0aW9uLERDPWFhcm9ucm9tYmF1dCxEQz1jb20/Y0FDZXJ0aWZpY2F0ZT9i
YXNlP29iamVjdENsYXNzPWNlcnRpZmljYXRpb25BdXRob3JpdHkwIQYJKwYBBAGC
NxQCBBQeEgBXAGUAYgBTAGUAcgB2AGUAcjATBgNVHSUEDDAKBggrBgEFBQcDATAN
BgkqhkiG9w0BAQsFAAOCAQEAII+RRVggpdqTK4gh806V2kvDRuXoT6aU2zuJz6cJ
4Dat1ISfjopWgIZvg6ZibRiW0hCZhqSlg4i10fswPUmdEis6i9wXqVbaqMZOFXp7
55VA3KMIZmIxJnpzJFPXSaEOunoaiuF0csv+WcGbCjDPl92e7vV06fWn7pEvk9gg
H/ZRaUkWjb6vRP7D22qioUZDFRJvDvHrQSBxMmilSOLjYTC3MsKuRXwjYx6OZLwS
/ly2KLuewANUwPi/WTHxfxw/VAmSGlEtXM0XzWXmTU/kkU89tquuP00hp9bRLs0B
nhcwXyVapVTENSZiy1LxBXiyO+/06u3MCmMcxxk695LASw==
-----END CERTIFICATE-----
Copy the entire contents, including the BEGIN and END lines, and paste into the Server Certificate text box.
For the Certificate Authority field, a combined certificate for the signing chain is required. If you open the certificate in Windows and click on the Certification Path, you will see the order of chain.
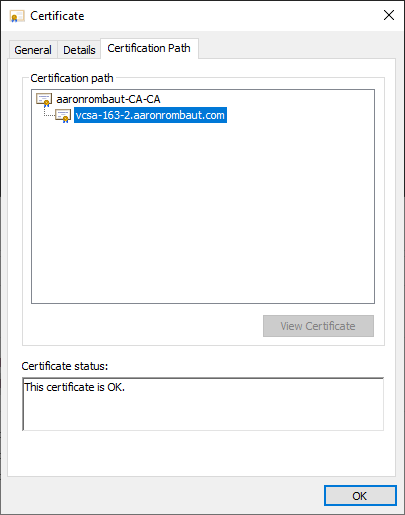
If on Linux, you can use OpenSSL to view the chain.
openssl x509 -issuer -noout -in <file name> | grep -i issuer=Here is the output from the previous command:
issuer= /DC=com/DC=aaronrombaut/CN=aaronrombaut-CA-CAOnce I get to the certificate issuer that shows the issuer as itself, I know I am at the root.
In the case of this post, I only have one certificate signing authority. The chain is in the order that they were signed, so I will add the contents of that in the Certificate Authority text box.
When ready, click Validate to make sure the certificate can be installed. Click Add Another to add additional resources.
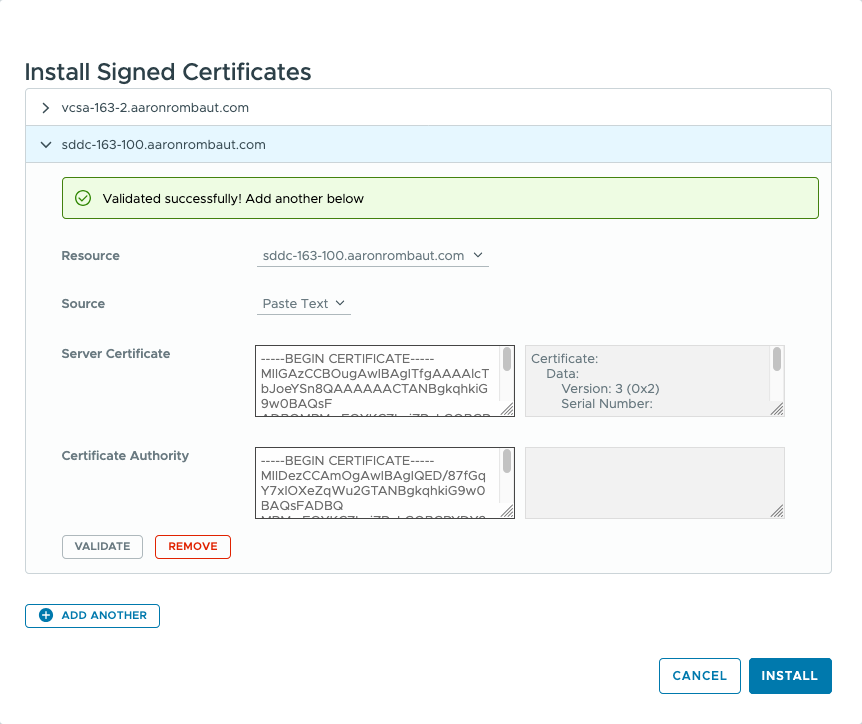
After all the resources have been added and validated, click Install. SDDC Manager will show the task progress in the Tasks window.

When the tasks are complete, refresh the browser window or navigate back to the Certificates tab.

You should notice the Issuer column in the certificates table now reflects the externally signed certificate.
Leave a Reply