I always seem to need certificates in my lab. I like to keep things as close to production as possible—it just feels like the right way to do it. But buying certificates for every little service or device would get expensive fast. Instead, I’m setting up a private Certificate Authority (CA) on two Fedora Server 42 virtual machines. The services I’m securing don’t really care who issued the certificate; they just need to trust it. So as long as I install my root certificate chain across all my devices, everything will play nicely together—no public CA required!
Assumptions
OpenSSL is installed. Most Linux distributions include OpenSSL by default. If it isn’t, install it using your package manager (for example, dnf install openssl or apt install openssl).
Command-line familiarity. You should be comfortable using a terminal. No graphical user interface (GUI) tools are used in this process.
Lab environment. This setup is intended for lab or educational use only. I’m not an expert in PKI, and this is not something I plan to deploy in a corporate or production environment. That said, the same concepts apply—if you decide to use this in production, be sure to research and follow security best practices.
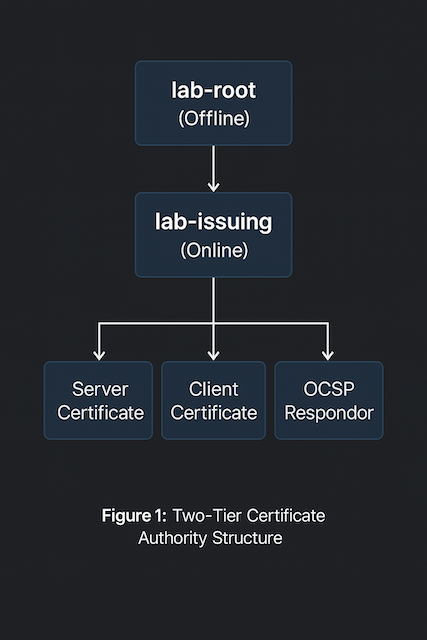
Certificate Authority structure. I’m creating one Root Certificate Authority (CA) and one Intermediate Certificate Authority (CA). Once the root certificate is configured and used to sign the intermediate, the root CA virtual machine will be powered off and archived to protect its private key. While not essential for a lab, it’s good practice and mirrors how production environments typically operate.
Private key security. Private keys are generated and stored only on the device where they’re created. They are never copied, transferred, or shared between systems.
Network isolation. The CA environment operates on a closed or controlled network. Internet connectivity isn’t required once all necessary packages and configuration files are in place.
System permissions. All commands are executed as root unless otherwise noted. This simplifies lab work but should be approached differently in production environments where role-based permissions are expected.
Documentation intent. These steps are written to be reproducible for learning purposes—showing how a local, trusted certificate chain can be built from start to finish.
RTFM
Let’s be honest — there’s no shortage of “how to build a CA with OpenSSL” guides, books, blogs, and videos out there, and most of them contradict each other or are just on the older or weaker side. After days (dare I say weeks?) of trial, error, and man-page archaeology, here’s my conclusion:
The official documentation is your best friend.
If you’re following along, these are the man pages worth keeping open in another tab or terminal window:
man openssl-config– explains the structure and syntax of configuration filesman openssl-ca– for managing your own certificate authorityman openssl-genpkey– for generating private keys securelyman openssl-req– for creating and signing certificate requestsman openssl-x509– for inspecting, converting, and signing certificatesman x509v3_config– defines how to use extensions in your CA or certificatesman openssl-verify– for validating certificate chainsman openssl-dgst– for hashing and verifying file integrity
And when in doubt, go straight to the source: openssl.org/docs.
If you’re ever tempted to copy-paste commands from random forums (including this one), remember the golden rule of OpenSSL:
If you don’t understand what a flag does, stop and RTFM.
Configuration Files
OpenSSL relies heavily on configuration files. The main system file is usually located at /etc/ssl/openssl.cnf, though some distributions symlink it to /etc/pki/tls/openssl.cnf.
For my lab setup, I decided to create my own configuration files instead. This gives me better visibility into what’s happening behind the scenes and lets me tailor settings for the root and intermediate Certificate Authorities (CAs).
Each OpenSSL configuration file is made up of sections, marked by square brackets (e.g., [ section_name ]), and options, written as key = value pairs. Some sections can reference others, allowing for a modular and reusable structure — a pattern I use throughout this setup.
When running OpenSSL commands, the section in use can be specified with the -name option. If not provided, OpenSSL uses the section defined in the default_ca variable.
For a CA configuration to work, a few key options are Mandatory (as defined in the openssl-ca man page):
new_certs_dir– where issued certificates are storedcertificate– the CA’s own certificateprivate_key– the CA’s private keydefault_md– the default message digest to usedatabase– a text index file used to track issued certificatesserial– a file containing the next serial number to usepolicy– the name of a policy section defining certificate field requirements
The policy section defines how fields in a certificate request must relate to those in the CA certificate. Each field is marked as one of the following:
- match – must match the same field in the CA certificate
- supplied – must be present in the request
- optional – may be present but not required
💡 Tip: Keeping your configuration files in a small Git repository can help track changes over time — especially when experimenting with different CA setups. It’s not essential in a lab, but it’s a great habit if you want to understand what changed (and why) months later.
This modular approach keeps things organized and readable — which is exactly what I need when I revisit my own notes down the road.
Root Certificate Authority (CA)
Directory Scaffolding
Before generating any keys or certificates, set up a clear directory structure. This helps keep files organized and reduces mistakes later.
You can adjust the naming convention to fit your environment. For example, here I’m using /etc/pki/lab-root and /var/lib/pki/lab-root.
# Adding the working directory and files
install --directory --mode=0700 /var/lib/pki/lab-root/private
install --directory --mode=0755 /var/lib/pki/lab-root/{certs,crl,newcerts}
touch /var/lib/pki/lab-root/index.txt
echo 1000 | tee /var/lib/pki/lab-root/{serial,crlnumber} >/dev/null
# Adding the configuration
mkdir -p /etc/pki/lab-root/
touch /etc/pki/lab-root/root.cnf
vi /etc/pki/lab-root/root.cnf
💡 Tip: The directory names
lab-rootandlab-issuing(orroot-ca/issuing-ca) are simple, descriptive alternatives to personal naming. They also scale nicely if you later add test environments or multiple tiers of CAs.
Root CA Configuration File (section-by-section)
The main configuration file (root.cnf) defines how OpenSSL behaves when creating and signing certificates.
It points to where key material lives, what policy to apply, and how extensions are handled.
Here’s a breakdown of the key sections and what they do — without pasting the entire file (the completed configuration file is at the end of this post section):
[ ca ] and [ CA_default ]
This defines the defaults OpenSSL uses for the Certificate Authority process.
dir– the CA’s working directorycertificate/private_key– where the CA’s own cert and key are storednew_certs_dir– where newly issued certificates are placeddatabase,serial,crlnumber– the CA’s internal tracking filesdefault_md = sha512– message digest algorithmdefault_days = 5475– ~15 years of validity for the root certificatecopy_extensions = none– prevents inheriting extensions from CSRs (best practice for a root CA)policy,x509_extensions,crl_extensions– references to other sections for control and consistency
# -------- Root CA main config (offline box) --------
[ ca ]
default_ca              = CA_default
[ CA_default ]
dir                     = /var/lib/pki/lab-root
certificate             = $dir/certs/root-ca.crt
private_key             = $dir/private/root-ca.key
new_certs_dir           = $dir/newcerts
database                = $dir/index.txt
serial                  = $dir/serial
crlnumber               = $dir/crlnumber
unique_subject          = no
default_md              = sha512
default_days            = 5475                  # ~15y root
default_crl_days        = 90                    # offline root: longer CRL validity is fine in a lab
policy                  = policy_strict
# x509_extensions       = v3_intermediate_cert  # fallback if -extensions omitted
# (left commented intentionally; always pass -extensions explicitly)
crl_extensions          = crl_extensions_root
copy_extensions         = none                  # root should not inherit CSR ext
name_opt                = ca_default
cert_opt                = ca_default
email_in_dn             = no
string_mask             = utf8only
rand_serial             = yes                   # use random serials instead of incrementing from $dir/serial
[ req ] and [ dn_root_cert ]
Defines how certificate requests (CSRs) are generated.
default_bits = 4096– strong key sizeencrypt_key = yes– protects private key with a passphrasedefault_md = sha512– consistent with CA defaultsprompt = no– avoids interactive prompts by using predefined valuesdistinguished_name = dn_root_cert– references a section that holds DN fields containing human-readable identity details for the root certificate.
### Requests / Distinguished Names (DN)
[ req ]
default_bits            = 4096
encrypt_key             = yes
default_md              = sha512
x509_extensions         = v3_root_cert
prompt                  = no
distinguished_name      = dn_root_cert
[ dn_root_cert ]
countryName             = US
stateOrProvinceName     = ExampleState
localityName            = ExampleCity
organizationName        = Example Org
organizationalUnitName  = Lab PKI
commonName              = Example Root CA
[ policy_strict ]
DN rules for CSRs signed by the Root CA. They enforce the C/ST/L/O to exactly match the Root’s DN, requiring a Common Name and allows OU/email to be optional. This prevents DN drift and simplifies audits.
This policy is intended for signing the Intermediate CA only—do not issue end-entity certs from the Root.
[ policy_strict ]
countryName             = match
stateOrProvinceName     = match
localityName            = match
organizationName        = match
organizationalUnitName  = optional
commonName              = supplied
emailAddress            = optional
[ v3_root_cert ]
Defines the X.509 v3 extensions for the self-signed root certificate.
# Self-signed Root certificate profile (used with: openssl ca -selfsign -extensions v3_root_cert)
[ v3_root_cert ]
basicConstraints        = critical, CA:true, pathlen:1
keyUsage                = critical, keyCertSign, cRLSign
subjectKeyIdentifier    = hash
authorityKeyIdentifier  = keyid, issuer:always
crlDistributionPoints   = @crl_dp_root
💡 Note: RFC 5280 specifies that
basicConstraintsmust be marked critical for CA certificates to prevent older clients from misinterpreting their role.
[ v3_intermediate_cert ]
These extensions are used later when signing the Intermediate CA certificate signing request. It is used with openssl ca -extensions v3_intermediate_cert.
# Profile to sign the Intermediate CA CSR
[ v3_intermediate_cert ]
subjectKeyIdentifier    = hash
authorityKeyIdentifier  = keyid, issuer:always
basicConstraints        = critical, CA:true, pathlen:0   # issuing CA cannot create sub-CAs
keyUsage                = critical, keyCertSign, cRLSign
crlDistributionPoints   = @crl_dp_root
authorityInfoAccess     = @aia_root
Certificate Revocation List (CRL)
The final section contains the URLs for the Certificate Revocation List (CRL), Authority Information Access (AIA), and optionally, the Online Certificate Status Protocol (OCSP). It is very important that these files are served from an unsecured web server. It is also important that they are accessible via DNS.
# CRL extensions for the Root's CRL
[ crl_extensions_root ]
authorityKeyIdentifier  = keyid:always
[crl_dp_root]
URI.0 = http://pki.lab.aaronrombaut.com/crl/root.crl  # ensure lab DNS/HTTP serves this path
[aia_root]
caIssuers;URI.0 = http://pki.lab.aaronrombaut.com/certs/root-ca.crt
Here is a full copy of the configuration file.
# -------- Root CA main config (offline box) --------
[ ca ]
default_ca              = CA_default
[ CA_default ]
dir                     = /var/lib/pki/lab-root
certificate             = $dir/certs/root-ca.crt
private_key             = $dir/private/root-ca.key
new_certs_dir           = $dir/newcerts
database                = $dir/index.txt
serial                  = $dir/serial
crlnumber               = $dir/crlnumber
unique_subject          = no
default_md              = sha512
default_days            = 5475                  # ~15y root
default_crl_days        = 90                    # offline root: longer CRL validity is fine in a lab
policy                  = policy_strict
# x509_extensions       = v3_intermediate_cert  # fallback if -extensions omitted
# (left commented intentionally; always pass -extensions explicitly)
crl_extensions          = crl_extensions_root
copy_extensions         = none                  # root should not inherit CSR ext
name_opt                = ca_default
cert_opt                = ca_default
email_in_dn             = no
string_mask             = utf8only
rand_serial             = yes                   # use random serials instead of incrementing from $dir/serial
### Requests / Distinguished Names (DN)
[ req ]
default_bits            = 4096
encrypt_key             = yes
default_md              = sha512
x509_extensions         = v3_root_cert
prompt                  = no
distinguished_name      = dn_root_cert
[ dn_root_cert ]
countryName             = US
stateOrProvinceName     = ExampleState
localityName            = ExampleCity
organizationName        = Example Org
organizationalUnitName  = Lab PKI
commonName              = Example Root CA
### Policies
[ policy_strict ]
countryName             = match
stateOrProvinceName     = match
localityName            = match
organizationName        = match
organizationalUnitName  = optional
commonName              = supplied
emailAddress            = optional
### x509v3 Extensions
# Self-signed Root certificate profile (used with: openssl ca -selfsign -extensions v3_root_cert)
[ v3_root_cert ]
basicConstraints        = critical, CA:true, pathlen:1
keyUsage                = critical, keyCertSign, cRLSign
subjectKeyIdentifier    = hash
authorityKeyIdentifier  = keyid, issuer:always
crlDistributionPoints   = @crl_dp_root
# Profile to sign the Intermediate CA CSR
[ v3_intermediate_cert ]
subjectKeyIdentifier    = hash
authorityKeyIdentifier  = keyid, issuer:always
basicConstraints        = critical, CA:true, pathlen:0   # issuing CA cannot create sub-CAs
keyUsage                = critical, keyCertSign, cRLSign
crlDistributionPoints   = @crl_dp_root
authorityInfoAccess     = @aia_root
### CRL Extensions
# CRL extensions for the Root's CRL
[ crl_extensions_root ]
authorityKeyIdentifier  = keyid:always
[crl_dp_root]
URI.0 = http://pki.lab.example.com/crl/root.crl  # ensure lab DNS/HTTP serves this path
[aia_root]
caIssuers;URI.0 = http://pki.lab.example.com/certs/root-ca.crt
Generating the Root CA Certificate
There are two ways to create the root certificate — either three commands (generate key → create CSR → sign cert) or two commands (generate key + CSR together → sign cert).
Both work; the two-command method is cleaner and my preferred approach.
Option 1: Three Commands
# Generate private key
openssl genpkey \
  -algorithm RSA \
  -out /var/lib/pki/lab-root/private/root-ca.key \
  -aes-256-cbc \
  -pkeyopt rsa_keygen_bits:4096 \
  -pkeyopt rsa_keygen_pubexp:65537
# Create CSR
openssl req -new \
  -config /etc/pki/lab-root/root.cnf \
  -key /var/lib/pki/lab-root/private/root-ca.key \
  -out /var/lib/pki/lab-root/certs/root-ca.csr
# Self-sign certificate
openssl ca -selfsign \
  -config /etc/pki/lab-root/root.cnf \
  -in /var/lib/pki/lab-root/certs/root-ca.csr \
  -out /var/lib/pki/lab-root/certs/root-ca.crt \
  -extensions v3_root_cert
Option 2: Two Commands (Preferred)
# Generate private key and CSR
openssl req -new \
  -verbose \
  -config /etc/pki/lab-root/root.cnf \
  -out /var/lib/pki/lab-root/certs/root-ca.csr \
  -keyout /var/lib/pki/lab-root/private/root-ca.key
# Self-sign the root certificate
openssl ca -selfsign \
  -verbose \
  -config /etc/pki/lab-root/root.cnf \
  -in /var/lib/pki/lab-root/certs/root-ca.csr \
  -out /var/lib/pki/lab-root/certs/root-ca.crt \
  -extensions v3_root_cert
Either way, the end result is your self-signed Root CA certificate — the top of your trust chain.
Verify the files (Optional)
tree /etc/pki/lab-root/
tree /var/lib/pki/lab-root/
alias ll='ls -la'
ll /etc/pki/lab-root/
ll /var/lib/pki/lab-root/
# tree output
tree /etc/pki/lab-root/
/etc/pki/lab-root/
└── root.cnf
1 directory, 1 file
tree /var/lib/pki/lab-root/
/var/lib/pki/lab-root/
├── certs
│   ├── root-ca.crt
│   └── root-ca.csr
├── crl
├── crlnumber
├── index.txt
├── index.txt.attr
├── index.txt.old
├── newcerts
│   └── 594D64593CECBD3B1892E62A2E60DC1E24236937.pem
├── private
│   └── root-ca.key
└── serial
5 directories, 9 files
# ll output
ll /etc/pki/lab-root/
total 4
drwxr-xr-x.  2 root root   22 Oct 22 21:44 .
drwxr-xr-x. 11 root root  141 Oct 22 21:43 ..
-rw-r--r--.  1 root root 3018 Oct 22 21:44 root.cnf
ll /var/lib/pki/lab-root/
total 16
drwxr-xr-x. 6 root root 152 Oct 22 21:45 .
drwxr-xr-x. 3 root root  24 Oct 22 21:41 ..
drwxr-xr-x. 2 root root  44 Oct 22 21:45 certs
drwxr-xr-x. 2 root root   6 Oct 22 21:41 crl
-rw-r--r--. 1 root root   5 Oct 22 21:41 crlnumber
-rw-r--r--. 1 root root 148 Oct 22 21:45 index.txt
-rw-r--r--. 1 root root  20 Oct 22 21:45 index.txt.attr
-rw-r--r--. 1 root root   0 Oct 22 21:41 index.txt.old
drwxr-xr-x. 2 root root  58 Oct 22 21:45 newcerts
drwx------. 2 root root  25 Oct 22 21:44 private
-rw-r--r--. 1 root root   5 Oct 22 21:41 serial
Subordinate (Intermediate/Issuing) Certificate Authority (CA)
Directory Scaffolding
Keep the structure parallel to the root so paths are predictable:
# Adding the working directory and files
install --directory --mode=0700 /var/lib/pki/lab-issuing/private
install --directory --mode=0755 /var/lib/pki/lab-issuing/{certs,crl,newcerts}
touch /var/lib/pki/lab-issuing/index.txt
echo 1000 | tee /var/lib/pki/lab-issuing/{serial,crlnumber} >/dev/null
# Adding the configuration
mkdir -p /etc/pki/lab-issuing
touch /etc/pki/lab-issuing/intermediate.cnf
vi /etc/pki/lab-issuing/intermediate.cnf
Intermediate CA Configuration File (section-by-section)
The Intermediate CA issues leaf certificates, so its defaults reflect modern TLS lifetimes and profiles. It also publishes its own CRL/AIA.
[ ca ] and [ CA_default ]
Defines the CA’s working directories, the CA’s own cert/key locations, and defaults for issuing leaf certs:
[ ca ]
default_ca              = CA_default
[ CA_default ]
dir                     = /var/lib/pki/lab-issuing
certificate             = $dir/certs/int-ca.crt
private_key             = $dir/private/int-ca.key
new_certs_dir           = $dir/newcerts
database                = $dir/index.txt
serial                  = $dir/serial
crlnumber               = $dir/crlnumber
unique_subject          = no
default_md              = sha512
default_days            = 397                   # modern TLS leaf lifetime
default_crl_days        = 30
policy                  = policy_loose
x509_extensions         = x509_fallback         # fallback if -extensions omitted
crl_extensions          = crl_extensions_intermediate
copy_extensions         = copy                  # let CA copy SAN from CSR
name_opt                = ca_default
cert_opt                = ca_default
email_in_dn             = no
string_mask             = utf8only
rand_serial             = yes
⚠️ Note on
copy_extensions = copy: This copies all requested CSR extensions (including SAN) into issued certs. That’s convenient for a lab. If you want stricter control, setcopy_extensions = noneand always pass-extensions v3_serveror-extensions v3_clientwhen issuing leaves.
[ req ] and [ dn_intermediate_cert ]
CSR/key generation for the Intermediate itself (this does not issue leaves):
### Requests / Distinguished Names (DN)
[ req ]
default_bits            = 4096
encrypt_key             = yes
default_md              = sha512
prompt                  = no
distinguished_name      = dn_intermediate_cert
[ dn_intermediate_cert ]
countryName             = US
stateOrProvinceName     = ExampleState
localityName            = ExampleCity
organizationName        = Example Org
organizationalUnitName  = Lab PKI
commonName              = Example Intermediate CA
These fields must satisfy the Root’s
policy_strict(you set C/S/L/O tomatchon the root), so keep them aligned with your Root DN.
[ policy_loose ] (for issuing leaves)
A permissive policy that accepts common DN layouts from servers/services:
### Policies
[ policy_loose ]
countryName             = optional
stateOrProvinceName     = optional
localityName            = optional
organizationName        = supplied
organizationalUnitName  = optional
commonName              = supplied
emailAddress            = optional
v3 Profile Extensions for Issued leaf Certs
x509_fallbackis used when you forget to pass-extensions.v3_server,v3_client, andv3_ocspare explicit profiles you can target during issuance.- AIA/CRLDP point back to the Intermediate’s published locations.
### x509v3 Extensions
# Baseline (server + client) fallback
[ x509_fallback ]
basicConstraints        = CA:false
keyUsage                = critical, digitalSignature, keyEncipherment
extendedKeyUsage        = serverAuth, clientAuth
authorityKeyIdentifier  = keyid, issuer:always
subjectKeyIdentifier    = hash
authorityInfoAccess     = @aia_int
crlDistributionPoints   = @crl_dp_int
# SAN comes from CSR via copy_extensions=copy
# Client-only
[ v3_client ]
basicConstraints        = CA:false
keyUsage                = critical, digitalSignature, keyEncipherment
extendedKeyUsage        = clientAuth
authorityKeyIdentifier  = keyid, issuer:always
subjectKeyIdentifier    = hash
authorityInfoAccess     = @aia_int
crlDistributionPoints   = @crl_dp_int
# Server-only
[ v3_server ]
basicConstraints        = CA:false
keyUsage                = critical, digitalSignature, keyEncipherment
extendedKeyUsage        = serverAuth
authorityKeyIdentifier  = keyid, issuer:always
subjectKeyIdentifier    = hash
authorityInfoAccess     = @aia_int
crlDistributionPoints   = @crl_dp_int
# OCSP responder (if you deploy OCSP)
[ v3_ocsp ]
basicConstraints        = CA:false
keyUsage                = critical, digitalSignature
extendedKeyUsage        = OCSPSigning
authorityKeyIdentifier  = keyid, issuer:always
subjectKeyIdentifier    = hash
authorityInfoAccess     = @aia_int
crlDistributionPoints   = @crl_dp_int
# noCheck can be included if desired:
# noCheck = ignored
Certificate Revocation List (CRL)
Serve these read-only over HTTP from your lab (e.g., /var/www/html/pki… behind pki.lab.example.com):
# CRL extensions for the Intermediate's CRL
[ crl_extensions_intermediate ]
authorityKeyIdentifier  = keyid:always
[aia_int]
caIssuers;URI.0 = http://pki.lab.example.com/certs/int-ca.crt
# If you run OCSP, add it here:
# OCSP;
[crl_dp_int]
URI.0      = URI.0 = http://pki.lab.example.com/crl/int.crl  # ensure lab DNS/HTTP serves this path
Here is a full copy of the configuration file.
# -------- Intermediate (Issuing) CA main config (online box) --------
[ ca ]
default_ca              = CA_default
[ CA_default ]
dir                     = /var/lib/pki/lab-issuing
certificate             = $dir/certs/int-ca.crt
private_key             = $dir/private/int-ca.key
new_certs_dir           = $dir/newcerts
database                = $dir/index.txt
serial                  = $dir/serial
crlnumber               = $dir/crlnumber
unique_subject          = no
default_md              = sha512
default_days            = 397                   # modern TLS leaf lifetime
default_crl_days        = 30
policy                  = policy_loose
x509_extensions         = x509_fallback         # fallback if -extensions omitted
crl_extensions          = crl_extensions_intermediate
copy_extensions         = copy                  # let CA copy SAN from CSR
name_opt                = ca_default
cert_opt                = ca_default
email_in_dn             = no
string_mask             = utf8only
rand_serial             = yes
### Requests / Distinguished Names (DN)
[ req ]
default_bits            = 4096
encrypt_key             = yes
default_md              = sha512
prompt                  = no
distinguished_name      = dn_intermediate_cert
[ dn_intermediate_cert ]
countryName             = US
stateOrProvinceName     = ExampleState
localityName            = ExampleCity
organizationName        = Example Org
organizationalUnitName  = Lab PKI
commonName              = Example Root CA
### Policies
[ policy_loose ]
countryName             = optional
stateOrProvinceName     = optional
localityName            = optional
organizationName        = supplied
organizationalUnitName  = optional
commonName              = supplied
emailAddress            = optional
### x509v3 Extensions
# Baseline (server + client) fallback
[ x509_fallback ]
basicConstraints        = CA:false
keyUsage                = critical, digitalSignature, keyEncipherment
extendedKeyUsage        = serverAuth, clientAuth
authorityKeyIdentifier  = keyid, issuer
subjectKeyIdentifier    = hash
authorityInfoAccess     = @aia_int
crlDistributionPoints   = @crl_dp_int
# SAN comes from CSR via copy_extensions=copy
# Client-only
[ v3_client ]
basicConstraints        = CA:false
keyUsage                = critical, digitalSignature, keyEncipherment
extendedKeyUsage        = clientAuth
authorityKeyIdentifier  = keyid, issuer
subjectKeyIdentifier    = hash
authorityInfoAccess     = @aia_int
crlDistributionPoints   = @crl_dp_int
# Server-only
[ v3_server ]
basicConstraints        = CA:false
keyUsage                = critical, digitalSignature, keyEncipherment
extendedKeyUsage        = serverAuth
authorityKeyIdentifier  = keyid, issuer
subjectKeyIdentifier    = hash
authorityInfoAccess     = @aia_int
crlDistributionPoints   = @crl_dp_int
# OCSP responder (if you deploy OCSP)
[ v3_ocsp ]
basicConstraints        = CA:false
keyUsage                = critical, digitalSignature
extendedKeyUsage        = OCSPSigning
authorityKeyIdentifier  = keyid, issuer
subjectKeyIdentifier    = hash
authorityInfoAccess     = @aia_int
crlDistributionPoints   = @crl_dp_int
noCheck                 = ignored
### CRL Extensions
# CRL extensions for the Intermediate's CRL
[ crl_extensions_intermediate ]
authorityKeyIdentifier  = keyid:always
[aia_int]
caIssuers;URI.0 = http://pki.lab.example.com/certs/int-ca.crt
# If you run OCSP, add it here:
# OCSP;
[crl_dp_int]
URI.0      = URI.0 = http://pki.lab.example.com/crl/int.crl  # ensure lab DNS/HTTP serves this path
Generate the Intermediate’s Key & CSR (on the Intermediate box)
# Generate private key and CSR
openssl req -new \
  -verbose \
  -config /etc/pki/lab-issuing/intermediate.cnf \
  -out /var/lib/pki/lab-issuing/certs/int-ca.csr \
  -keyout /var/lib/pki/lab-issuing/private/int-ca.key
(Optional) sanity check the CSR:
# Sanity check the CSR
openssl req -text -noout -verify -in /var/lib/pki/lab-issuing/certs/int-ca.csr
Copy only the CSR to the Root CA
The private key never leaves the Intermediate CA virtual machine.
# Copy the Intermediate CSR to the Root CA
scp /var/lib/pki/lab-issuing/certs/int-ca.csr root@[ROOT_CA_VM]:/root/
Sign the Intermediate on the Root CA
Sign the Intermediate CSR on the Root CA virtual machine, specifying the v3_intermediate_cert profile from the root.cnf. Also, specify days, otherwise the default_days value will be used.
# Sign the Intermediate CSR on the Root CA (specify days; otherwise picks up the default_days)
openssl ca -batch \
  -verbose \
  -config /etc/pki/lab-root/root.cnf \
  -extensions v3_intermediate_cert \
  -in /root/int-ca.csr \
  -out /var/lib/pki/lab-root/certs/int-ca.crt \
  -days 1095
🧩 Tip: The
-days 1095flag sets the Intermediate CA certificate lifetime to roughly 3 years—shorter than the root’s 15 years, and more realistic for an issuing CA.
Build the CA Chain
Build the certificate chain on the Intermediate CA virtual machine.
That’s where clients and services will typically pull from (and where you’ll publish AIA/CRL).
Copy the Root and Intermediate certificates to the Intermediate CA
Option A: scp from the Root to the Intermediate
# Run on the Root CA VM
scp /var/lib/pki/lab-root/certs/root-ca.crt \
    /var/lib/pki/lab-root/certs/int-ca.crt \
    root@[INT_CA_VM]:/var/lib/pki/lab-issuing/certs/
Option B: download from your published URL (if you’ve put the root cert on HTTP)
# Run on the Intermediate CA VM
curl -o /var/lib/pki/lab-issuing/certs/root-ca.crt \
  http://pki.lab.example.com/certs/root-ca.crt
curl -o /var/lib/pki/lab-issuing/certs/int-ca.crt \
  http://pki.lab.example.com/certs/int-ca.crt
Build a Certificate Chain on the Intermediate CA (Int CA + Root CA)
openssl x509 -in /var/lib/pki/lab-issuing/certs/int-ca.crt -outform PEM > /var/lib/pki/lab-issuing/certs/ca-chain.crt
openssl x509 -in /var/lib/pki/lab-issuing/certs/root-ca.crt -outform PEM >> /var/lib/pki/lab-issuing/certs/ca-chain.crt
# Modify the permissions
chmod 0644 /var/lib/pki/lab-issuing/certs/ca-chain.crt
Order matters: intermediate first, then root.
What not to do
Don’t move private keys off their VM. Only CSRs go up (to the root), and only signed certs come down.
Verify the files (Optional)
tree /etc/pki/lab-issuing/
tree /var/lib/pki/lab-issuing/
alias ll='ls -la'
ll /etc/pki/lab-issuing/
ll /var/lib/pki/lab-issuing/
# tree output
tree /var/lib/pki/lab-issuing/
/etc/pki/lab-issuing/
└── intermediate.cnf
1 directory, 1 file
tree /etc/pki/lab-issuing/
/var/lib/pki/lab-issuing/
├── certs
│   ├── ca-chain.crt
│   ├── int-ca.crt
│   ├── int-ca.csr
│   └── root-ca.crt
├── crl
├── crlnumber
├── index.txt
├── newcerts
├── private
│   └── int-ca.key
└── serial
5 directories, 8 files
# ll output
ll /etc/pki/lab-issuing/
total 4
-rw-r--r--. 1 root root 3685 Oct 22 22:08 intermediate.cnf
ll /var/lib/pki/lab-issuing/
total 8
drwxr-xr-x. 2 root root 81 Oct 22 22:16 certs
drwxr-xr-x. 2 root root  6 Oct 22 22:07 crl
-rw-r--r--. 1 root root  5 Oct 22 22:07 crlnumber
-rw-r--r--. 1 root root  0 Oct 22 22:07 index.txt
drwxr-xr-x. 2 root root  6 Oct 22 22:07 newcerts
drwx------. 2 root root 24 Oct 22 22:08 private
-rw-r--r--. 1 root root  5 Oct 22 22:07 serial
Issue Leaf (Client, Server, or OCSP) Certificates
Now that both the Root CA and Intermediate CA virtual machines are configured and a certificate chain exists, the Intermediate CA is ready to start signing certificates for servers or clients.
While I don’t plan to use client certificates in my lab, the process is identical for all leaf certificates—server, client, or OCSP responder.
Generate a CSR on the target system
Each system or application will generate its own Certificate Signing Request (CSR) and private key.
How that CSR is created depends on the platform—some have GUI tools, some offer CLI options, and others automatically generate them when enabling HTTPS or LDAPS.
🔒 Key rule: The private key stays on the system that generated it.
Only the CSR is transferred to the Intermediate CA. The CA never needs, and should never have, the private key.
Since there are countless ways to generate CSRs, follow the vendor’s documentation or your preferred method. The only requirement is that the CSR be valid PEM format (it begins with -----BEGIN CERTIFICATE REQUEST-----).
Transfer the CSR to the Intermediate CA
Place the CSR in the Intermediate CA’s certificate directory:
scp server-fqdn.csr root@[INT_CA_VM]:/var/lib/pki/lab-issuing/certs/
If network transfer isn’t possible (for example, the target host and CA are on isolated networks), you can still move the CSR safely:
🧩 Sneakernet tip:
Copy the CSR contents directly from the SSH or terminal window and paste them into a new file on the Intermediate CA virtual machine:vi /var/lib/pki/lab-issuing/certs/server-fqdn.csrPaste, save, and verify with:
openssl req -in /var/lib/pki/lab-issuing/certs/server-fqdn.csr -noout -subject -verify
When the certificate is issued, simply reverse the process—copy the resulting certificate text back into a new file on the requesting server.
Issue the certificate on the Intermediate CA
This command signs the CSR using the Intermediate CA.
It looks similar to when the Intermediate CA certificate itself was signed, but this time the -extensions option defines what type of certificate is being issued.
Available profiles:
v3_server– Server TLS/HTTPS certificatesv3_client– Client authentication certificatesv3_ocsp– OCSP responder certificates
Example (server certificate):
openssl ca -batch \
  -verbose \
  -config /etc/pki/lab-issuing/intermediate.cnf \
  -extensions v3_server \
  -in /var/lib/pki/lab-issuing/certs/server-fqdn.csr \
  -out /var/lib/pki/lab-issuing/certs/server-fqdn.crt
The
-batchflag suppresses interactive prompts, anddefault_daysfrom your configuration file determines the validity period (typically 397 days for TLS).
Verify and deploy
After issuing, confirm the certificate chain is valid:
openssl verify \
  -CAfile /var/lib/pki/lab-issuing/certs/root-ca.crt \
  -untrusted /var/lib/pki/lab-issuing/certs/int-ca.crt \
  /var/lib/pki/lab-issuing/certs/server-fqdn.crt
A valid result prints:
/var/lib/pki/lab-issuing/certs/server-fqdn.crt: OK
You can now deploy server-fqdn.crt (and optionally ca-chain.crt) to your service’s TLS configuration.
Quick Recap
- Generate the CSR on the target system (keep the private key local).
- Transfer the CSR to the Intermediate CA virtual machine.
- Use
openssl cawith the appropriate-extensionsprofile to issue. - Copy only the signed certificate back to the requesting system.
- Never move private keys between systems.
Certificate Revocation Lists (CRLs)
A Certificate Revocation List (CRL) is exactly what it sounds like—a list of certificates that are no longer trusted before they naturally expire.
In production environments, CRLs (or OCSP) are essential for maintaining trust.
In a lab, they’re optional but still worth learning how to generate and inspect.
Generate a CRL on the Intermediate CA
Run this command on the Intermediate CA virtual machine to create a fresh CRL file:
# Generate the CRL on the Intermediate CA
openssl ca -gencrl \
  -verbose \
  -config /etc/pki/lab-issuing/intermediate.cnf \
  -out /var/lib/pki/lab-issuing/crl/intermediate.crl
This reads the crl_extensions_intermediate section from your configuration file and produces a CRL file signed by the Intermediate CA.
You can view its contents with:
# Verify the contents
openssl crl -in /var/lib/pki/lab-issuing/crl/intermediate.crl -noout -text
Generate a CRL on the Root CA (optional)
If you’re running an offline Root CA, you’ll rarely need to revoke certificates.
Still, it’s good practice to generate at least one CRL for completeness (some clients expect it to exist, even if empty):
# Generate the CRL on the Root CA
openssl ca -gencrl \
  -verbose \
  -config /etc/pki/lab-root/root.cnf \
  -out /var/lib/pki/lab-root/crl/root.crl
View it the same way:
# Verify the contents
openssl crl -in /var/lib/pki/lab-root/crl/root.crl -noout -text
Copy the Root CRL to the web server. For this lab, I am using the Intermediate CA.
# Copy the CRL file to the web server
scp /var/lib/pki/aaron-root/crl/root.crl root@[INT_CA]:/var/www/html/pki/crl/root.crl
Publish the CRLs
Both Root and Intermediate configuration files define CRL Distribution Point (CDP) URIs, such as:
http://crl.lab.example.com/root.crl
http://crl.lab.example.com/int.crl
To make those URLs functional, copy your CRLs to wherever your web server serves static files (for example, /var/www/html/pki):
# Make the directories to serve the files
mkdir -p /var/www/html/pki/{certs,crl,ocsp}
# Copy files into the new directories
cp /var/lib/pki/aaron-issuing/certs/root-ca.crt /var/www/html/pki/certs/root-ca.crt
cp /var/lib/pki/aaron-issuing/certs/int-ca.crt /var/www/html/pki/certs/int-ca.crt
cp /var/lib/pki/aaron-issuing/crl/intermediate.crl /var/www/html/pki/crl/int.crl
cp /var/lib/pki/aaron-issuing/crl/root.crl /var/www/html/pki/crl/root.crl
# Change the mode
chmod -R a+rX /var/www/html/pki/
Install Apache.
# Install Apache
dnf install httpd --assumeyes
Create a virtual host file.
# Create a PKI Virtual Host file
touch /etc/httpd/conf.d/pki_virtual_host.conf
Add a Directory directive.
<VirtualHost *:80>
    ServerName pki.lab.aaronrombaut.com
    DocumentRoot /var/www/html/pki
    <Directory "/var/www/html/pki">
        Options Indexes FollowSymLinks
        AllowOverride None
        Require all granted
    </Directory>
    # Optional: also answer at crl.lab.aaronrombaut.com for readability in CDPs
    ServerAlias crl.lab.aaronrombaut.com
    # Correct MIME type for CRLs (helps some clients)
    AddType application/pkix-crl .crl
    # Light caching: CRLs are static but time-bound; adjust as you like
    <Location "/crl/">
        Header set Cache-Control "public, max-age=600"
    </Location>
</VirtualHost>
Verify the Firewall allows http.
# Verify the Firewall allows http
firewall-cmd --list-all
Add the http service to the Firewall (if necessary)
firewall-cmd --permanent --add-service=http
firewall-cmd --reload
Enable and start the Apache server.
# Enable and start the Apache Server
systemctl enable httpd --now
Verify DNS is populated or machine DNS is poisoned (/etc/hosts).
Verify the files are accessible in a browser or with curl:
curl -I http://crl.lab.example.com/int.crl
Revoking a certificate (optional lab test)
If you want to see CRL updates in action, revoke one of your issued certificates:
openssl ca \
  -config /etc/pki/lab-issuing/intermediate.cnf \
  -revoke /var/lib/pki/lab-issuing/newcerts/1001.pem
Then regenerate the CRL:
openssl ca \
  -config /etc/pki/lab-issuing/intermediate.cnf \
  -gencrl \
  -out /var/lib/pki/lab-issuing/crl/intermediate.crl
You’ll now see the revoked serial listed when you run:
openssl crl -in /var/lib/pki/lab-issuing/crl/intermediate.crl -noout -text
(Optional) Verify a certificate against the CRL
Once you’ve published a CRL, you can test revocation checks locally:
openssl verify \
  -crl_check \
  -CAfile /var/lib/pki/lab-issuing/certs/root-ca.crt \
  -untrusted /var/lib/pki/lab-issuing/certs/int-ca.crt \
  -CRLfile /var/lib/pki/lab-issuing/crl/intermediate.crl \
  /var/lib/pki/lab-issuing/certs/server-fqdn.crt
If the certificate is revoked, the output will show something like:
/var/lib/pki/lab-issuing/certs/server-fqdn.crt: revoked
Summary
- Generate CRLs regularly (even empty ones).
- Publish them to match the URLs in your configuration files.
- Regenerate a CRL whenever you revoke a certificate.
- Keep Root CA CRLs simple (offline CAs rarely revoke).
- Verify CRL accessibility if you simulate client validation.
Validation and Testing
Before powering down the Root CA virtual machine and calling the lab complete, it’s worth running a few validation steps. These checks confirm your hierarchy is sound, certificates verify correctly, and your CRLs are usable.
Confirm the Root ↔ Intermediate chain
From the Intermediate CA virtual machine, confirm that the Intermediate certificate chains correctly back to the Root:
openssl verify \
  -CAfile /var/lib/pki/lab-issuing/certs/root-ca.crt \
  /var/lib/pki/lab-issuing/certs/int-ca.crt
Expected output:
/var/lib/pki/lab-issuing/certs/int-ca.crt: OK
Validate a leaf certificate
Check that a newly issued server certificate links cleanly through the Intermediate and Root:
openssl verify \
  -CAfile /var/lib/pki/lab-issuing/certs/root-ca.crt \
  -untrusted /var/lib/pki/lab-issuing/certs/int-ca.crt \
  /var/lib/pki/lab-issuing/certs/server-fqdn.crt
Output should be:
/var/lib/pki/lab-issuing/certs/server-fqdn.crt: OK
If you see “unable to get local issuer certificate,” confirm your paths, filenames, and that the chain order (leaf → intermediate → root) is correct.
Check CRL availability
Ensure the CRL Distribution Point (CDP) URLs defined in your configuration actually serve files:
curl -I http://crl.lab.example.com/int.crl
curl -I http://crl.lab.example.com/root.crl
Each should return an HTTP 200 OK.
You can also validate a certificate with CRL checking:
openssl verify \
  -crl_check \
  -CAfile /var/lib/pki/lab-issuing/certs/root-ca.crt \
  -untrusted /var/lib/pki/lab-issuing/certs/int-ca.crt \
  -CRLfile /var/lib/pki/lab-issuing/crl/intermediate.crl \
  /var/lib/pki/lab-issuing/certs/server-fqdn.crt
Inspect certificate contents
View details of any certificate to confirm extensions and validity periods:
openssl x509 -in /var/lib/pki/lab-issuing/certs/server-fqdn.crt -noout -text
Look for:
- Issuer/Subject values matching your hierarchy
- Key Usage and Extended Key Usage lines consistent with the selected profile
- CRL Distribution Points and Authority Info Access URIs populated correctly
Snapshot and back up
Once verified:
- Power off the Root CA virtual machine and snapshot or export it in a powered-off state.
- Back up the Intermediate CA’s
/etc/pkiand/var/lib/pkidirectories, especially theprivate/key directories,index.txt, and serial files.
These snapshots are your rollback and long-term trust anchors.
Summary and Conclusion
Building a private Public Key Infrastructure (PKI) in a lab isn’t just a technical exercise—it’s a masterclass in how digital trust actually works.
In this post, we:
- Designed a two-tier CA hierarchy (offline Root + online Intermediate).
- Built consistent directory scaffolding and configuration files from scratch.
- Created and self-signed the Root CA certificate.
- Issued and signed the Intermediate CA certificate safely—CSR only travels up, signed certs come down.
- Learned how to issue leaf certificates for servers, clients, and OCSP responders.
- Generated, published, and verified Certificate Revocation Lists.
- Validated the entire chain from end to end.
The result is a functioning, fully self-contained Certificate Authority ecosystem you can extend to almost any environment.
In production, you’d add automation, auditing, and hardware security modules—but for lab and educational purposes, this structure mirrors real-world PKI remarkably well.
🔐 Final takeaway: Protect private keys, keep your Root CA offline, and document everything. Future-you (and your future systems) will thank you.
Leave a Reply